
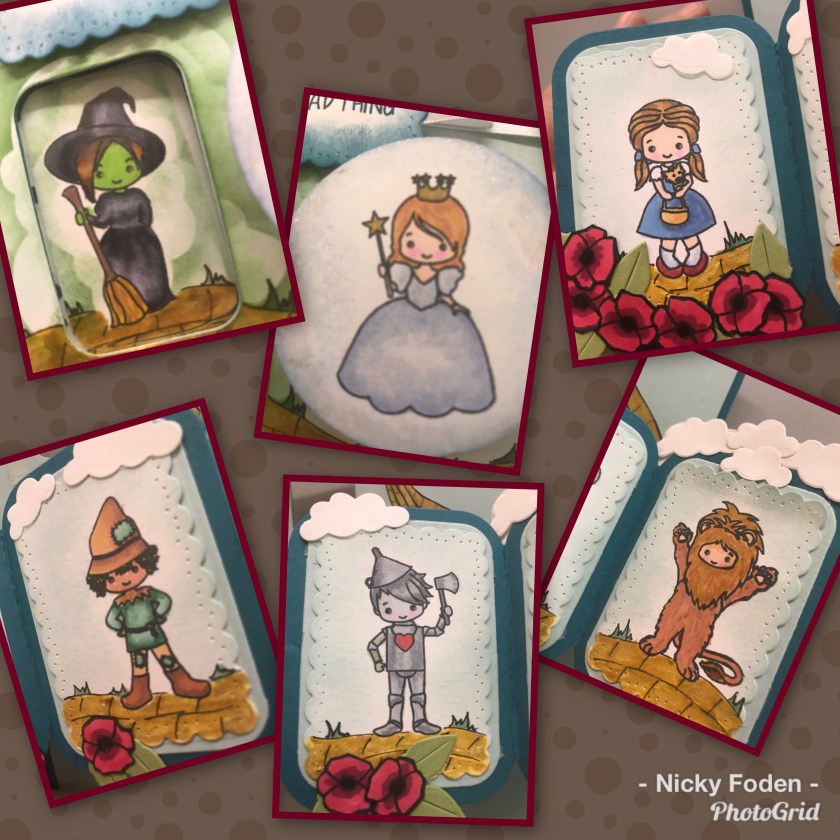
This card is my most favourite card of the year, or possibly ever. This card is for my sister and TODAY is her birthday. This card started off in my head as a fairly simple idea using this “Off to see the Wizard” stamp set ( the witch theme is an inside joke). Then I thought the rest of the characters should pop out the middle, then I thought wouldn’t it be fun to have the Witch of the West be able to pop in and out of the scene, then I thought the Good Witch should be in her bubble, then I thought I should add more glitter…….and more glitter……. and maybe some more glitter……………..and maybe some poppies……….and hey should the poppies have glitter?…….. my mind is often a very chaotic place when I’m card making. Lol
The glitter is hard to see but it’s there, and there is lots of it……..all of the yellow brick road, the ruby slippers, Tin Man, the bubble, the Good Witches dress, wand and crown, the Lions mane, the Scarecrows hair (not sure why I just thought it needed a little something 😆), and the Emerald City.

Click “Read More” to see more
Where do I start 🤔, my directions are also a little chaotic as I did bounce around a lot when creating so you may want to read from start to finish if planning on recreating this card.
The characters were stamped using a set from Kindred Stamps called “Off to see the Wizard”. I then coloured them in with alcohol markers from Chameleon. I highlighted the Ruby Slippers, The Good Witches dress, wand and crown, Tin Man, the Cowardly Lion’s mane and the Scarecrows hair with A Wink of Stella glimmer pen. My alcohol colouring leaves a lot to be desired, I did look at how these characters were coloured from other people to help me find the highlights and shading that gives these guys all their character.
I created the card base using Karen Burniston’s Twist Panel Pop-Up die set following these directions (directions to create a card with the window in the front) https://youtu.be/ccPRAHXOKaM
I ran into a little problem when creating mine, as I used a witch and a bigger window, as opposed to the coffee cup and a smaller window (Karen’s directions in video ⬆️) when my witch was adhered to the back of the flipping panel she was visible when the card was open, the back of her could be seen from behind the lion. So to fix this I covered the visible section with clouds then carried more clouds throughout the panels to make it look like they were part of the plan and not just a cover-up 😀
The scalloped die used to cut out the inside characters is from the same die set as the card base, I cut out the four characters and sponged some Soft Sky ink for the sky and hand drew the yellow brick road and the grass and coloured them with my Chameleon alcohol markers. I also coloured the yellow brick road with Gold Wink of Stella to make it glimmer.
The Wicked witch was cut out with a stitched rectangle die and the good Witch was cut out with a circle die. I sponged a bit of Bashful Blue around the bubble to give it a more “bubble” appearance and coloured the edges with Wink of Stella. Before I adhered the Wicked Witch to the inside I lined her up to the card front to where she would be when the card is closed so I could create the background. The card front was Whisper White cardstock cut with a large scalloped square die. I sponged the sky and created the road and grass the same way as the inside panels. I used a cloud stencil to create the green puffs of smoke around the witch. I ran into problem #2, to make everything fit the card base is not an exact square but the card front was and looked a little funny as when I lined up the window there was going to be a big gap at the top, so I cut the scalloped square and adhered both pieces to a Soft Sky piece of cardstock (cut to be a little smaller than the card base, but bigger than the card front, and used a corner punch to round the corners) and made sure I had it centred how I liked, then covered the gap with a piece of ribbon and a faux bow. Now the scalloped square appeared to be a scalloped rectangle.
To make the Good Witch look like she was floating in her bubble I attached her with a spring I made with some wire I had kicking around, I essentially made a homemade Action Wobbler.
The Witch greeting is from the same stamp set and was stamped with Island Indigo ink, cut out with the same die used to cut out the inside characters then sponged with Island Indigo ink. Then I glued it to the card front using Dimensionals at the top and bottom so it was stuck to the actual card and not the ribbon.
Now back to the inside, I decided to add the poppies because the card seemed off balance with the clouds hanging up over the top, I felt it needed something on the bottom. The poppies are in the same stamp set, again I coloured them with my Chameleons and then fussy cut them, I also used a black marker to colour the edges to hide the white edges, it gives a more finished look. The leaves are from a little die set that I have. Be careful when sticking down your clouds and poppies because if they are too high/low they may make it so the card doesn’t close so test for closeability (I totally made up that word lol) as you are going along. I also added a few poppies to the bottom of the inside of the card.
I wasn’t going to add the Emerald City but decided that I liked how I had coloured it and that it belonged here somewhere so I hand drew another yellow brick road as if the city was off in the distance, trimmed it and adhered them both down.
All the cardstock is from Stampin’ Up and as mentioned above the colours used are Island Indigo, Soft Sky, and Whisper White. The ink for the greeting and the ink to sponge the sky and the bubble are also from Stampin’ Up as is the white ribbon.
The Happy Birthday greeting is from a die that I have from my stash, will have to figure out where it came from 🙄
The window sheet is from the office supply.
😅 this card was a doozy but when my sister received it she loved it and her children thought it was hilarious as they know the inside joke 😉

This is SPECTACULAR!!! I just love it! You are sooooo talented…. thank you for sharing!
LikeLike
Thanks soooo much, I appreciate you taking the time to check out. Y blog 😊
LikeLike