
It’s CHALLENGE TIME 🥰 the Karen Burniston September Challenge is “Just”. This challenge gives us the opportunity to use the brand new “Just Because” die set and I also used the new Label Charm Pop up dieset. And I have to say I love how this card turned out.

All the die sets will be linked at the bottom of the post.
All the fun is in the reveal, to see this card in action please check out my FACEBOOK page, feel free to join if you would like to share your own crafty creations. You can also see a video of this card on my INSTAGRAM page.
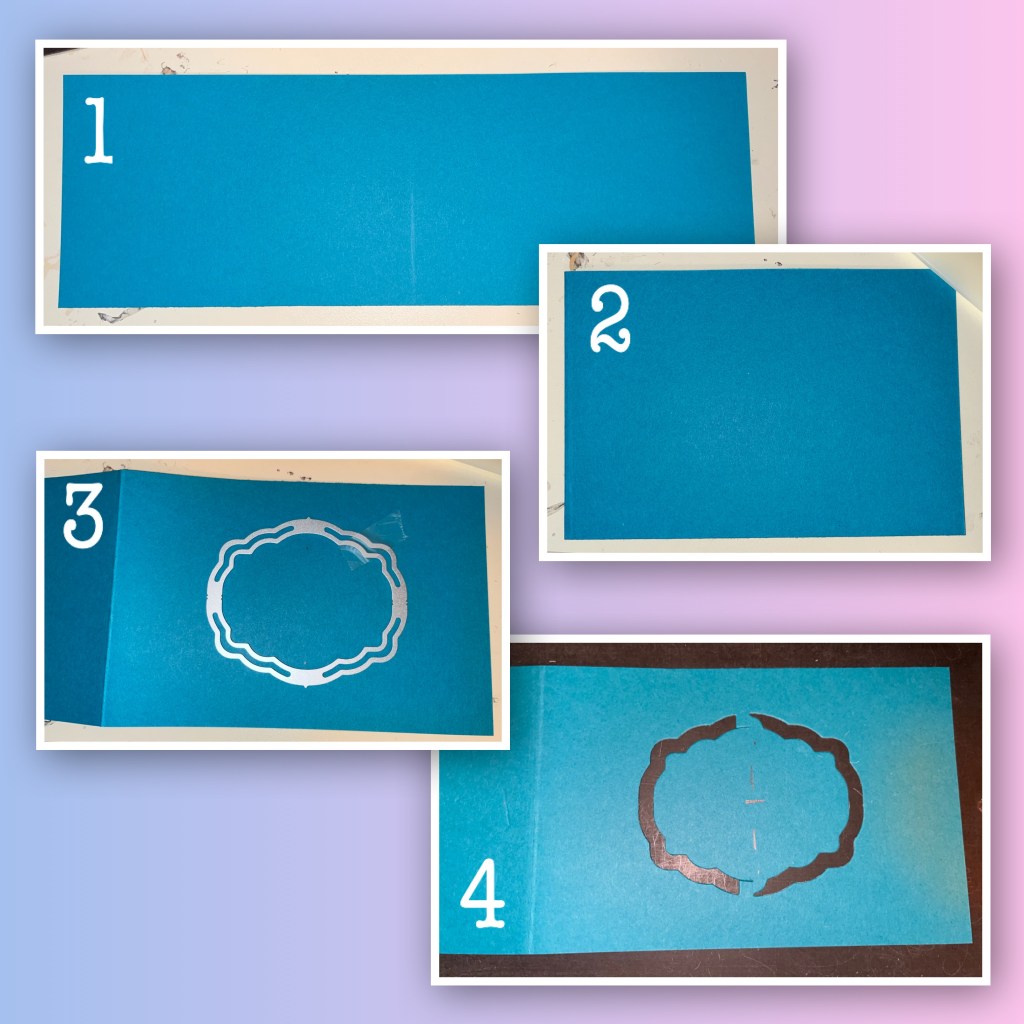
1- The card-stock for the base was in my stash, and it was cut to 12” X 3 3/4”, scored @ 6”. It is a 6” X 3 3/4” side fold card
2- it’s hard to see but I marked the centre of the card front (you can see it better in photo #4
3- open the card and tape down the biggest die in the set.
4- remove the die, and the extra pieces.
5- I cut 3 pieces of 5 1/2” x 3 3/4” patterned paper, I laid one of the patterned papers over the card front and traced the opening on to the backside, so I know that when I die cut the opening will be centred (the flower side is the back sideJ
6- I did this on 2 of the pieces, then trimmed out the centre mechanisms from both.
7- add one to the front
8- add one to the inside left, and add the third patterned paper to the inside right.

9- diecut 2 of the large label with the tab on the side. There is a die in the set that lines up perfectly with this shape, but will cut out an oval. I did this for one of the labels. Connect Tab A with the right side of the label that is in the centre of the card front. Connect tab B with the right side of the label with the opening.
10- accordion fold the three labels on top of the original label from the card front and add adhesive then close the card
11- when opening the card the A tab connection should be a mountain fold and the B tab connection should be a valley fold.

I die cut 2 of the large decorative labels from a coordinating patterned paper, and 1 oval that fits perfectly inside the oval cut out in step 9
13 this is when I realized that when the card is closed it is all the same colour so I removed the mechanism from the back……
14- so I added a 4 3/4” x 3” panel to the back then reattached the back page of the accordion mechanism.
15- now closed there is a border around the cutout.

16- diecut “Just Saying” and “Hi”. I originally cut out “Hi” from the Mini Alphabet and Numbers dieset
17-18- in the middle label I hung the oval tag but it kept flipping around so I used flowers on both sides to attach it to the frame. I decorated with flowers and butterflies that I had die-cut for another project and had extra of

19- I thought the “Hi” was too small so I cut out it from the Alphabet set, adhered it to the patterned paper and added it to the card.
20-I added a turquoise gem stone border around the cutout, and added a few more details.
21- I added a few more flowers to the inside and some gemstones. The gemstones are from the dollar store.


To see some other fun fold cards please check these out
Birthday Pivot Twist Slim line
Monochromatic Swirler Shaker Slimline card
Surprise Elephant Birthday card
The die sets used in this card are ………
The flowers are a mix from the following sets

Love the layers and embellishments! Pretty card!
LikeLike
Cute card! Thanks for showing the steps.
LikeLiked by 1 person
sure to bring a smile to some lucky person!
LikeLiked by 1 person
I LOVE how this opens! Great flowers and paper!
LikeLike
Appreciate the tutorial and the card is beautiful! Wonderful color concept!
LikeLike
Very pretty with all the flowes and butterfly
LikeLike
This is fabulous – I always like you show steps on your work – btw I kept clicking and clicking like 5 times in a row and finally FB popped up so I could publish this comment- hugs, Gail
LikeLike
Glad it finally worked. 😃
LikeLike
Loving that blue you used! The butterflies leaves & flowers are so charming & enchanting! GREAT CARD! HUGS! YOU ARE LOVED!
LikeLike
Another awesome tutorial and brilliant card x
LikeLiked by 1 person