

I know it’s a little late, but my hubby did get it on time. This is the first time I’ve made a slime line easel card and it turned out exactly how I imagined.
All the fun is in the reveal, to see this card in action please check out my FACEBOOK page, feel free to join if you would like to share your own crafty creations. You can also see a video of this card on my INSTAGRAM page.
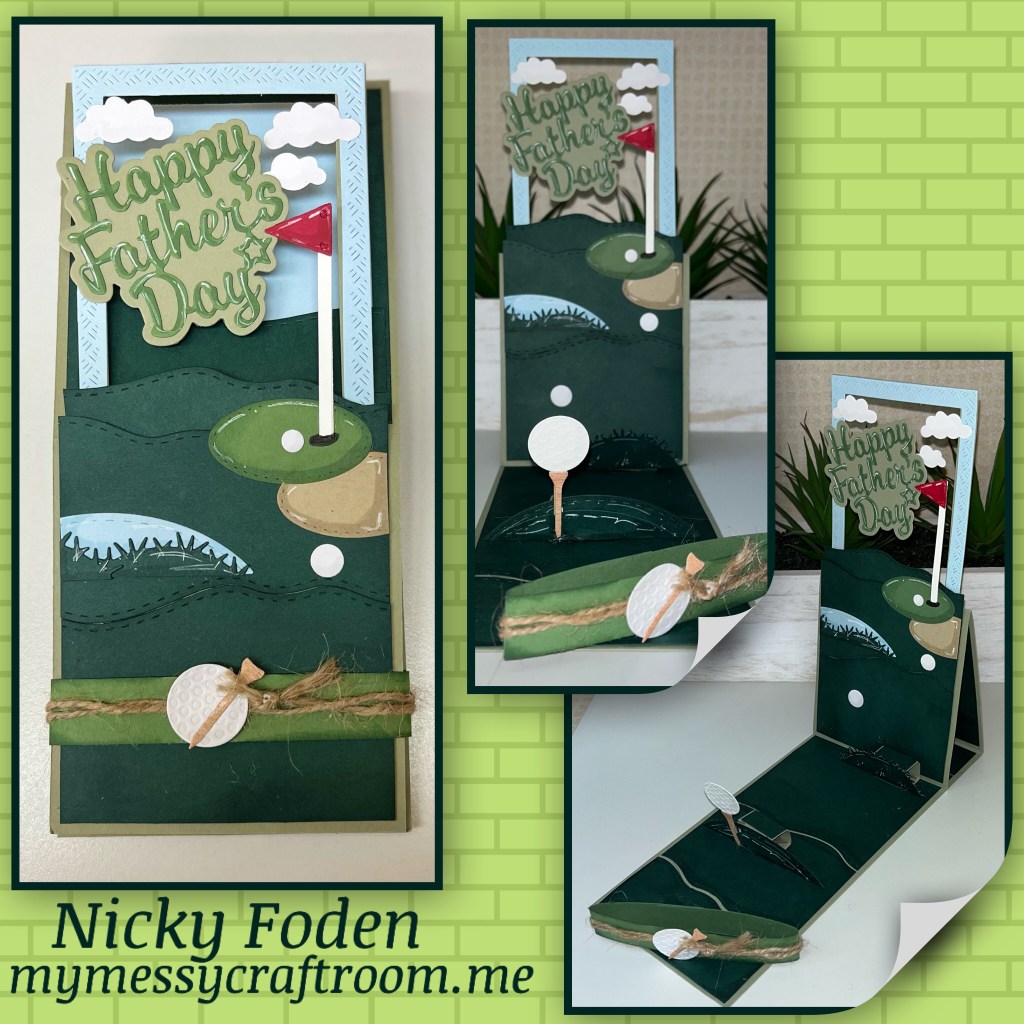
1a- I cut the card base in 2 pieces from a light green cardstock as show below. I also cut out 2 frames using the 2 largest rectangles from the Rectangle Crosshatch, one of green, one in blue.
B- I attached the 2 pieces to make the easel card, and I attached the 2 frames together, having the blue on top of the green
2a- I cut out panels to the dimensions shown below, I used the Natures Edges to cut them as shown.
B- I used Versa Mark ink it sponge the edges.

3- start adding the panels as shown
4- add the rectangle frame as shown

5a- add the other green panels shown. I had to add another little piece to have full coverage of the bottom half of the card.
Cut a blue piece and some more of the green to add to the top of the front panel but under the frame. This part is only visible when the card is closed.

6- make two mini Bam Boxes from the Small Scenes Bam box, and assemble as shown. I am showing a side by side of the new small Bam Box die next to the original Bam Box die.
7A- I cut out some of the Small Scene pieces form the Small Scenes Bam Box, and a golf ball and tee from the Sports Charms I also used punches to punch out a 1/4” and 3/8” circles. I added the ball to the tee with a small strip of paper. I diecut a little red flag from the Little Twist Label die set.

8- to get the tee to stand up better I add a tooth pick to the back, I sandwiched just the toothpick between two of the little hills and added to the front of the hill. I also added a little piece of white paper to hold the toothpick to the back of the ball.
9- I diecut an oval from a medium shade of green (I forgot which set but any oval would work) and added as shown to make the green. I also added the other Bam Box with the grass piece to make “the rough”, this piece holds up the card when it is in the easel position.

10- I die cut Happy Father’s Day and added shading with a Versa Marker and highlights with a white gel pen
11- I decided I needed a water hazard and a sand trap so using the same dies as above, and I added the little balls that I cut earlier.

Oops I used 11 twice – I just wrapped a strip of the medium shade of green around the card. Then I wrapped a piece of twine around and tied it in a knot, I added some foam adhesive and added another golf ball and tee to match the one on the inside.
12- I added a few clouds from the Castle Pop up to finish it off.


Other Tools used

This card is amazing. My son’s birthday is coming up and he is an avid golfer. I hope I can do your instructions justice as I try and duplicate. Thank you.
LikeLiked by 1 person
Thanks. If you have any questions just ask. I would love to see it when your done
LikeLike
Will do 😁
LikeLiked by 1 person