
I can’t get enough of these 3-D roses, they make a card really special, and this was a card for a very special girl, my daughter. This was a card I made for her quite a few years back and it is still a favorite.

to see other 3D rose cards check this out.
Red Roses Birthday Card https://mymessycraftroom.me/2019/01/04/red-roses-birthday-card/
Birthday Roses https://mymessycraftroom.me/2018/09/10/birthday-roses/
Click “read more” to see more
All the supplies are from Stampin’ Up. The colours used are Pretty in Pink, Very Vanilla, So Saffron, Garden Green. The size of this card is 5 1/2″ x 5 1/2″
The top panel of Very Vanilla Cardstock was embossed using a swirl patterned embossing plate with a rubber matt. An embossing plate is bigger than an embossing folder, but I still had to run it through twice to be able to cover the entire panel with the swirly embossed image.
I used a label punch for the greeting, first I punched in Vanilla cardstock and sponged the edges with So Saffron Ink and I stamped Happy Birthday with Garden Green Ink. Then I punched 2 tags in Pretty in Pink and 2 tags in Garden Green. I cut one of each colour in half Horizontal (from pint to point) and one of each colour in half vertically (from point to point) then I layered them behind the vanilla tag spacing them to make a double layered frame.
These Roses and Lilies are easier to make than you would think. They are made out of punched flowers and trimmed as follows.

you will need to take a bone folder and curl all the pieces several times, you do this for 2 reasons, 1 you want the petals to look curled, and 2 you want the cardstock fibres to break down so the pieces are easier to twist and bend so the flowers are easier to assemble. At this point, I usually sponge ink on the edges, it gives the petals more depth.
To assemble the Rose, and Lily, once the pieces are curled and pliable you want to use a strong adhesive to adhere the edges of the pieces together. The single petal I usually curl in an S shape. You won’t nee the 2 petal piece for the Lily.

once the glue is dry you will layer the pieces biggest to smallest, curling the petals as you go. the pieces may need trimming from the bottom side if they don’t seem to stack nice, the top 2 pieces of the rose will most likely need trimming.
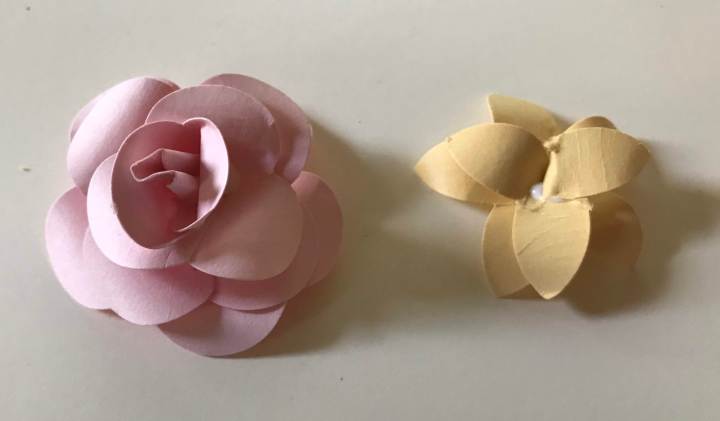
To make the small roses and rosebuds you would just use fewer layers (remove the lower layers), I usually put a rhinestone in the centre of the Lily.
To make the leaves I just folded a piece of green cardstock in half and used an oval punch to punch the desired shapes. I also sponge ink on the leaves to give them more dimension as well. The smaller leaves are from a retired Sizzlet,
The finishing touches are some little loops of vanilla ribbon in between some of the flowers, and three rhinestones in the corner.

So lovely. Gorgeous roses.
GG
LikeLike
This is beautiful, great tutorial, thank you so much for sharing xx
LikeLike