

Soooo excited, this week I am a guest designer for the Die Cuttin’ Divas Weekly Challenge Blog, and this week’s challenge is to create anything Tropical or Summer themed, and what’s more summer-themed than a giant sandcastle. I got inspiration from a couple of different sources to make this card. First I saw a tutorial for a sandcastle card from Karen Burniston where she used her Castle Pop-up and her Ice Cream Sundae Pop-up to make an interactive Pop up castle, the only problem was I don’t have the Ice Cream Sundae Pop-up, so I was trying to work it out in my head how I would make a fun but different Sand Castle card. Then I was binge-watching Jennifer McGuire videos and I came across her video on how to make a Bridge Card and I thought WOW the Castle dies would be perfect for this, so away I went.
you can find the Die Cuttin’ Divas weekly Challenge blog HERE
Click “Read More” to see more

So I thought that I would start with the card base, I didn’t follow Jennifer’s sizes as the castle base was longer than I thought so I had to make the card a little wider than she did. My card measures 10 1/2″ wide and 5″ high. I score it at 1 1/2″ in on each side, then 1 1/2″ in from the first score lines. I will have to make an envelope for this card as finished and flat is 10″ x 5″ (I also have the palm trees hanging over the edges)

I wanted a pretty cloudy sky so I used Soft Sky ink, a sponge dauber and a cloud stencil to create it.

The bridge part took a couple of goes but I created it with an 8 1/2″ strip of Crumbcake Cardstock and a wavy edge die.

the piece I cut for the middle bridge is 7″ wide, scored at 1/2″ in on either side.

I started cutting out the Castle Pop-up pieces, the Castle base pieces were cut from Crumb cake cardstock and the detailed pieces were cut out of sandpaper. I ran them back through my big shot with silicone matt to emboss the brick and stone details.

Then I assembled all the castle pieces together.

Originally I thought these were going to be enough pieces for what I thought I would need 😂

I used an older Karen Burniston edge die to cut out the background out of Crumbcake cardstock, it is 6″ wide and I coloured in the palm trees with Chameleon Markers

I cut out and attached a few more castle pieces and added them to the bunch. In all, I cut out one whole castle and I cut 4 extra towers and 3 extra sections of the castle

I went over the sandy beach with a Clear Wink of Stella

I lined up the castle pieces how I wanted them to look from the front.

I lined up the first row of the castle and the sand how I wanted it to look. I wanted it to look like the castle was built in the sand.

I went over the middle bridge and the sand for the background with Wink of Stella

I added the middle bridge to the card, by adhering the 2 side flaps facing the back of the card and having the bridge high enough that the second layer of the castle would line up properly.

because of how I wanted the castle to line up on the sand bridge I had to add a supporting brace to the back.

then I added the first row of the castle to the card base.

Next, I added the second row of the castle to the inside bridge. Making sure to line up the pieces nicely behind the first row. When the card was folded down there was a gap in the sandcastle (to the right of the first tower with the door) so I cut a few more pieces and filled it in.

Then I added the background with the palm trees.

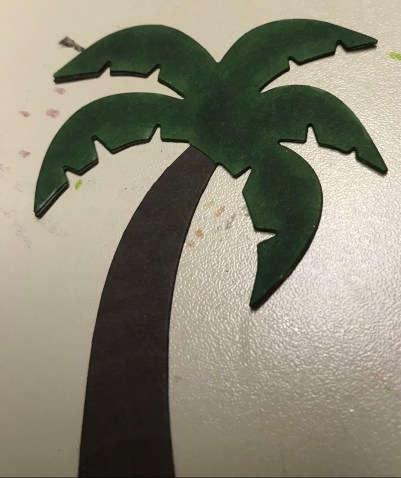
Next, I cut out the sand pail, shovel (older die of Karen Burniston), palm trees (one is older the other is from the Palm Tree Pop-up, and sand dunes. the colours used are Poppy Parade, Crumb Cake, Garden Green, Early Espresso, and Pacific Point

I added the same shades of Chameleon markers as used above to add some details to the palm trees.
I added some Wink of Stella to the sand dunes, the shovel and the sand in the pail and added them to the card. I made sure to cover the small gap on the left side with one of the palm trees.

The seashells are dies from the Tropical scenes die set, cut out of So Saffron, Pink Pirouette, and Cantelope Crisp. I added some Wink of Stella to them as well.

And added them to the card. I put them where I thought shells would be used to decorate a sandcastle.

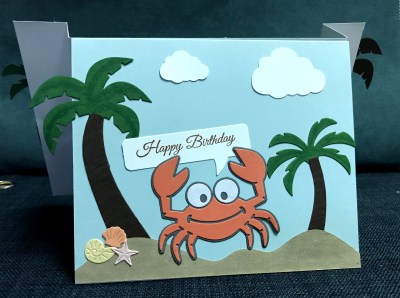
Here comes Rocky The Crab, he is a retired Karen Burniston die set. He is cut out of Calypso Coral, and Basic Gray. I stamped Happy Birthday and cut it out with an old Stampin Up word bubble die.

My intention was to have him look like he was popping out of the sandcastle but no matter where I put him he seemed like he was covering up too much of the castle And since I had put so much work into the castle I didn’t want Rocky to steal the show 🦀

So I did what Jennifer did in her video and add a card to the back, I cut a piece of Soft Sky Cardstock that was 10 ” x 6″ scored at 5″

I stamped a birthday greeting from an old Stampin Up set with Soft Sky ink

And then decorated with Rocky and duplicates of some of the elements used on the front. And attached it to the back of the card. I also added a few die cut clouds.


to see Rocky the Crab and some other beachy fun cards check these out

Nicky you inspire me everyday with your beautiful cards. Just love your designs
LikeLiked by 1 person
Thanks so much 🥰
LikeLike
Thanks for being our guest designer at Die Cuttin’ Divas this week. You did an amazing job on your project.
LikeLike
Thanks. It was fun. 😀
LikeLike
Oops, that would be Die Cuttin’ Divas! I’m on both teams :).
LikeLike
Too funny. I was confused there for a second. And I had so much fun. Thanks. 😀
LikeLike
Wow, wow, wow! This is absolutely amazing! What a fabulous project. Thanks so much for sharing your talent with us as our guest designer at Cut it Up Challenge blog.
LikeLike
Wow, this is an awesome make hun, congrats on the guest designer, brilliant xx
LikeLike