
This 3-d roses card was so fun to make and so impressive to give, and it really wasn’t that hard to create. The only problem is that it doesn’t fit in an envelope so it is a little difficult to mail, I have only given them in person but it could be sent in a small box if need be.
Pink 3-D roses card https://mymessycraftroom.me/2018/09/10/birthday-roses/

Click “Read More to See More” 🙂
Also feel free to join My Messy Craft Room Facebook page.
All the Card Stock and ink used in this card are from Stampin’ Up. The colours used are Cherry Cobbler, Garden Green and Whisper White. All the punches and embossing plate used are also from Stampin’ Up.
To create the Roses you will need a large 5 petal flower punch (or die), and punch and trim as follows.

You will need to take a bone folder and curl all the pieces several times, you do this for 2 reasons, 1 you want the petals to look curled, and 2 you want the cardstock fibres to break down so the pieces are easier to twist and bend so the flowers are easier to assemble. At this point, I usually sponge ink on the edges, it gives the petals more depth.

To assemble the Rose once the pieces are curled and pliable you want to use a strong adhesive to adhere the edges of the pieces together. The single petal I usually curl in an S shape.
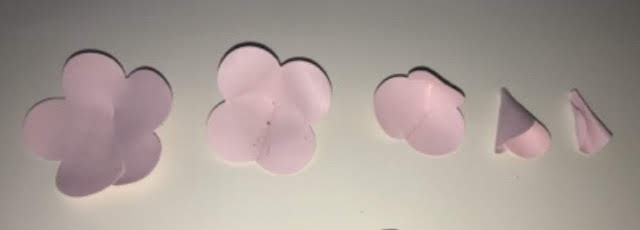
Once the glue is dry you will layer the pieces biggest to smallest, curling the petals as you go. The pieces may need trimming from the bottom side if they don’t seem to stack nice, the top 2 pieces of the rose will most likely need trimming.

To make the small roses and rosebuds you would just use fewer layers (remove the lower layers).
To make the leaves I just folded a piece of Garden Green cardstock in half and used an oval punch to punch the desired shapes. I also sponge ink on the leaves to give them more dimension as well.
The front white panel of the card was run through my Big Shot with a swirly patterned embossing plate, embossing folders would create the same effect. I then trimmed the bottom with an eyelet patterned border punch. I sponged the edges with Cherry Cobbler ink.
The happy birthday tag was created by using a ticket corner punch on a Cherry Cobbler and a Whisper White piece of cardstock stamped then layered.
Sometimes these Roses are a little trick to adhere to a card, I have used hot glue to adhere the roses to a card when needed.

This is beautifully done, gorgeous card and great tutorial, thanks for sharing xx
LikeLike