

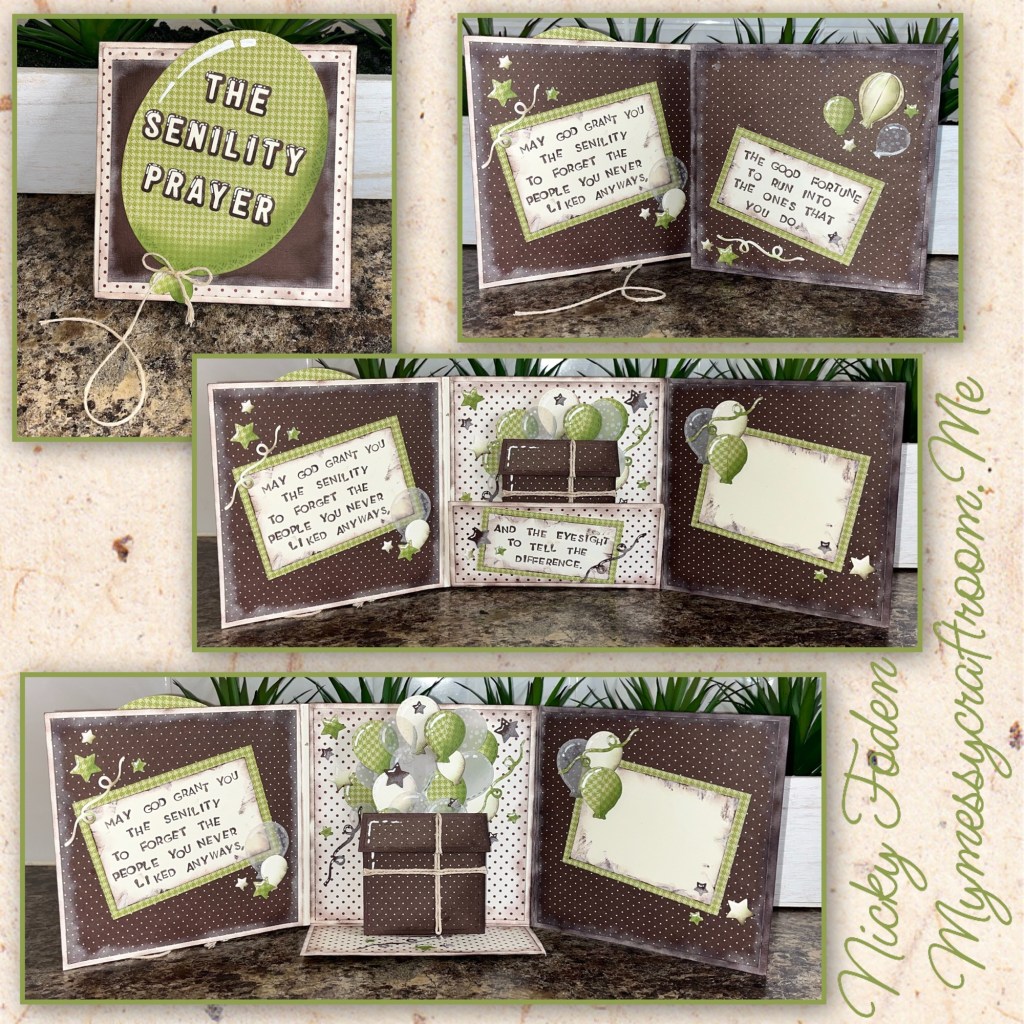
This week I’ve got another Craft Roulette inspired card, I thought these parameters would make a good birthday card for my dad.

This is how I met the parameters. Trifold is three folds, I have one on each side and one on the bottom. Sleigh Ride colours, trees and snow can be seen on a sleigh ride. I googled jokes for older men and found this one. And the balloon on the front is way bigger than the rest so it is out of proportion.

All the fun is in the reveal, to see this card in action please check out my FACEBOOK page, feel free to join if you would like to share your own crafty creations. You can also see a video of this card on my INSTAGRAM page.
1A- I found brown and cream polka dot papers and a green patterned paper in my stash. I also used brown and cream cardstock. I cut and scored the bard base pieces as shown.
2- I planned out my card base as shown. The middle pieces has the 2” fold on the bottom.
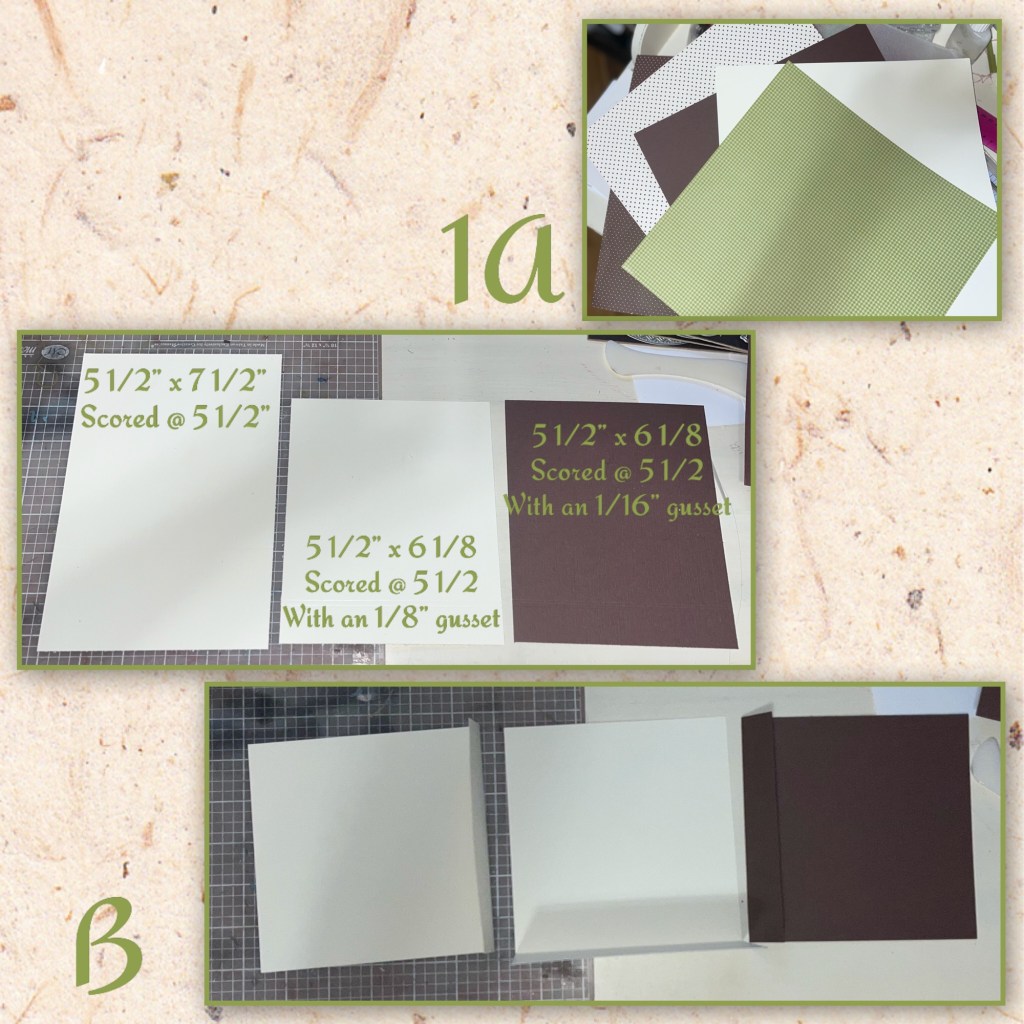
2A- cut the brown and cream polka dot papers as shown.
B- I used brown ink around the edges of the cream paper, and vanilla craft ink around the edges of the brown paper.
C- I also inked the edges of the cardstock pieces.
D- I added the the cream paper to the front, and the middle inside panel, and brown to the left and both sides of the right panel (shown further down)

I googled “funny card for adults” and came up with this one.

3A- using the largest oval from Ovals Crosshatch and a smaller heart from the Hearts Crosshatch I made the big balloon. I used green ink and a sponge dauber to add shading to the bottom right and a white gel pen it had the highlight in the top left.
B- I cut out the words for the front using the Mini Alphabet and Numbers , vanilla cardstock for the letters, brown for the shadows. I added shading with a Versa Mark Marker, and highlights with a white Gelly Roll pen
C- here it is assembled

4A- I needed to cut out the pieces of the Parcel Pop up, but I only have textured brown cardstock. I know from experience that textured card stock does not show the score lines very well so I added vanilla craft ink to the score lines on the die before I cut so the score lines will be visible on the cardstock. It worked, and the mechanism is not visible when the card is complete. (Karen has a video tutorial on the product page for the assembly of this dieset at the link ⬆️ )
B- I assemble the box pieces from the brown polka dot paper and brown cardstock. I added shading with a Versa Mark Marker, and highlights with a white Gelly Roll pen and added it to the mechanism then into the card as shown.

5A- I cut out 2 pieces of acetate with a square die from the same set. And used double sided adhesive to adhere them together end to end.
B- I added double sided adhesive to the back of a plain vellum and a star printed vellum. I diecut balloons using the Balloons Heart Collage add on from the green, vanilla, and vellum papers.
C- on the green balloons I added the shading on the right with the green ink and dauber. On the vanilla balloons I added shading with a little bit of the green and a little bit of brown. I used a white gel pen to add highlights to both. Because of the texture of the vellum I had to use a silver sharpie to add the shading and a white metallic marker for the highlights.

6A- on the acetate piece I added two short double sided tape piece to the bottom on the back side (this will attach to the mechanism) and 4 longer strips going down the front (this is where the balloons will be attached.
B- start adding the balloons to the acetate making sure to stay inside the limits of the acetate for the balloons that will be closer to the bottom. The higher balloons can stray outside the lines a little bit. I added one of the layered balloons.
C- make sure the balloons go into the box when the bottom flap is up and they pop out when the bottom flap is down.

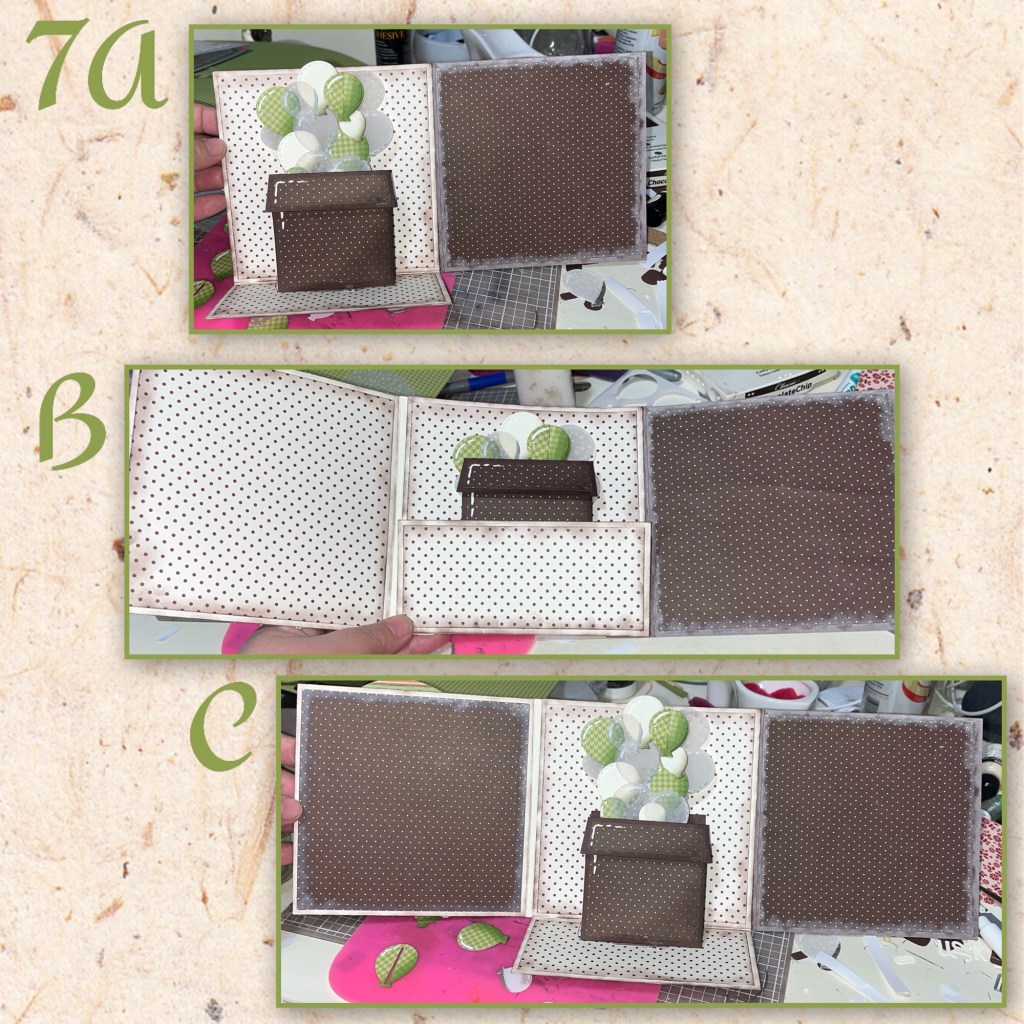
7A- I added the brown panel to the right
B- I added the vanilla panel to the left and decided I didn’t like it this way
C- I added a brown polka dot paper over the vanilla one on the left. I like this much better.
8A- I added a few balloons to the back wall of the card behind the other balloons to make the bouquet look fuller.
B- when adding in the mechanism I had a little glue seepage which slightly ripped the paper when I opened the card.
C- I added twine to the box as shown hoping it would distract from the little rip.

9A- I stamped out the poem (retired Stampin Up, but could be printed on a computer) then trimmed it out. I had a couple of spots where the stamp smudged onto the cardstock (above the L in liked, and L in tell)
B- I tried to cover the smudges with Vanilla ink and that didn’t work so I then I decided to rub the edges with the brown ink pad and then sponge on some of the vanilla ink to distract from the smudges.
C- added matting around the words with the green paper.

10A- I made a bow using the same twine as I used on the inside. I added the balloon and the bow to the card. I thought the green pattern and polka dot pattern was a lot so I added the brown square (4 3/4” square) between the Balloon and the card front.
B- I didn’t like that the back side of the patterned paper was visible from the inside so I cut another section of the balloon and added it to the inside as shown.

11A- I added a message block using some of the scraps. It is 2 3/4” x 3 3/4”, I inked it up like I did the word blocks, and added it to the right panel .
B- I diecut the spirals and stars from the Raising Platform dieset and coloured them the same way I did the balloons. I added all the elements as shown.

Other Tools used

How cool is this created and what a wonderful lot of sentiments you have added xx
LikeLiked by 1 person