
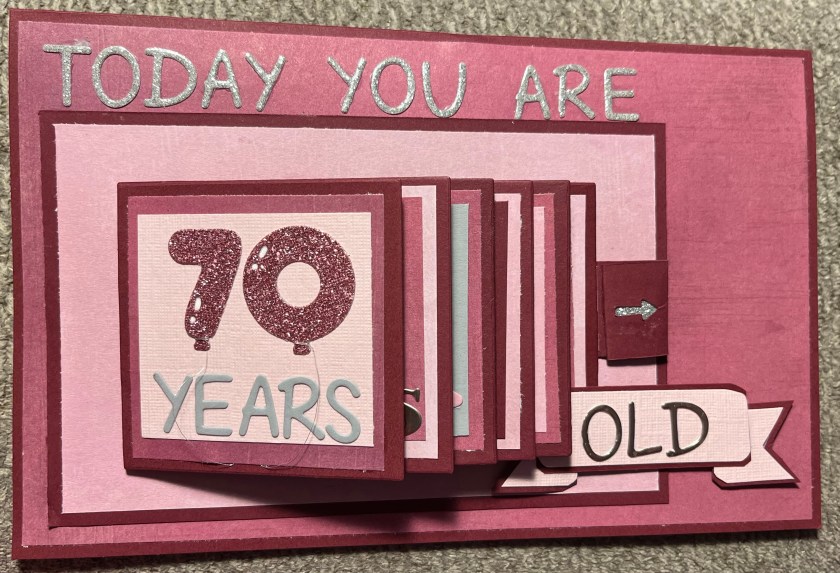
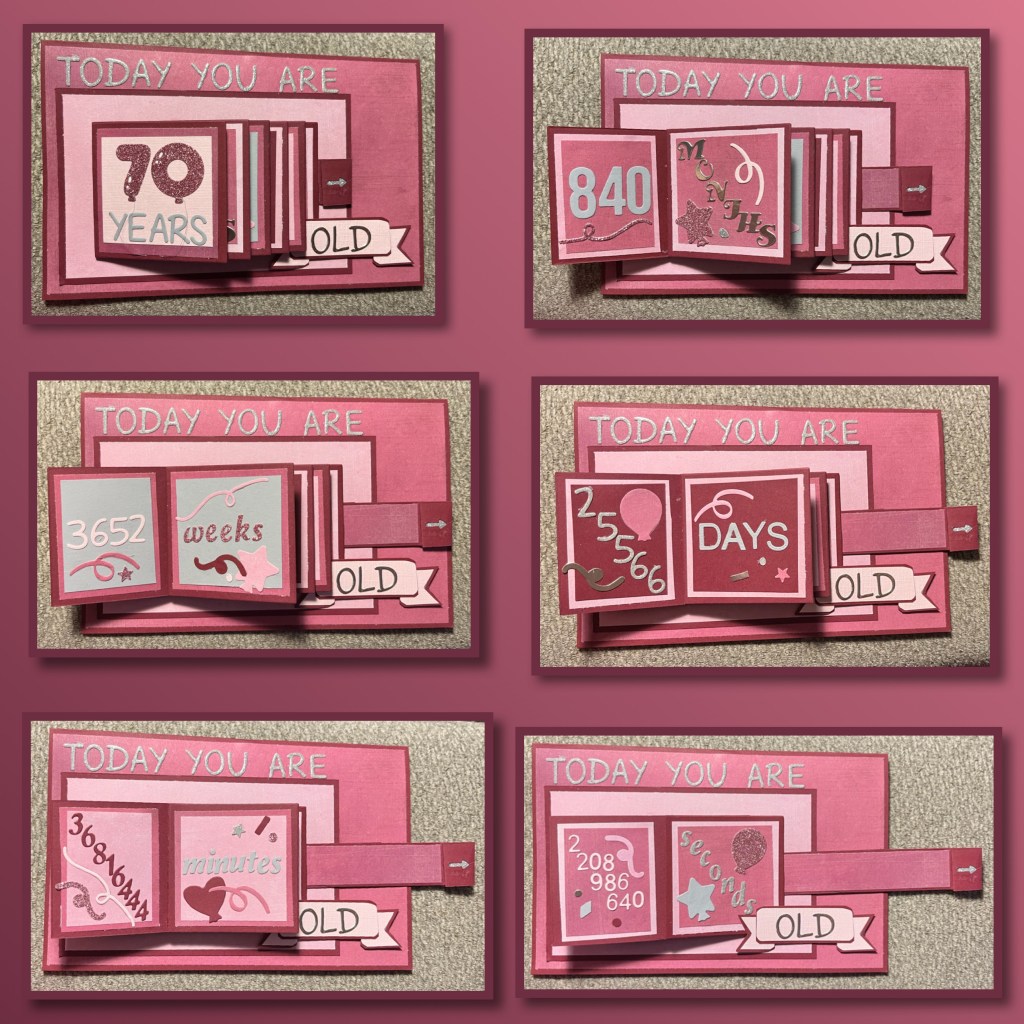
So my craft room has been packed up for A YEAR!!, with me sneaking a few things out from time to time. Now that I am trying to get my blog back on track, I’ve already had a special request, and I just had to go for it. A lady doesn’t turn 70 everyday, and my crazy craft brain went a little over the top for this one. I lost track of how many hours of die cutting and assembling (I need to find my alphabet stamps lol) but I had a vision and here it is….


And here it is in action 🤩
I’m trying something a little different with this post, I’ve numbered the photos to match the directions that are just below each photo
I wanted to do something different for this card, so I googled 70th birthday to see if some thing sparked my imagination. I found this photo but I decided to Google to see if the numbers were accurate and they are slightly different than the numbers in the photo but since the person who posted the photo misspelled counting, lol I decided to trust Google on the numbers.

On the front of this card I decided I wanted to have a waterfall mechanism. So I used Karen Burnistons Frame Pull Pop up set to to make the mechanism. I recommend watching her VIDEO as she gives amazing directions. I have the directions below because I did alter it from a four page to a six page.

1- die cut the piece with the :), the large square and 2 pull arms.
2-Fold on the score line close to the 🙂 , then add four more score lines 3/8” apart as shown
3-fold on all the score lines
4-add adhesive to the end of the pull arm, as shown
5- attach the arm directly behind the 🙂
6- add the second arm to the first arm to make it longer, I also put a little silver cardstock behind the arrow.
7- make sure when the piece with the score lines lays across the pull arm, the end with the arrow sticks out as shown.
8- cut a piece of paper 4 1/2” x 3/4” to cover the length of the pull arm to avoid catch points. It covers where the two arms were adhered together.

9- cut a cardstock panel to 4” x 6 1/4”, and a piece of decorative paper to 3 3/4” to 6”
10- die cut six squares using the large square from the Frame Pull diset.
11-Lay the mechanism over the panel. Add two staples to right top and right bottom corners, there isn’t as much space to play with on this version so add a second set of Staples just beside the first set as shown in the picture.
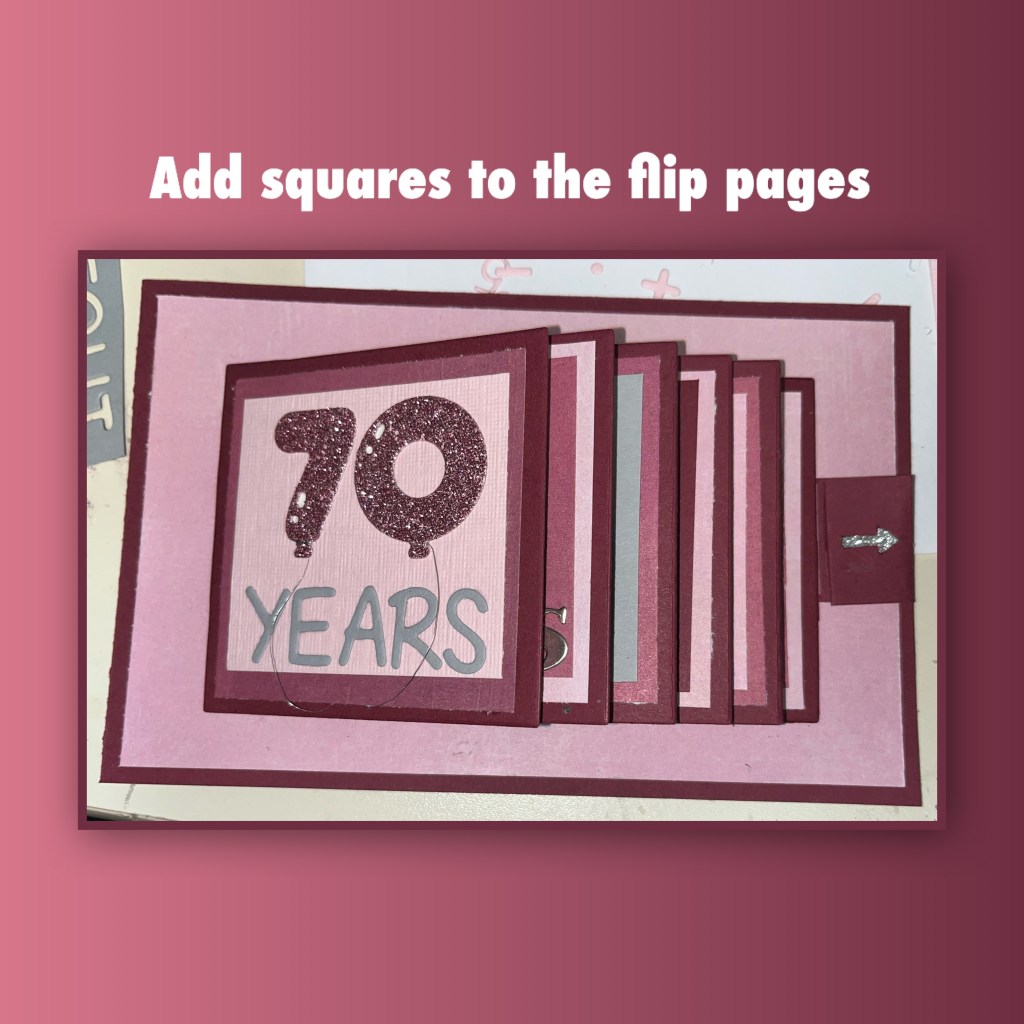
12-take one of the large squares and line it up with the right side of the mechanism and adhere down, this should cover the staples, it should also lineup with the first score line
13- One space at a time add adhesive between the square lines and then line up a square to the left edge of that space. Work your way up until you get to the end and all the squares should match up with all the spaces.

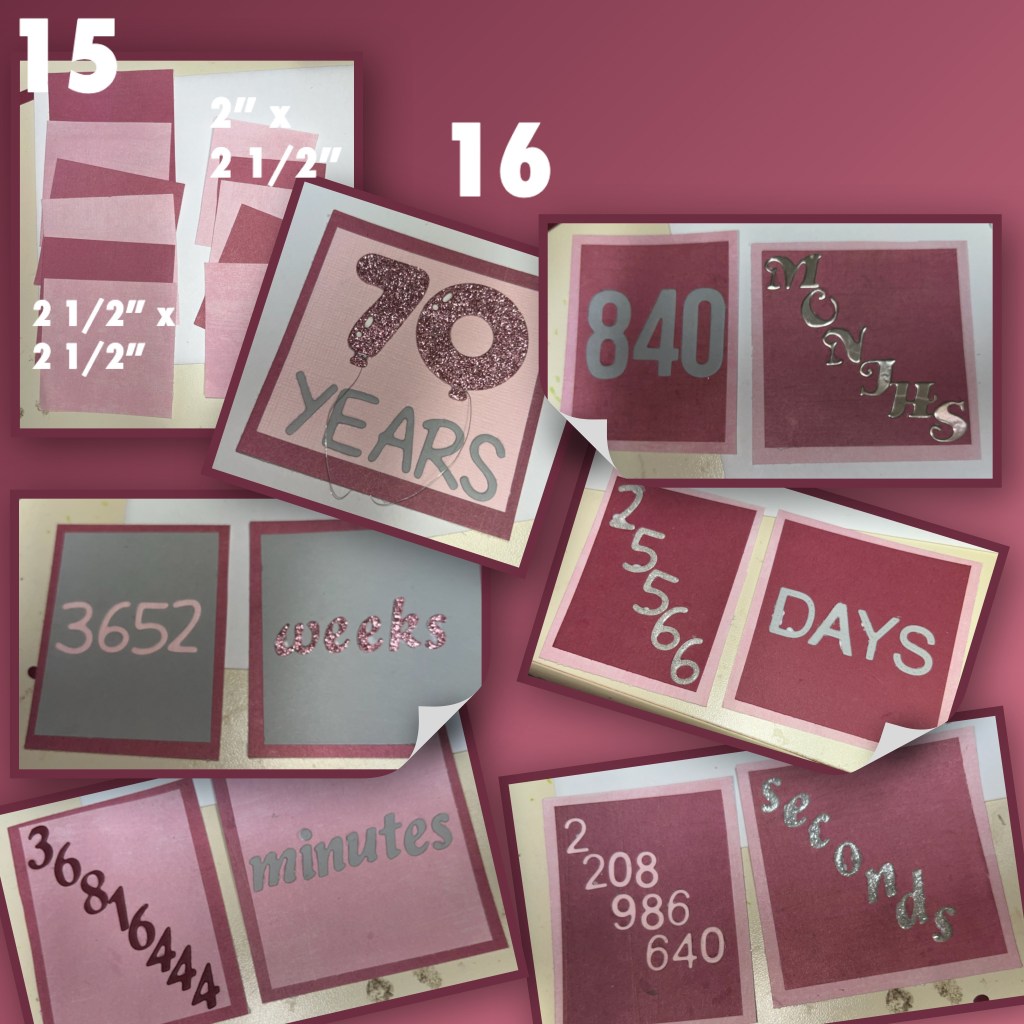
15- cut 6 squares of decorative paper to 2 1/2 x 2 1/2”, 5 to 2” x 2 1/2”. I used alternating colours.
16- To decorate I cut more squares cut to 2 1/4” x 2 1/4” and 1 3/4” x 2 1-4”, I mixed the colours up. For the letters I use random die sets that I had, some of them I bought secondhand so I’m not sure where they came.
Now for the card base
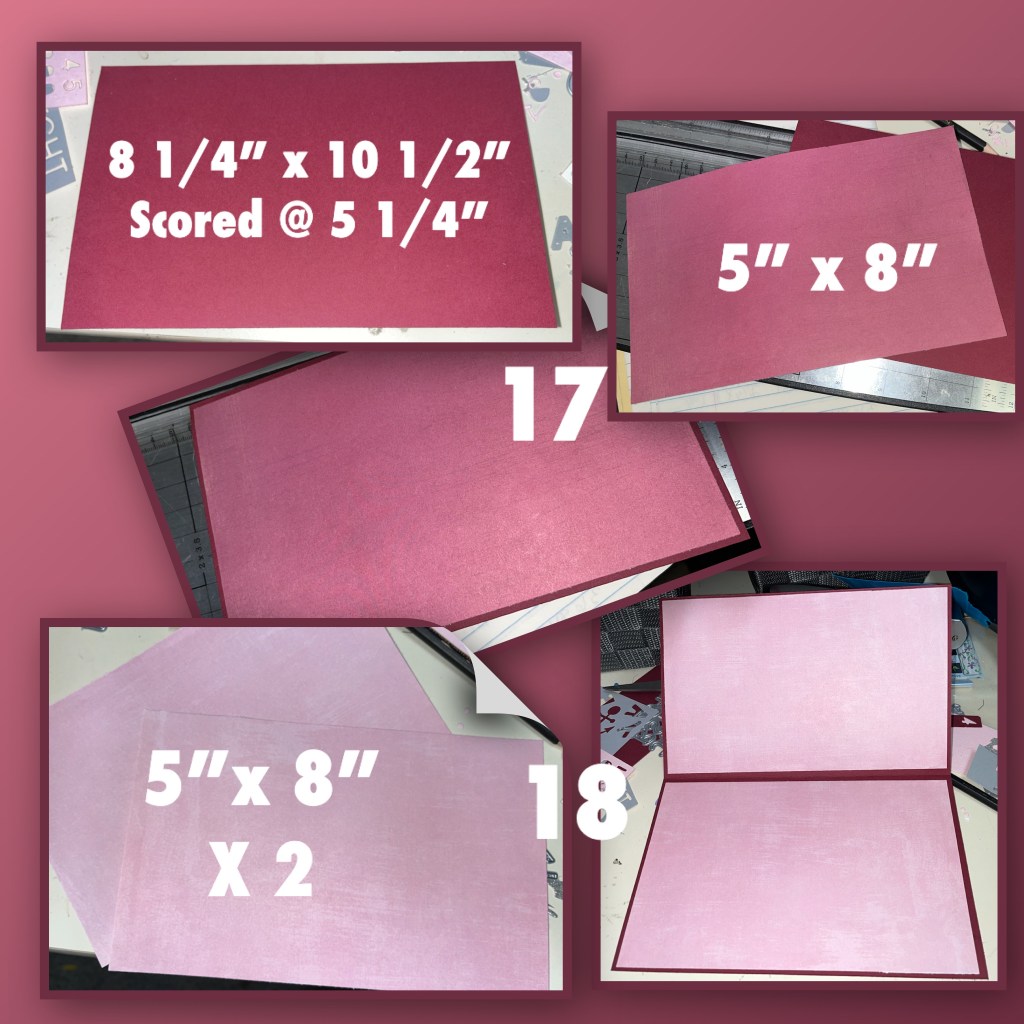
This is a large card,
17- the card base is 81/4” x 10 1/2” scored at 5 1/4”, I cut a paper panel to 5” x 8” and adhered it to the card front.
18- for the inside I cut two lighter paper panels to 5“ x 8“ and I added them inside the card
What is better than one mechanism lol, this card has two. This set is the Photo Collage dieset , and again I do have photo above but watching the VIDEO will make it so much easier
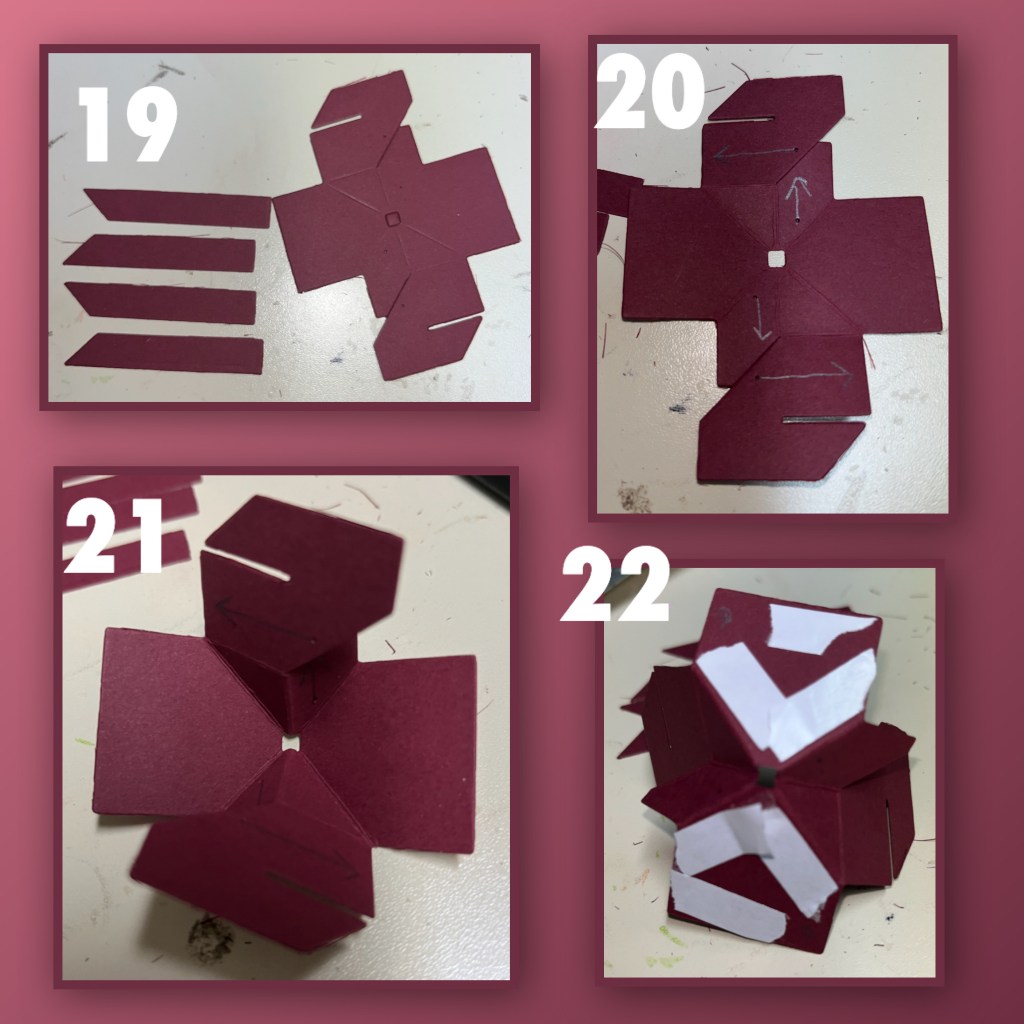
19- die cut mechanism and arms
20- draw lines from the dots out as shown. I missed a photo, there should also be two pencil dots behind the mechanism. If you follow the long arrows and draw a dot behind the corner that they are pointing too then you have the right spot. There should be one on two corners
21- fold on all the score lines as shown, the mechanism should be able to fold into itself and flat. (Check video too hard to describe with just photos)
22- add adhesive as shown, avoiding the pencil dots that are in the corners. I also ended up using liquid glue to fill in the middle where you don’t see sticky strip.

23- peek through the little hole in the middle of the mechanism and line it up with the score line of the card as shown here, only one side down at this time.
24- add a thin line of adhesive along the arrow that you drew in step 20
25- add an arm making sure the angle in the arm matches the angle of the mechanism.
26- do this with all four arms. The two arms that are facing up and down have to be tucked under the mechanism piece, look close at the photo and you’ll see what I mean
27- Carefully take the two pieces with the notches cut into them fold them in and hook the notches together. The piece should be able to go flat
28- Now it’s time to adhere the other side of the mechanism down. If you back fold the card you will have easier access to the adhesive strips to pull them off
29- The mechanism should look like this.

30- I thought it would be easier to put the words “but who’s counting” on before decorating the mechanism.
31-Every time I make this mechanism, I always make a catch point. I thought it would be easier to add a half bubble to the back of the two arms that scrape along when you open and close the card. They are on the back side And they help the arms glide over any items that would cause the arms to catch.
332- I die cut balloon, streamers and confetti from all the coordinating colours. Most if the balloons and streamers are from the Explosion pop up die set from Karen Burniston. The balloon with the ears is from a retired KB die set. The other streamers and confetti are from. Retired Stampin’Up punch.
When die cutting the numbers for the front, I ended up cutting extra numbers out so I used those to decorate the balloons on the inside
33- I started adding to the mechanism as shown Open and close the card as you add the pieces. To make sure that none of the pieces get tangled or caught when the arms twist and move when you open and close the card
34” I added more pieces to the mechanism, and to the background to make the area look full and bright.

35- back to the front, I lined up the mechanism so I knew where the greeting would go. I didn’t adhere to the front previously as the card would not lay flat and it would make it hard to add all the rest of the inside pieces.
36- I added lots of adhesive to get this mechanism panel to stick to the front.
37- I thought the word “old” would look good on a banner so I made my own.
38- to help the banner lay flat, I put liquid adhesive where the banner would attach to the last page of the mechanism, and foam tape on the other side to make up the space difference.
I added some balloon, streamers, and confetti to some of the empty spaces on the pages.

To see some other cards I have made with the Frame Pull Pop up
Have A Happy Super Duper Amazing Birthday
Please check out my FACEBOOK page, feel free to join if you would like to share your own crafty creations. You can also see my cards on my INSTAGRAM page,

Absolutely loved this card and your spin on it. Well thought of and planned with great instructions. I look forward to trying this! Thanks for sharing 😊
LikeLiked by 1 person
Thanks. I would love to see your take on it 😊
LikeLike