
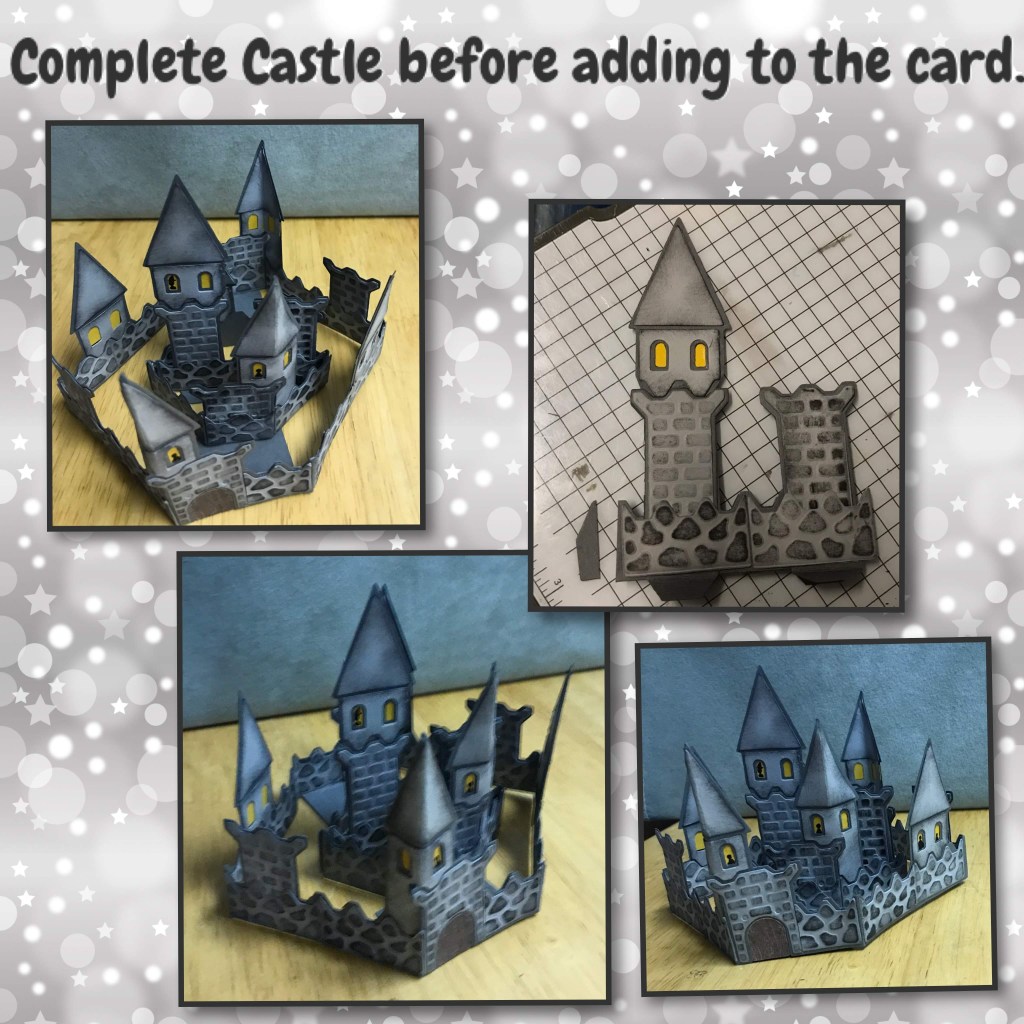
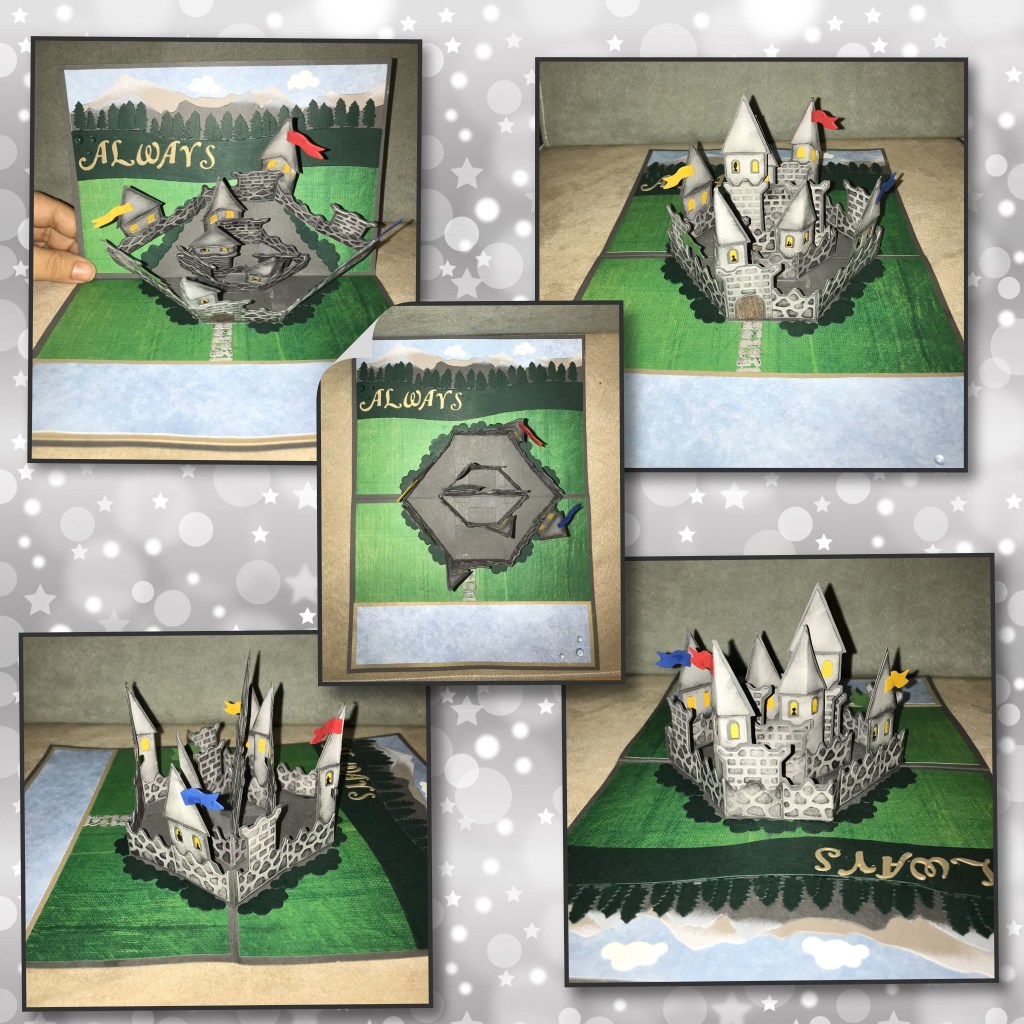
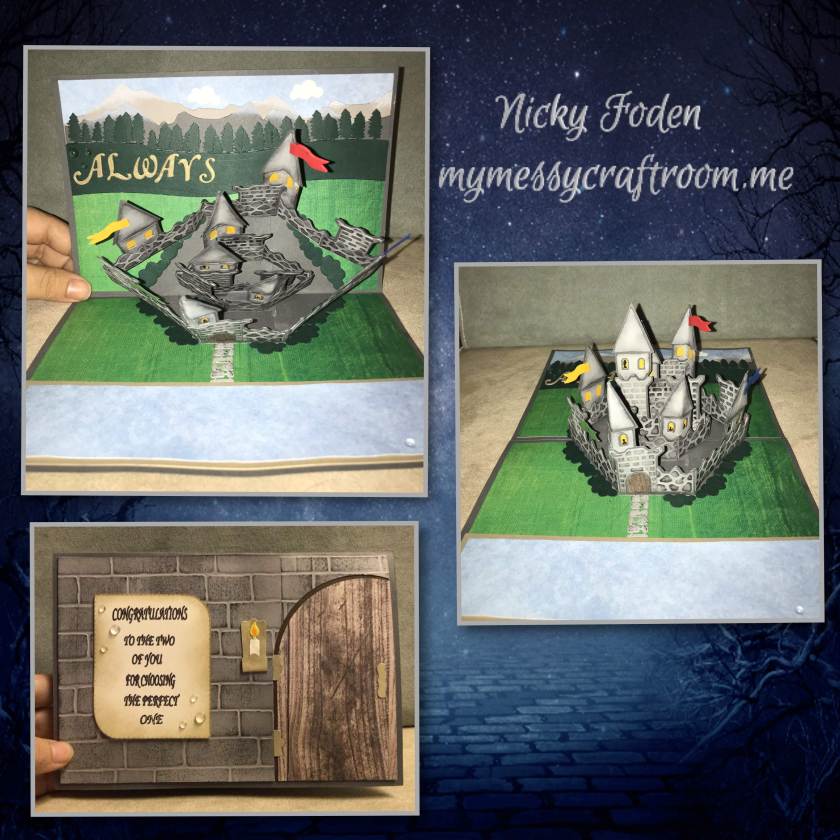
*I am so excited to be sharing this card, I never thought I would have the opportunity to make a Harry Potter wedding card, so when the opportunity came up I decided that this should be a very special card. It took a lot of planning, and a lot of tweaking, but I was determined to find a way to make this big castle fold into a card. It turned out much better than expected and I am pleased to share how I did it with you.

To see this card in motion please check out my Facebook page https://www.facebook.com/groups/MyMessyCraftroom/ Feel free to join if you would like to share your own crafty creations
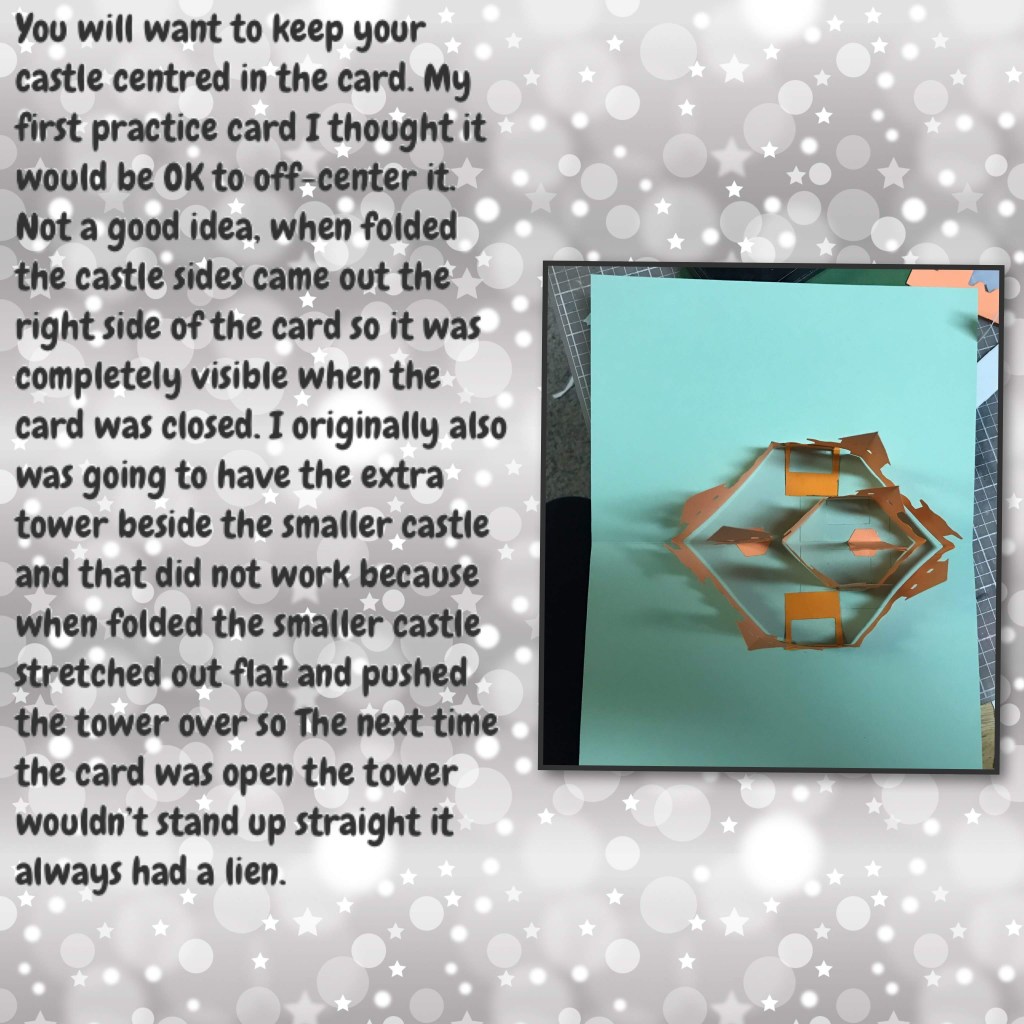
So when I first started planning this card, I thought it would be in my best interest to make a couple practice cards first. I needed to make sure that this card would indeed fold nicely into itself, so the castle would not be seen when the card is closed, but would still open up with all the different layers.
When I was originally planning this card I thought that it would be a good idea to make a couple of practise cards, and I am glad did. I will do my best to explain the details as well as I can, some of the photos below were taken with the practice card and some with the real card, and I took as many photos as possible with the hopes that I could pass this castle technique on with out too much confusion, I recommend reading the whole post before making your own, also there is some advice on what not to do and the very end of the post, so here goes……
Most of the paper and all of the card stock and inks are from Stampin Up and the colours are all listed in the description below.
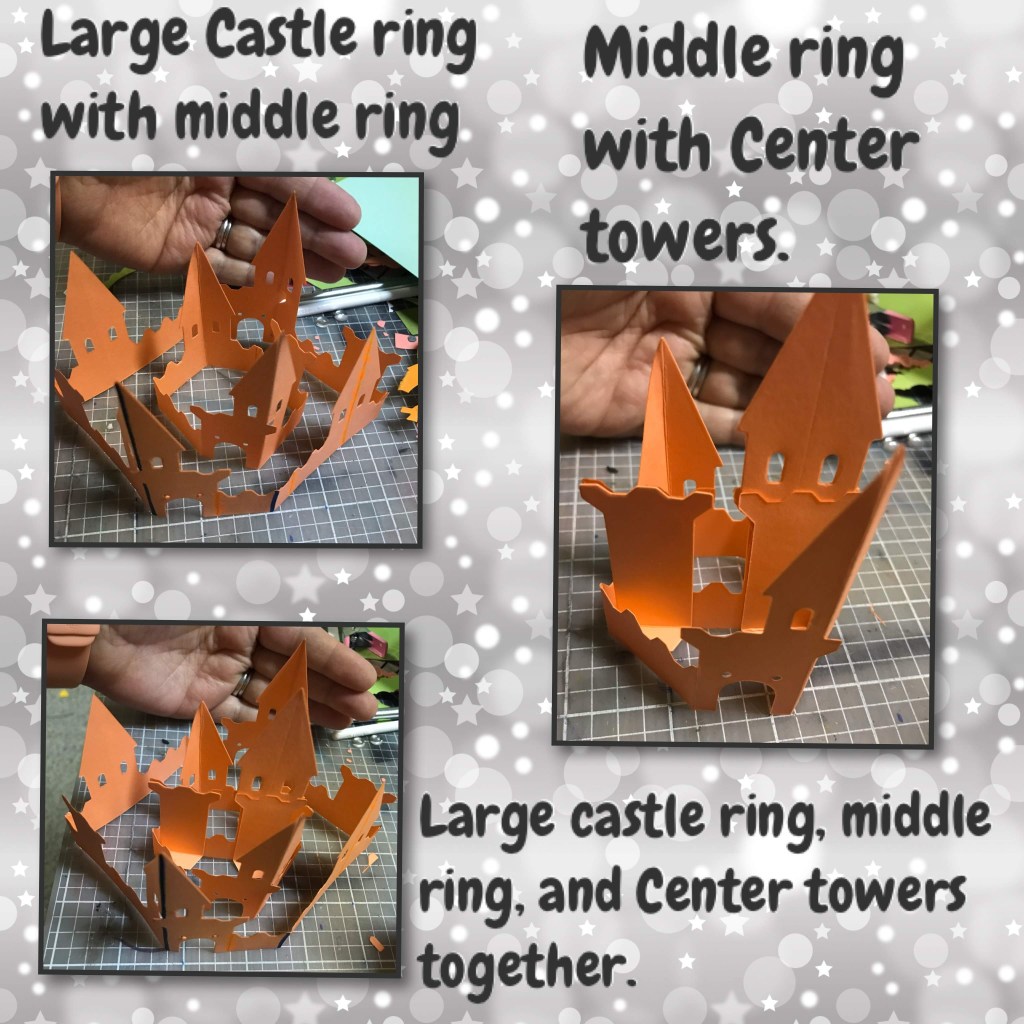
Most of the dies used are from Karen burnistons Castle Pop up die set, the original design for this die set is a much smaller castle, the middle ring of this card is the castle how it was originally designed to be created. I used mostly the same pieces to make it much larger. I highly recommend watching her assembly VIDEO it will give you an understanding on the mechanisms and how the original card folds.
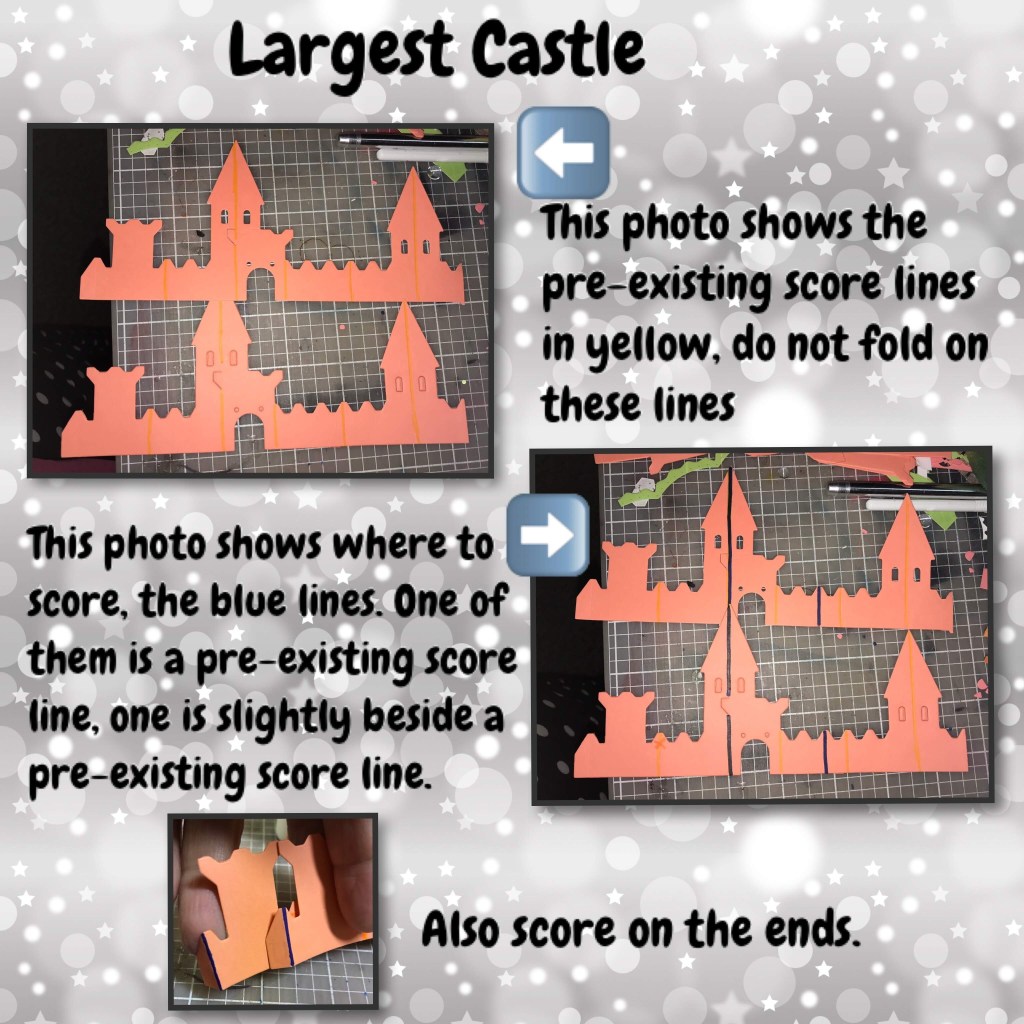
Starting with how to make the larger outer ring of the castle….
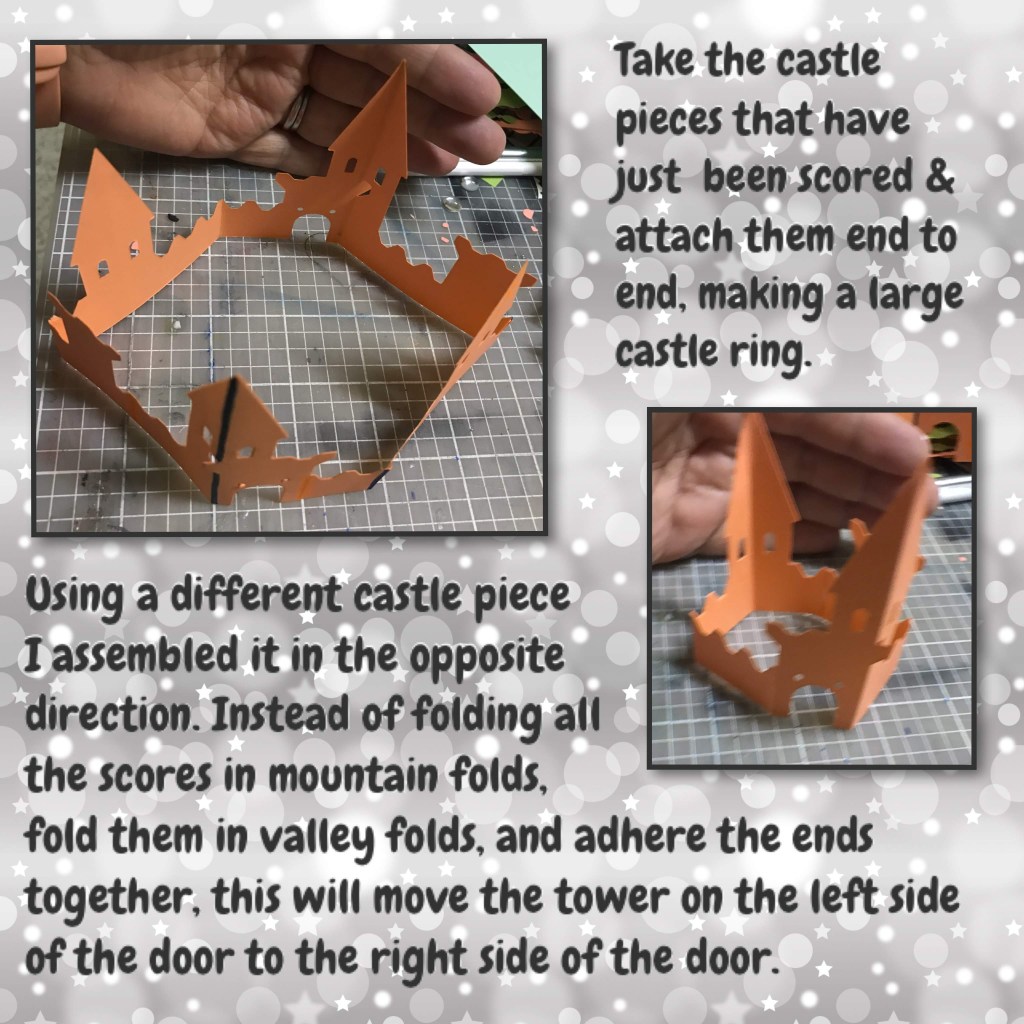
The reason I decided to make the inner ring of the castle in reverse was because when I made it the proper way the tower lined up perfectly with the tower on the outer ring which depending on the angle one tower would block the other, the silhouette of the castle was much better with the towers offset from each other.
To make the center tower wall……

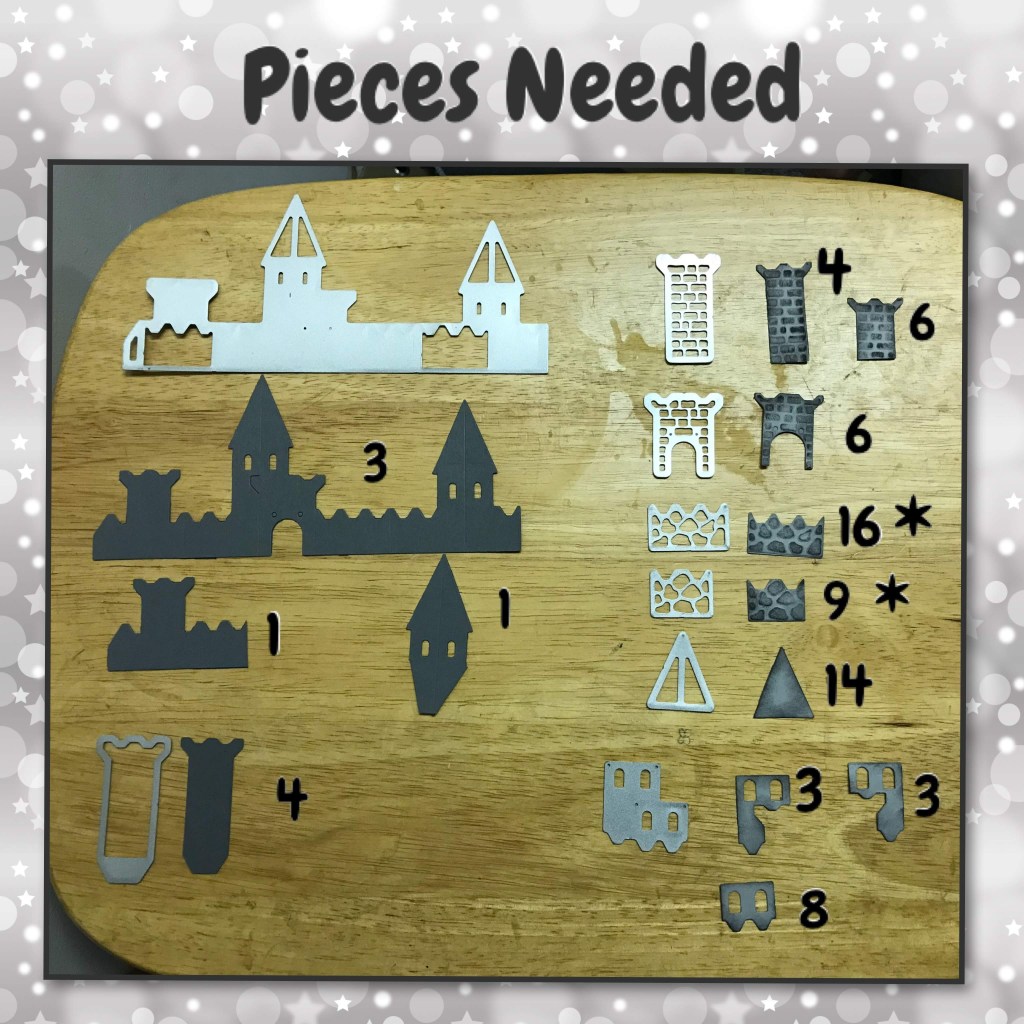
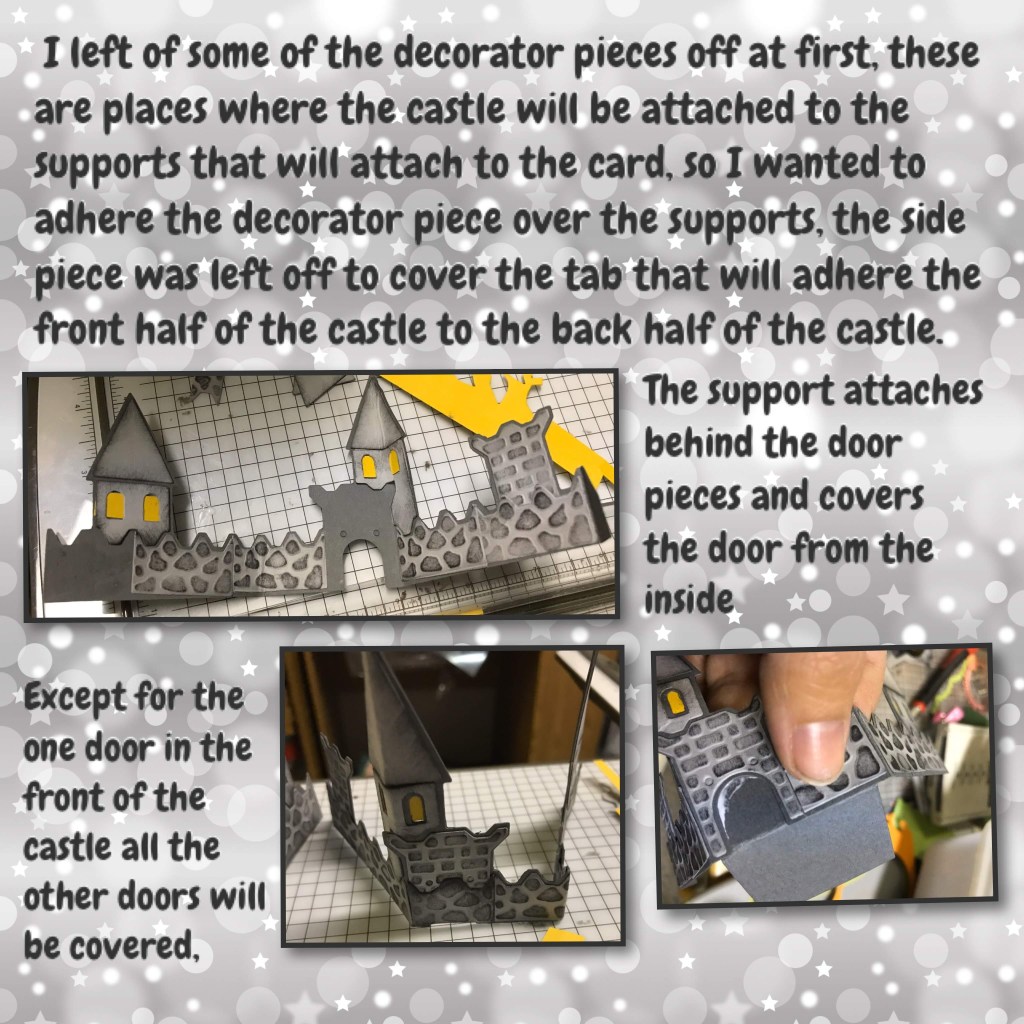
I counted the pieces after I finished assembling the card so I think I have an accurate count. the pieces with the * beside it are the only ones I’m not sure, I would start with at least the amount I specified but maybe a few spares just in case. (This is the amount that I used to decorate the frontside and the backside of the outer ring, the middle ring, and the tower wall, so the castle is decorated from every angle.)
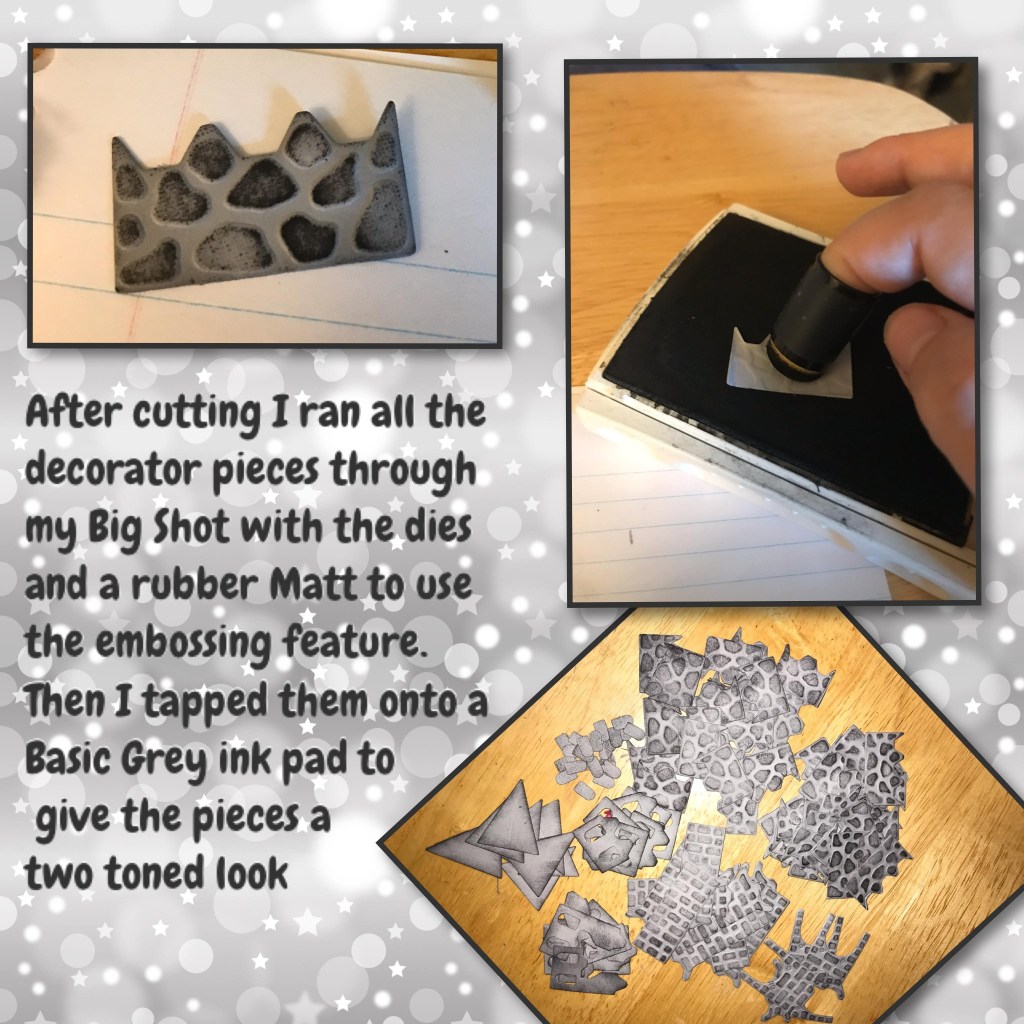
I also sponged grey along all the edges of all the pieces.

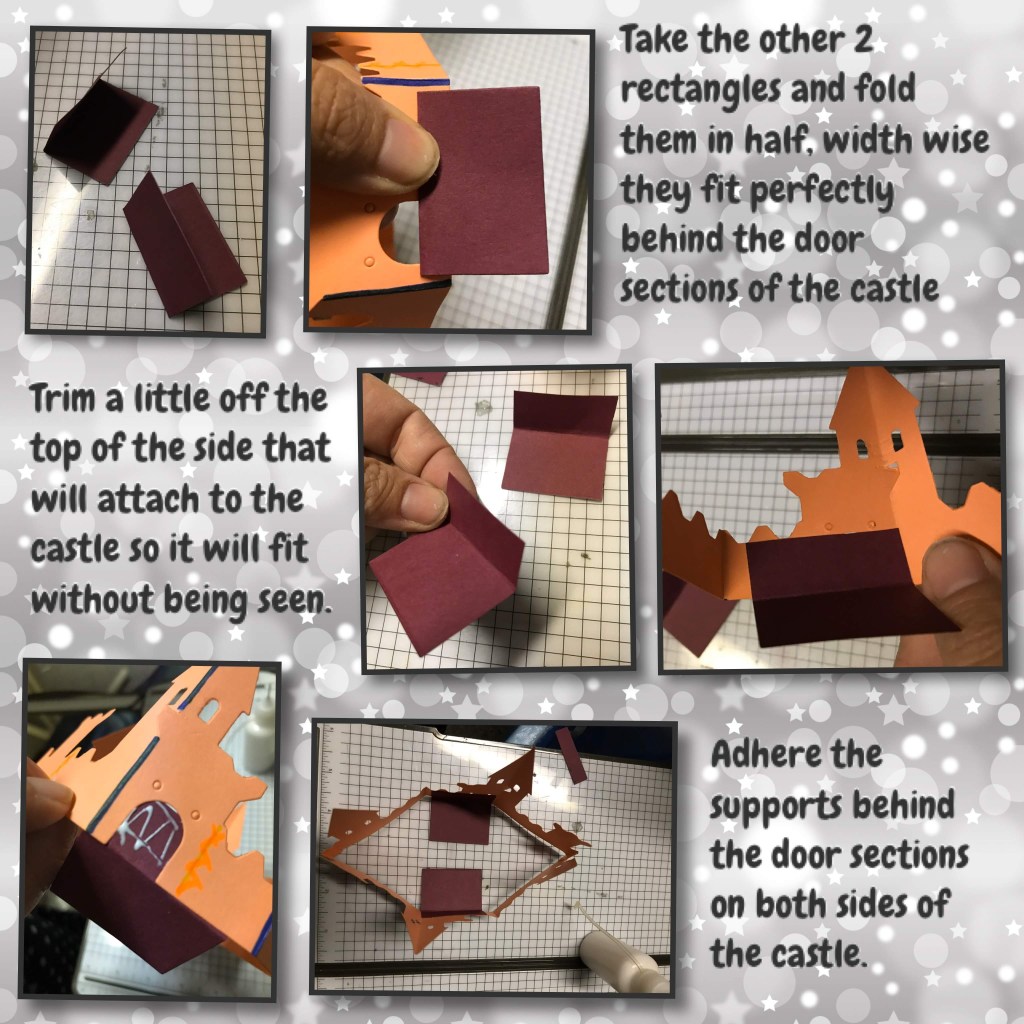
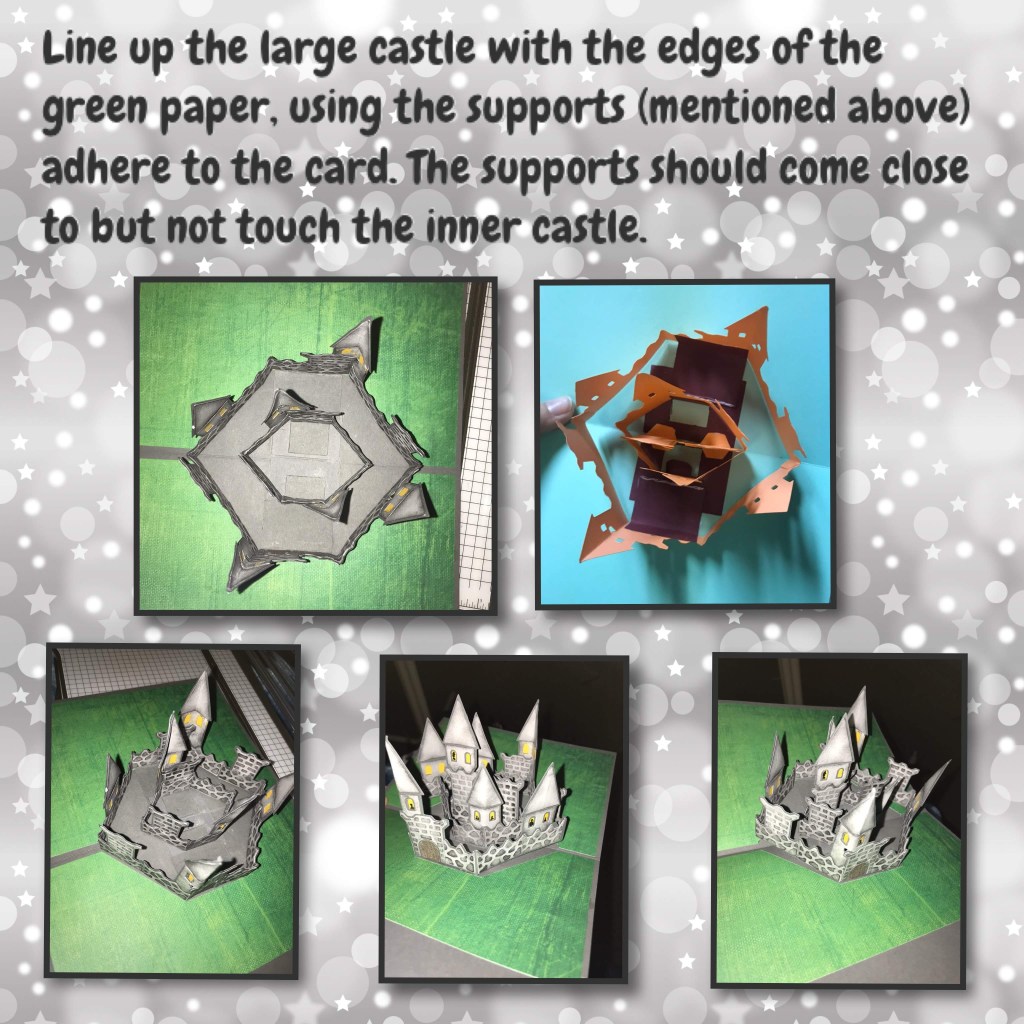
To make the supports to attach the castle to the card I used the rectangle from Karen’s Triple Flip die set, also this is where Karen’s VIDEO would be good to watch as it explains how to attach the middle ring of the castle. The middle ring is added to the card base first.

The supports for the outer ring…..
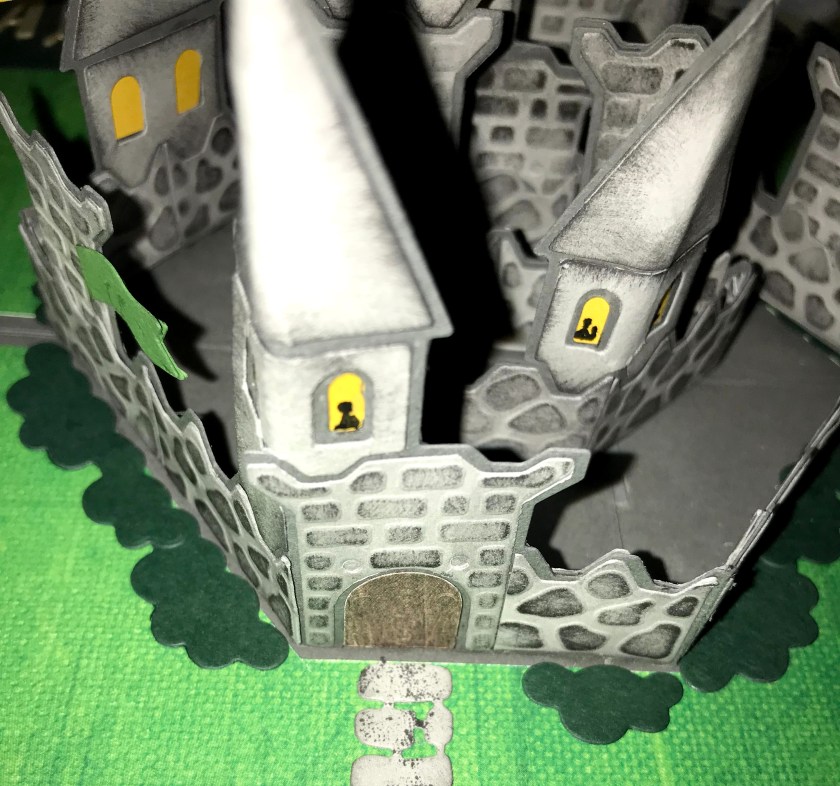
The Completed outer ring of the castle.

Now to create the card base……
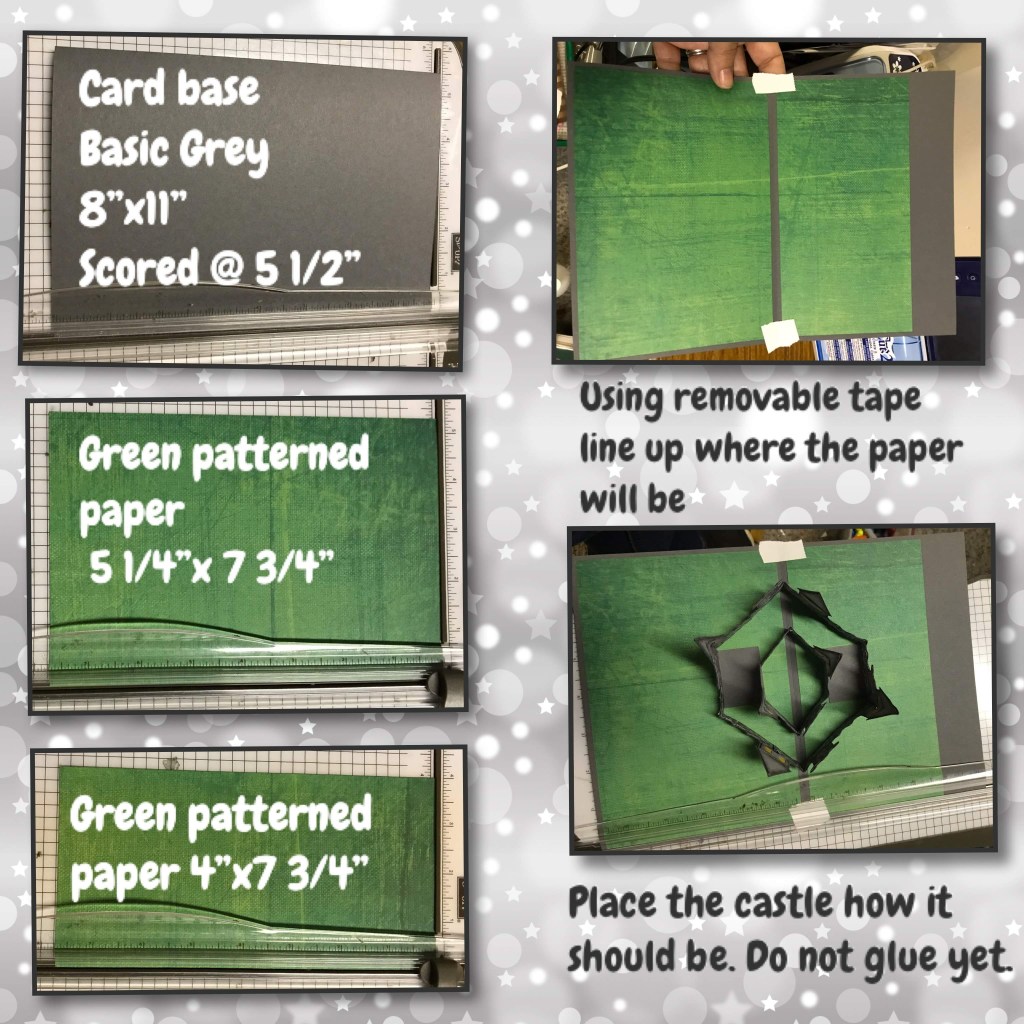
When lining up the outer ring of the castle you need to be VERY mindful of how you line this up, this will make or break whether the card will fold, Make sure the card base is FLAT, tape it down if you have to, make sure that the peaks on the sides of the castle PERFECTLY line up with the fold of the card on BOTH sides, make sure the castle is centered, make sure that the castle is sitting flat against the card (no gaps), look at it from above and make sure it all looks even.
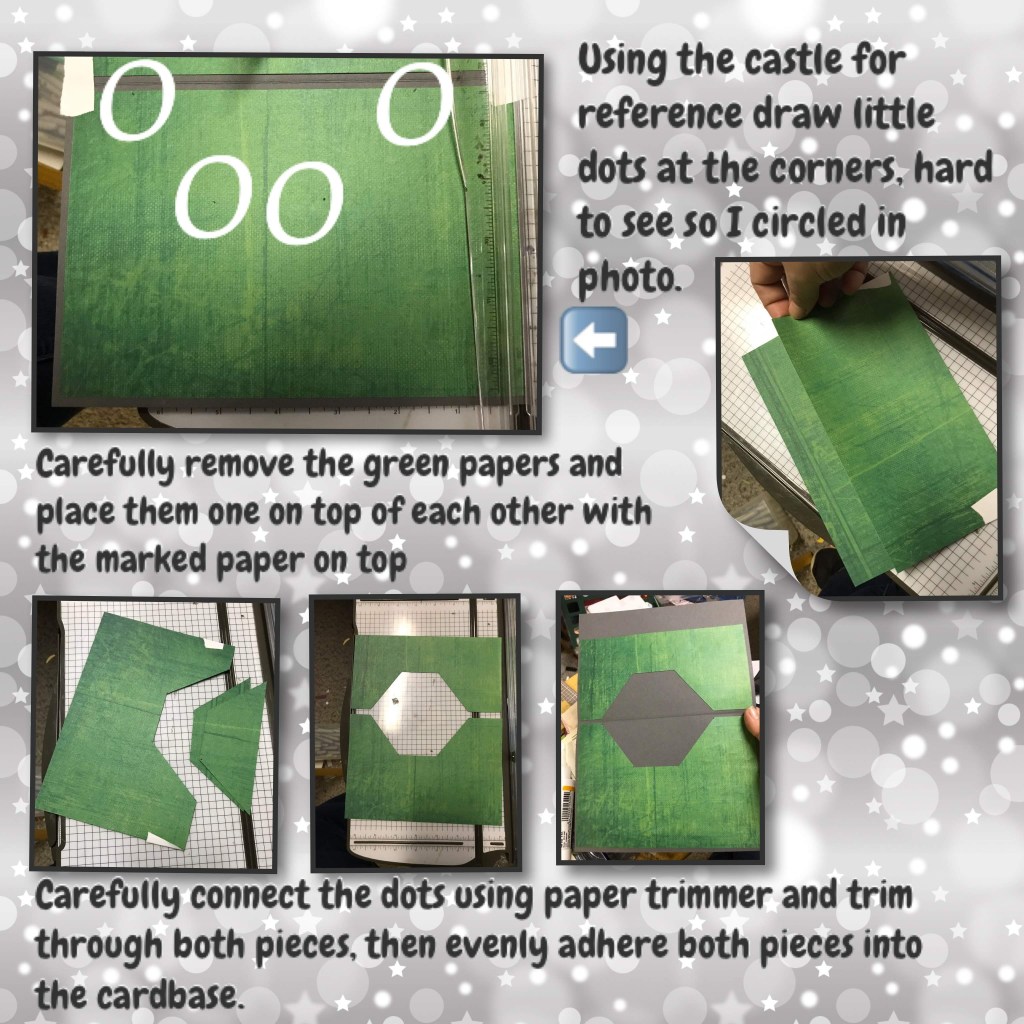
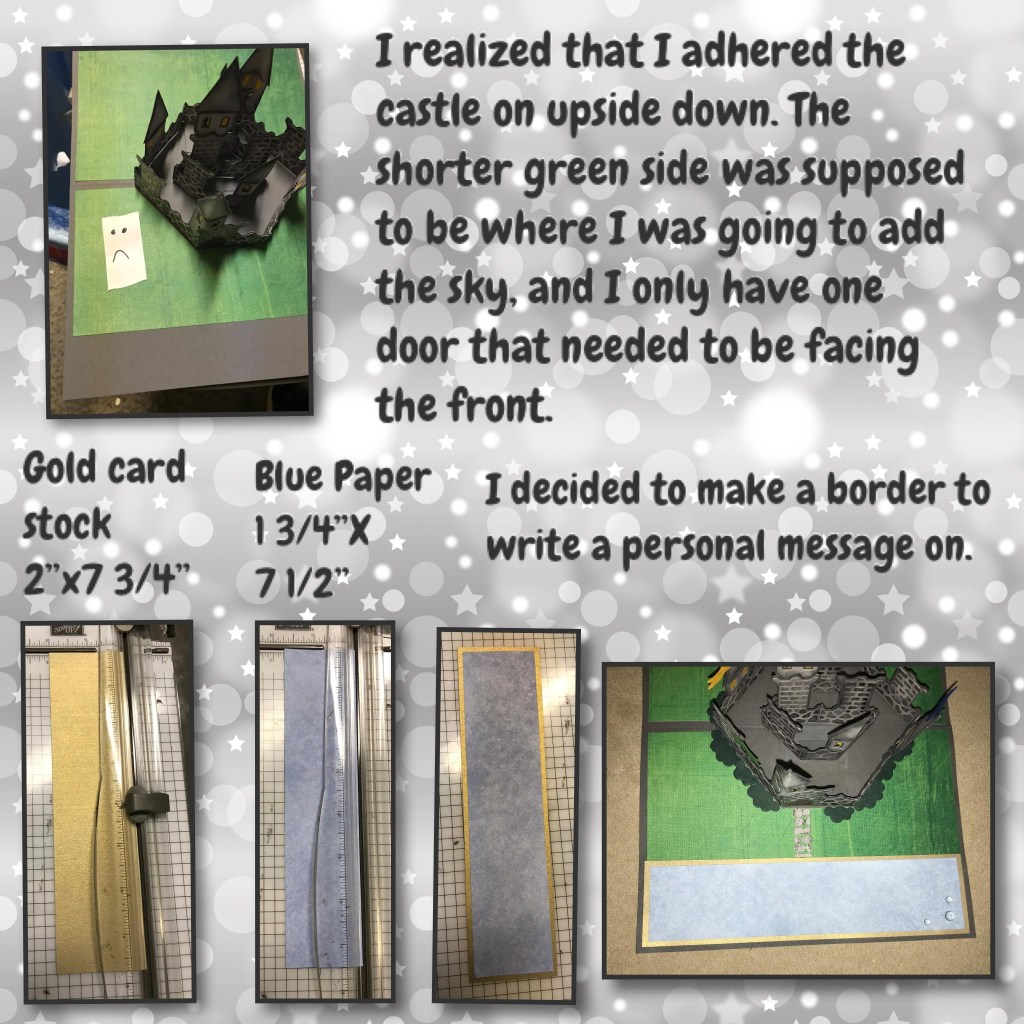
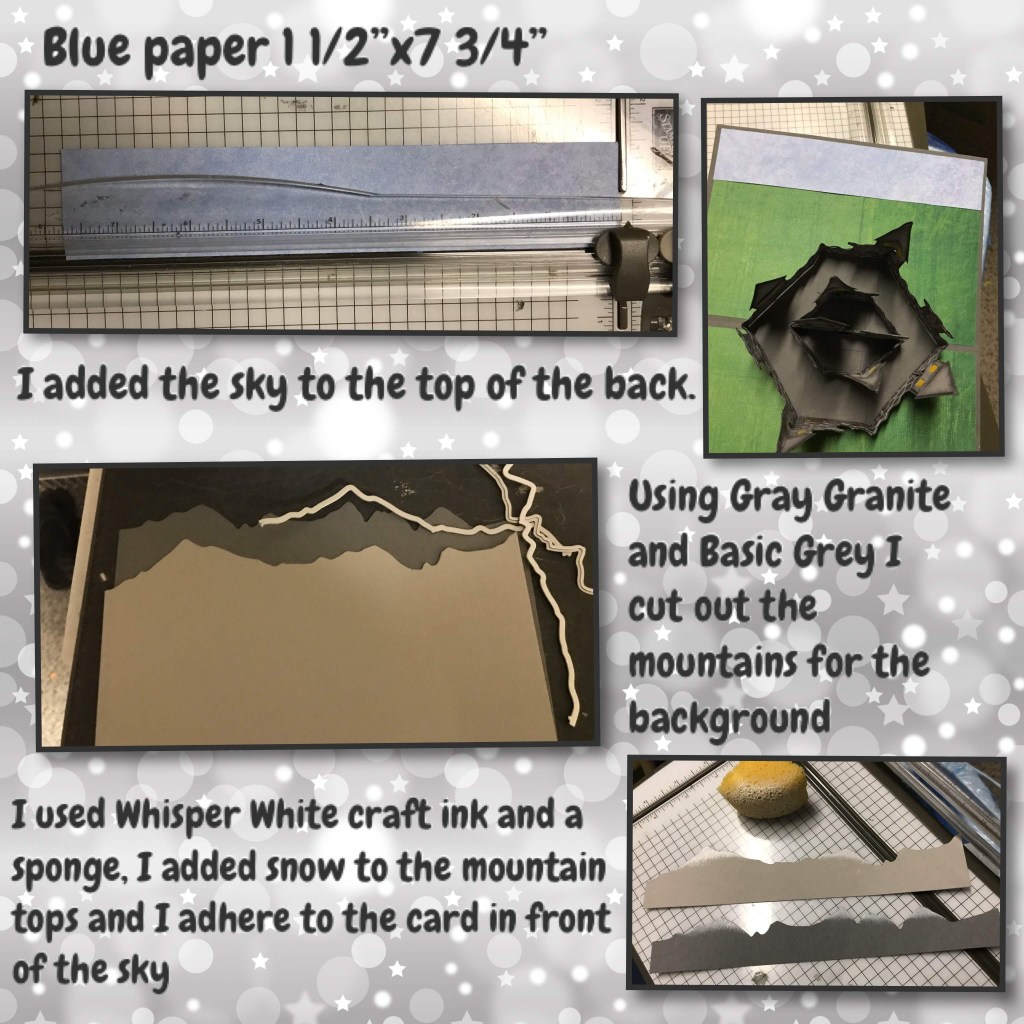
In case you’re wondering why I cut the green paper out from the center of the card I wanted the inside of the castle to not have grass, also I know the castle supports were grey and I wanted the supports to blend in. And MOST importantly I didn’t want there to be too many layers in the fold of the card as there are many layers already when you take into consideration that the tower wall will also be in the fold of the card.

This is also where you would attach the Tower wall, it has little feet under both towers, add adhesive and add it right into the fold. It is best if you let the adhesive dry completely before folding the card. I know its hard because it is really fun to fold.

I did have to add a little drop of adhesive behind all the trees, they have skinny trunks so I know over time the may have gotten bent if they were not attached properly.
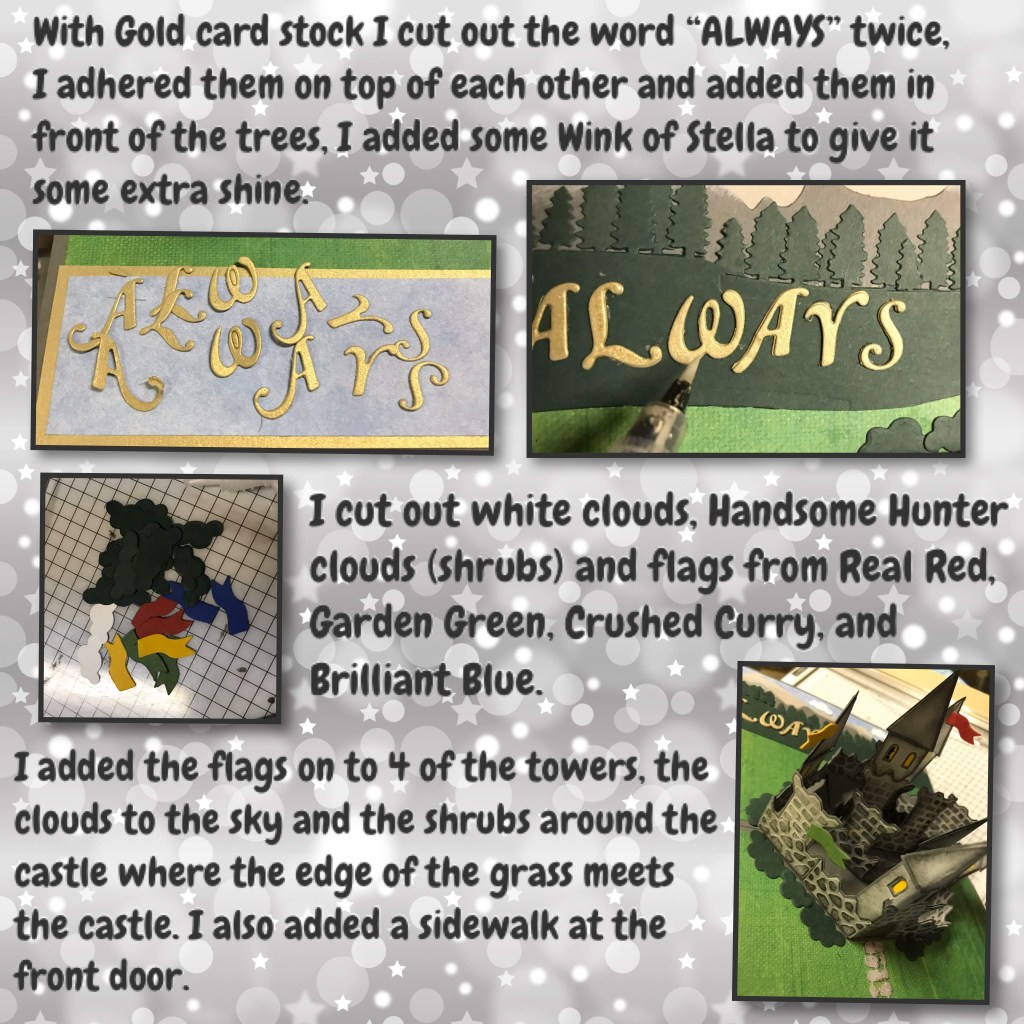
I decided to add the shrubs because the line where the grass ended seemed too harsh and was a little bit noticeable. The sidewalk is from Karen’s House and Fence pop up dieset.
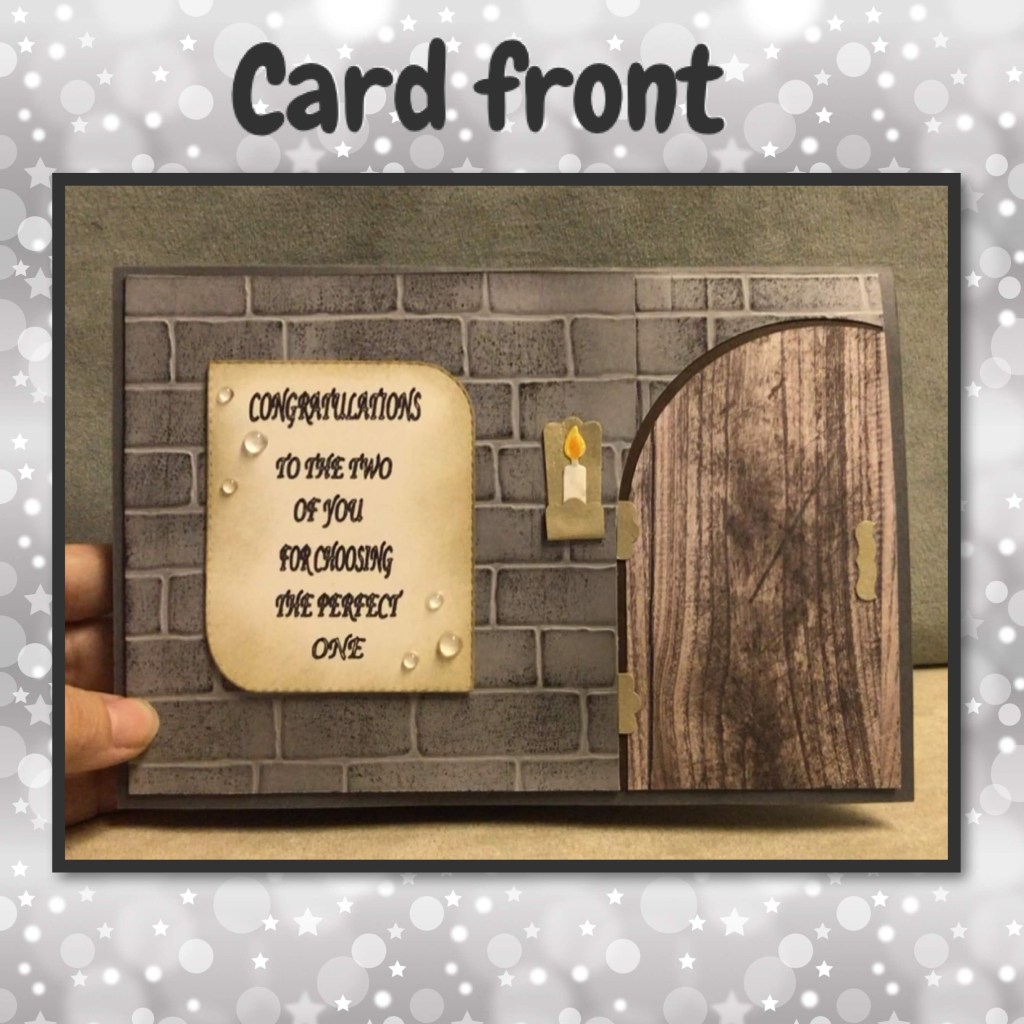
Now for the front of the card, I wanted the front to hint at the magic inside but without giving away the surprise,
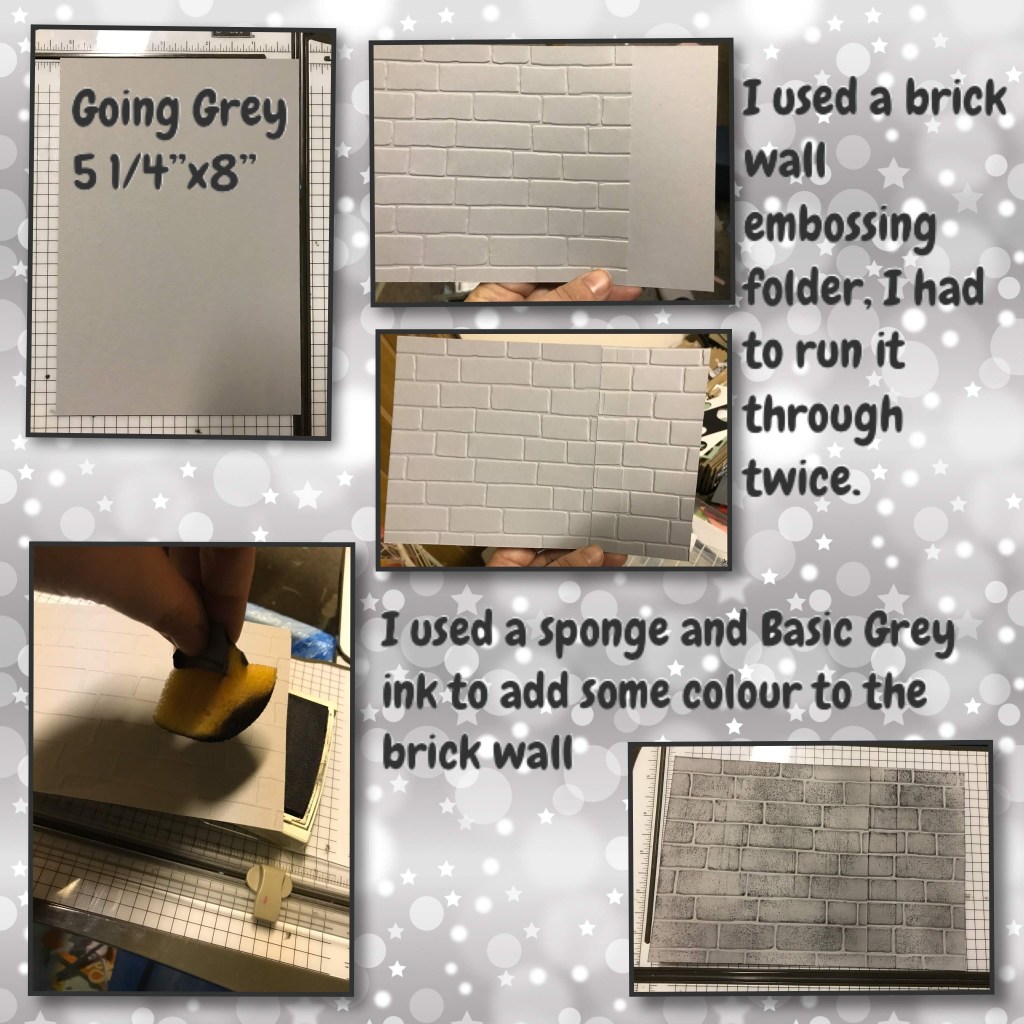
because I had to use the embossing folder twice there is a noticeable seam
The Greeting– all my wedding stamp sets had really small fonts, and would look lost on the very large card and I also wanted a message on the outside that would work with the “Always” on the inside (Harry Potter fans would get the “Always” reference so I wanted to use it on the card.)
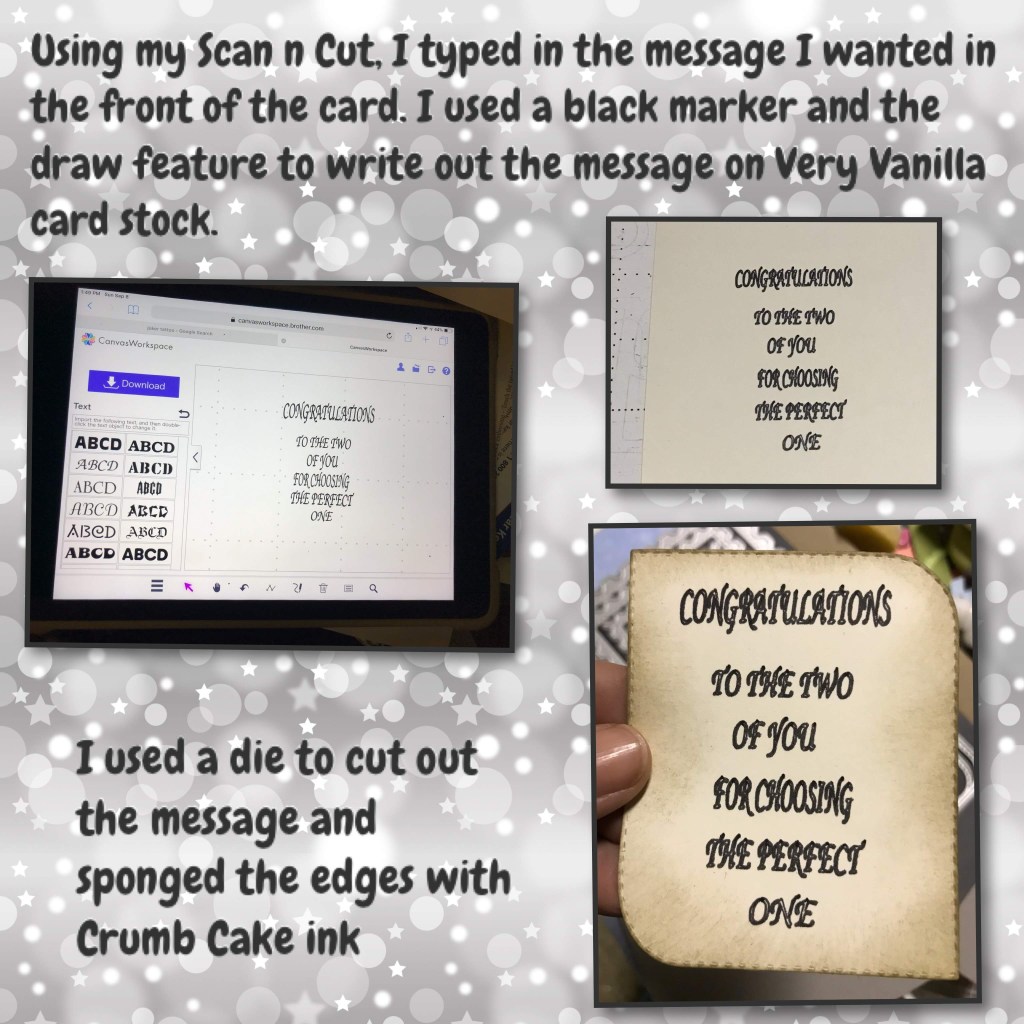
CORRECTION below- the little label punch was only used to make the door handle, the Modern label punch was used to make the hinges and the candle holder.
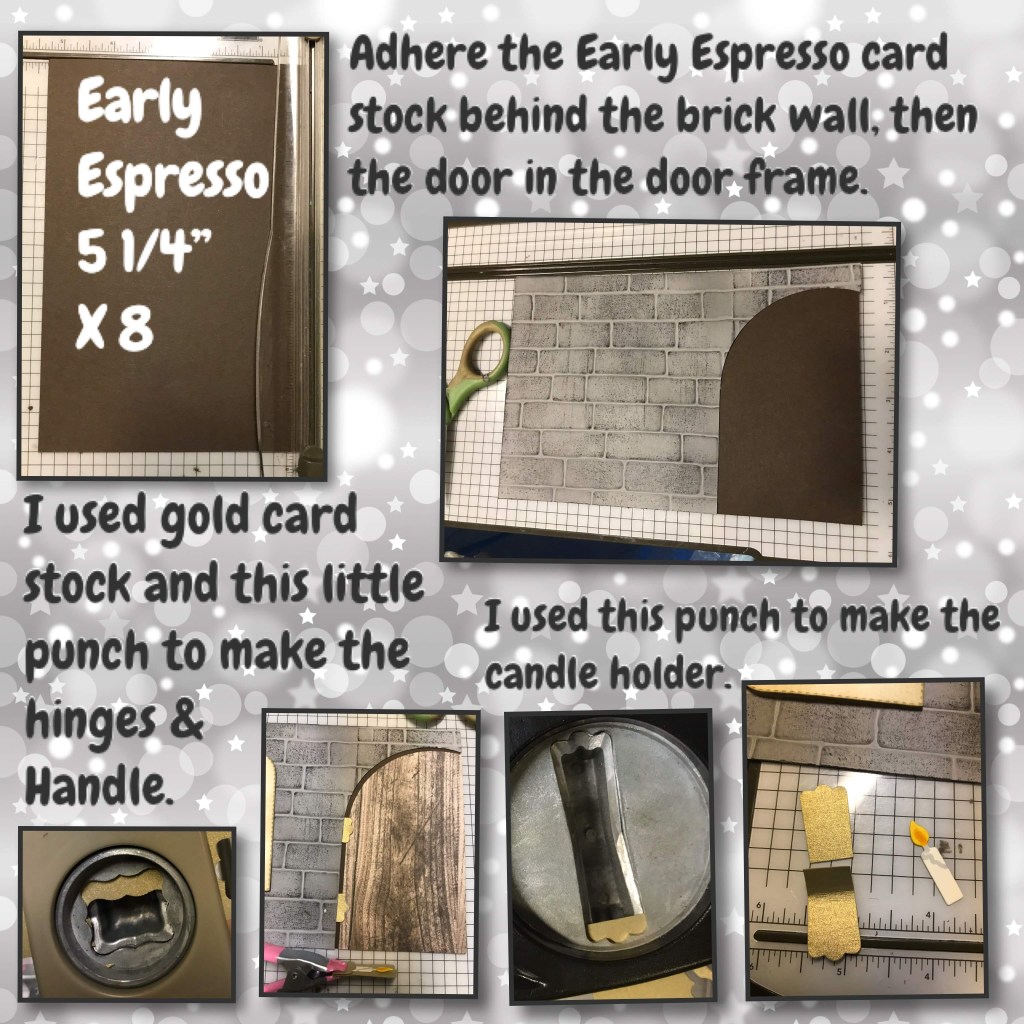
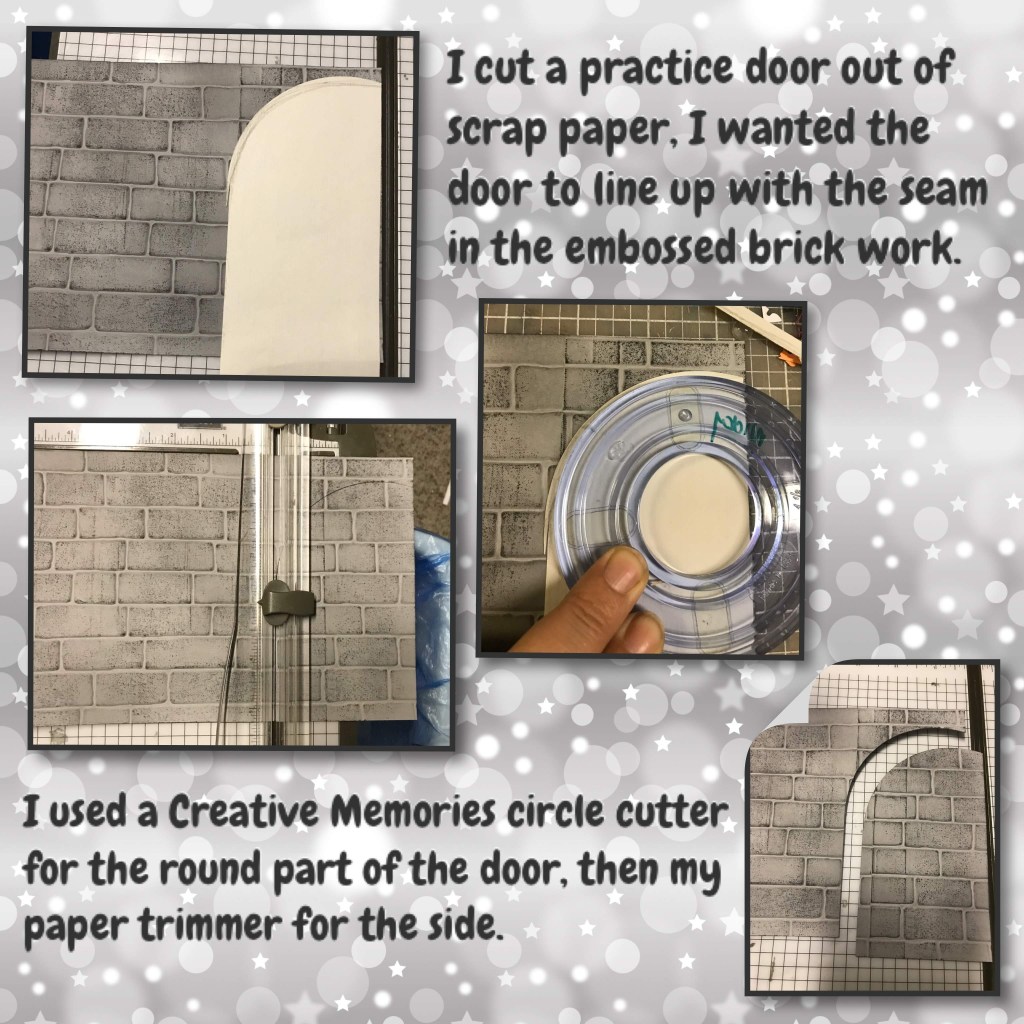
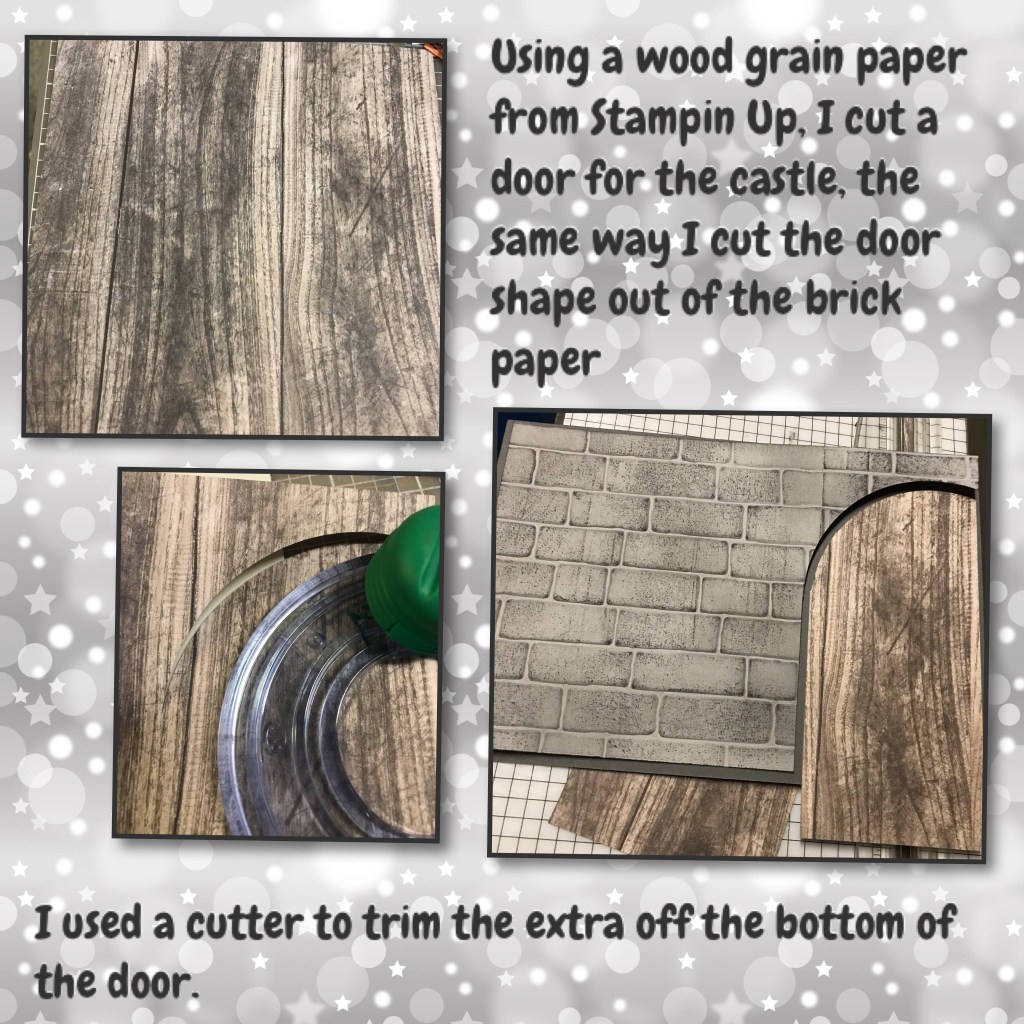
Add the brick wall and door to the card front.
The little details…….

The card was very front heavy so I cut a piece of Basic Grey cardstock to 5 1/4″ x 8″ and adhered it to the backside of the card, it isn’t really noticeable but it makes the back a little sturdier.
To see Some other fun castle cards please check these out
Rupunzel Rupunzel let down your hair
Hints and Tips
If I were to make this card again, things I might do differently…………
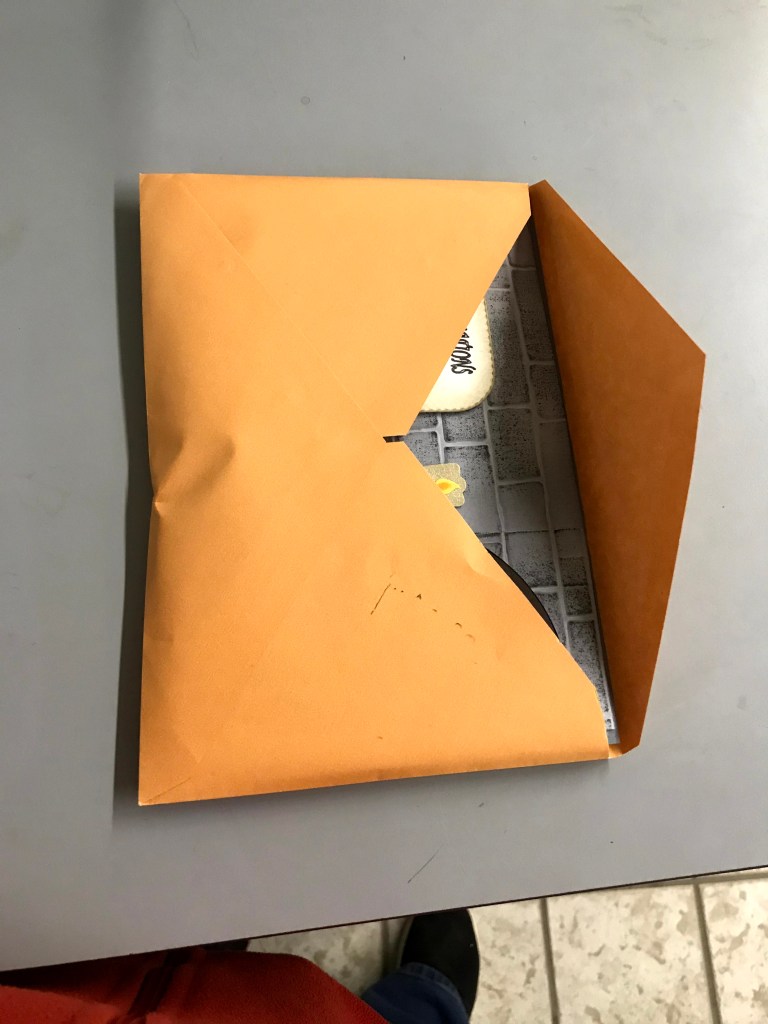
I would probably use a paper instead of a cardstock when making the decorator pieces, when folded this card is think and cardstock on cardstock on the fronts and backs of ALL the castle pieces make this a very thick card and it took alot of training to get some of the folds to fold. It did fit in an envelope but barely. The fold in the card did look a little lumpy from the outside because of all the mechanism in the fold, I might play with that a bit to see if there is a way to give it a smoother look from the outside.

I am amazed with your work. This card is priceless!
LikeLike
Thanks 😊
LikeLike
This is absolutely amazing, awesome work hun
LikeLike