
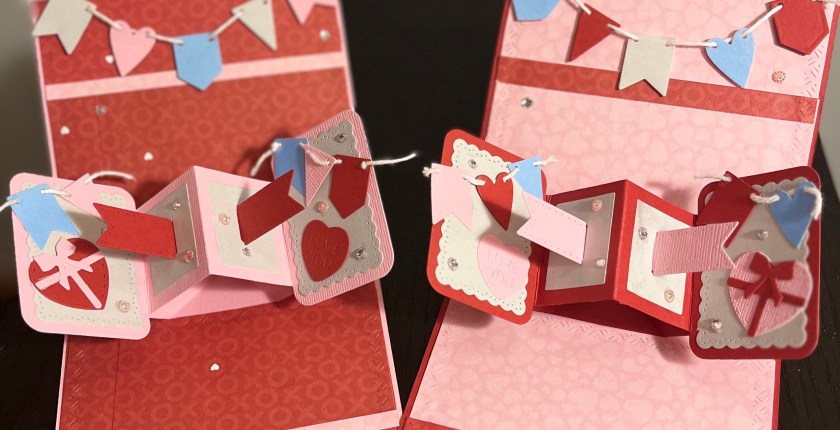
Surprise, I had so much fun with this release I have 2 cards 2 days in a row 😀 I really wasn’t thinking when I was sitting down writing my blogs so I have 2 Little Twist Panel cards in a row. The Valentine’s cards had to be posted on Valentines Day, and I already had the other post all typed out. The previous card (if you missed it) was showing 2 mechanisms in a slimline card, this post shows 1 mechanism in a cute little square note card, like I said, this set is so versatile.

I thought this die set would make adorable valentines, and I was right, these are so cute, they are only 4 1/4” square and these Little Twist Panel mechanisms work perfectly. I could have actually made them even smaller if I wanted to but I also want to use the largest square crosshatch to cut the layers for the front inside and back and they are 4 1/8th Square. According to Karen B, you can fit this mechanism inside a 3 1/2” square card 🤯 I decided to make 2 cards using the same materials but opposite of each other.
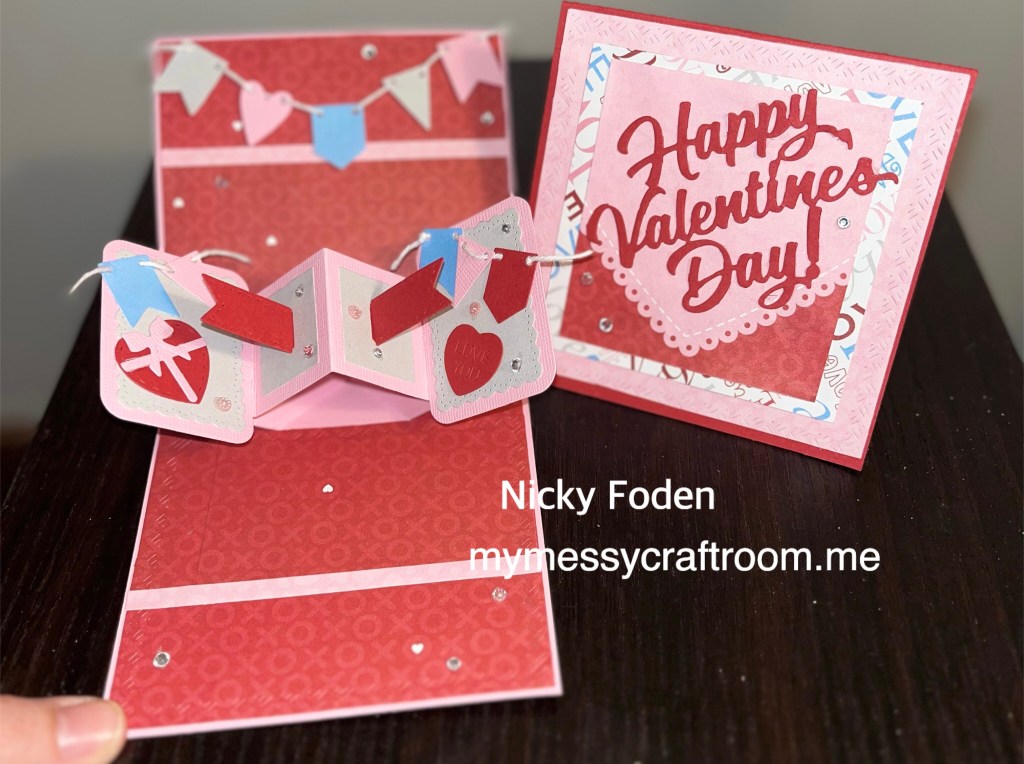

All the fun is in the reveal, to see this card in action please check out my FACEBOOK page, feel free to join if you would like to share your own crafty creations. You can also see a video of this card on my INSTAGRAM page.
1- if you follow my blogs you may already know that I often pull out scrap book kits when I’m in a hurry, or don’t feel like trying to match up the random papers and card stocks that I have. This is a VERY OLD Creative Memories kit (circa 2011)
2- I still had to find matching cardstocks for the bases, I cut out a pink and a red base dimensions below.
3- I decided to just diecut everything I needed all at once, die sets will be listed throughout and at the bottom of this post

4-using the largest and second largest dies from the Squares Crosshatch sets I cut frames for the card fronts ( I do this to conserve paper, if it’s going to be covered I might as well cut it out and it takes away a bit of the bulk)
5- I added these pieces to the card fronts as shown. I didn’t know when I was starting that I was going to cover most of the “love” paper or I would have cut the center out as well. It was hard to read the greeting over it.
6- using the medium cross hatch die I cut out a matching (not so busy pattern) paper for the front and added “Happy Valentines Day”

7- work the mechanism as shown, the arms should fold up and in when the mechanism is folded
8- add the precut patterned paper inside
9- add adhesive as shown, make sure the mechanism is centered and is lined up perfectly with the fold, close the card to stick the mechanism to the one side, do the same to the other side.
10- progress on both cards so far.

11- I decided to cover most of where the mechanism is attached to the card so using the largest crosshatch again, cut matching papers to what is inside, then cut them in half. I added them to the card covering the mechanism, making sure that the cross hatch end is under the mechanism and the cut end is in the middle. (I thought that would be less noticeable)
12- now for the panel part, (I gave directions on how to add the slots in my previous blog post) layer the pieces a shown.

13- fold the panel as shown, and add the banners (again I gave better directions in previous post)
14- add the panel by adding adhesive to the top left and bottom right of the arms, and line up with the matching corners on the panel strip.
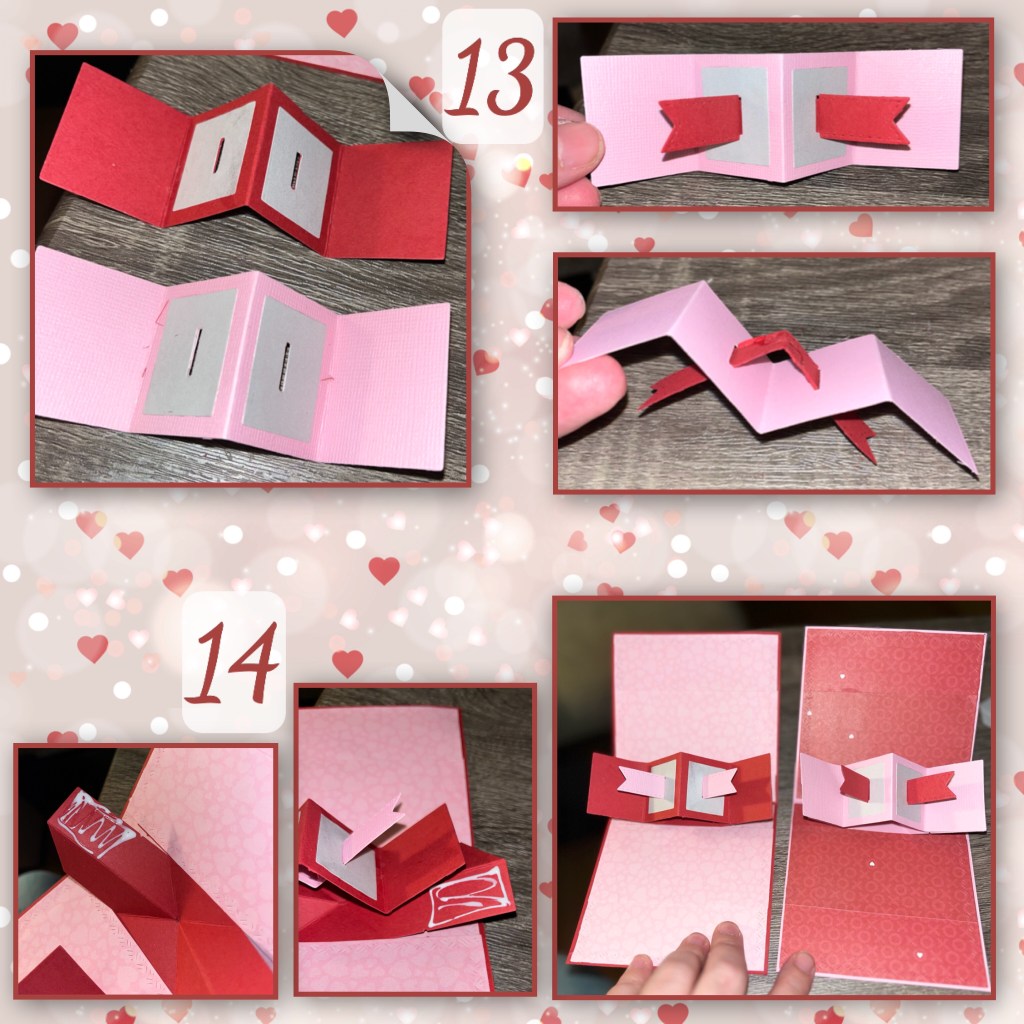
15- add the framed rectangles to the panel
16- time to decorate, ALL THE BANNERS come with this dieset, the other die cuts are from the Love charms set. I just added the banners to some white bakers twine. I also added strips of opposite coloured papers to cover the seams of the back ground paper.

17- last but not least what’s a card without a little bling. I added some rhinestones to the front and insides of the cards.

All the diesets used are from Karen Burniston
Tools

Nicky this is brilliant, I watch your step by step and love what you do…x
LikeLiked by 1 person