
Hi Crafty Friends,
Welcome to our Karen Burniston Products – KB Riley LLC June Release Blog Hop. The Design Team have come together with Karen today for a fun blog hop to celebrate the release of 12 new dies and 5 new stamp sets. Sneak peeks of the new release started last week, and the dies are available to order NOW!

This release includes:
• 2 new Pop-up Die Sets
• 2 new Pop-up Add-ons Die Sets
• 2 new Lorna Add-ons Die Sets
• 1 new Fancy Label Add-on Die Set
• 1 new Fancy Label Frame Die Set
• 2 new Border Die Sets
• 1 new Sentiment Shadow Die Set
• 1 new Charm Set Die Set
• 5 new Clear Sentiment Stamp Sets
Dies are available to order now on the website.
GIVEAWAY:
To celebrate the release Karen Burniston and each of the Karen Burniston – KB Riley LLC Design Team members will be giving away a $25 Gift Certificate to some lucky person who comments on our blog posts, so make sure you join the hop and comment on everyone’s blog post. Winners will be randomly chosen from ALL of the blog hop comments received on our blog posts by Monday, 8th July 2024. Lots of chances to win some goodies, so just leave a comment on this post or any other blog hop posts to enter! Don’t forget to leave some way for us to contact you, in case you are a lucky winner!
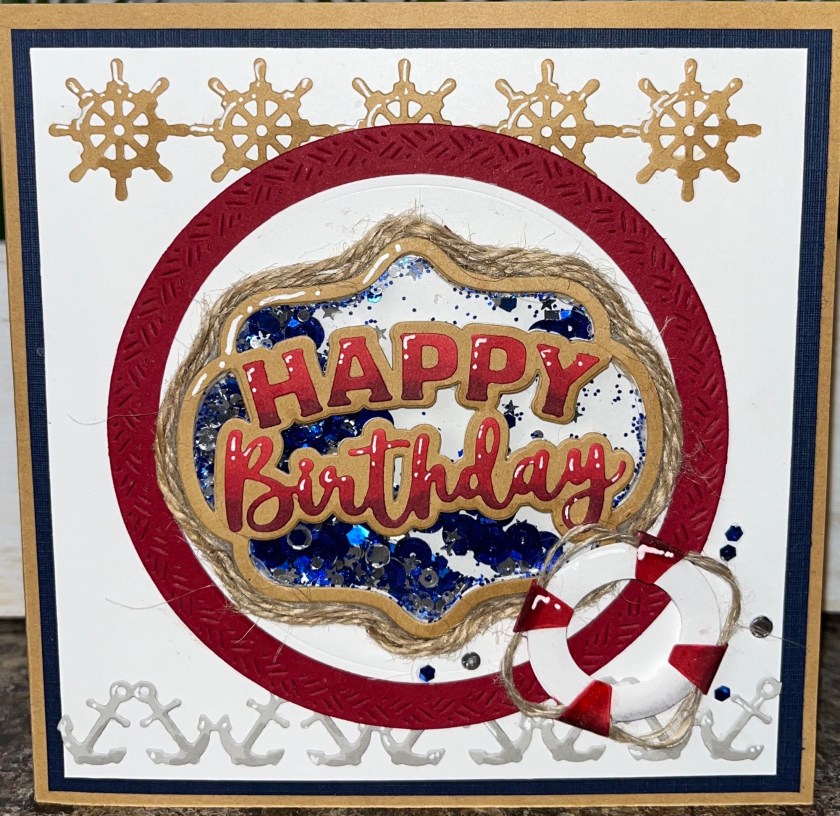
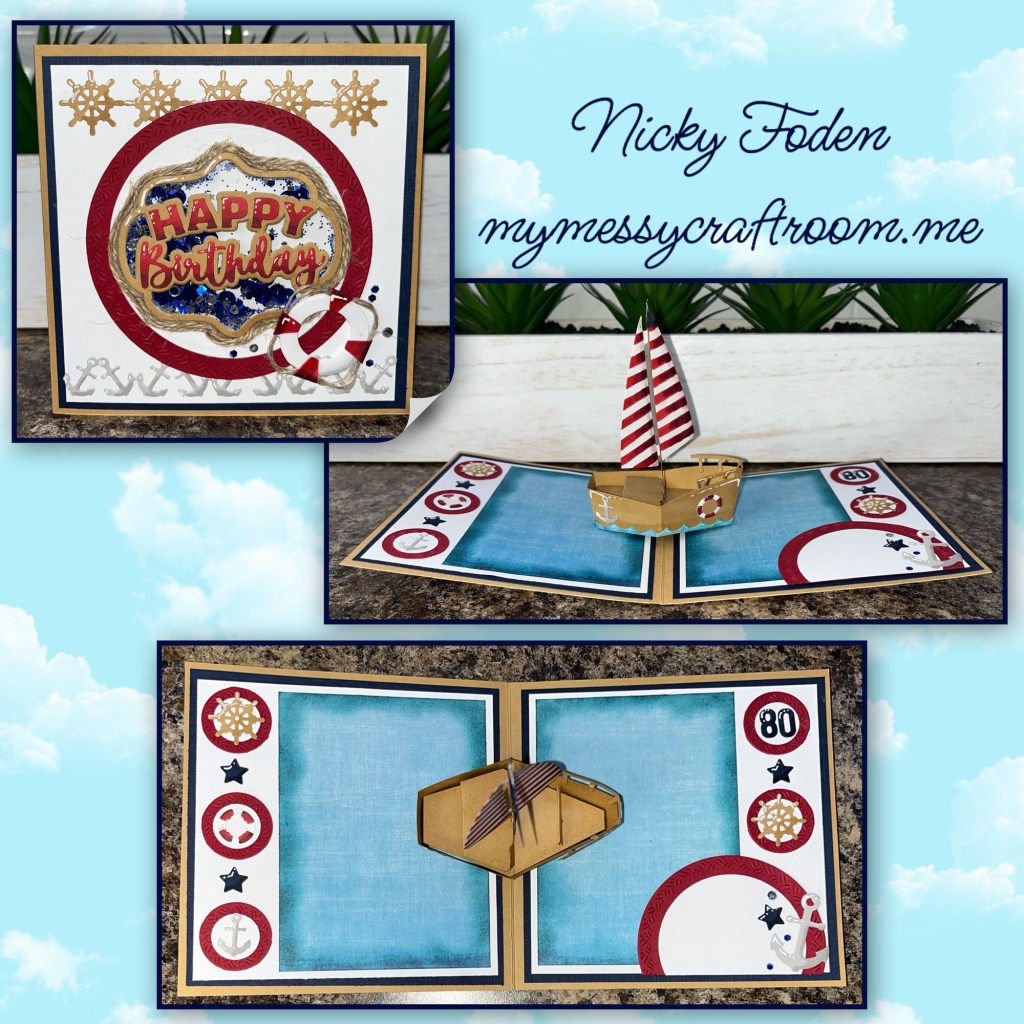
I used a few of the new diesets on this card, including Happy Birthday- Lorna Label Pop up, Boat Pop Up, Sailboat Add on, and the Set Sail Borders. All the other dies used will be listed at the bottom.
All the fun is in the reveal, to see this card in action please check out my FACEBOOK page, feel free to join if you would like to share your own crafty creations. You can also see a video of this card on my INSTAGRAM page, or TikTok 😊
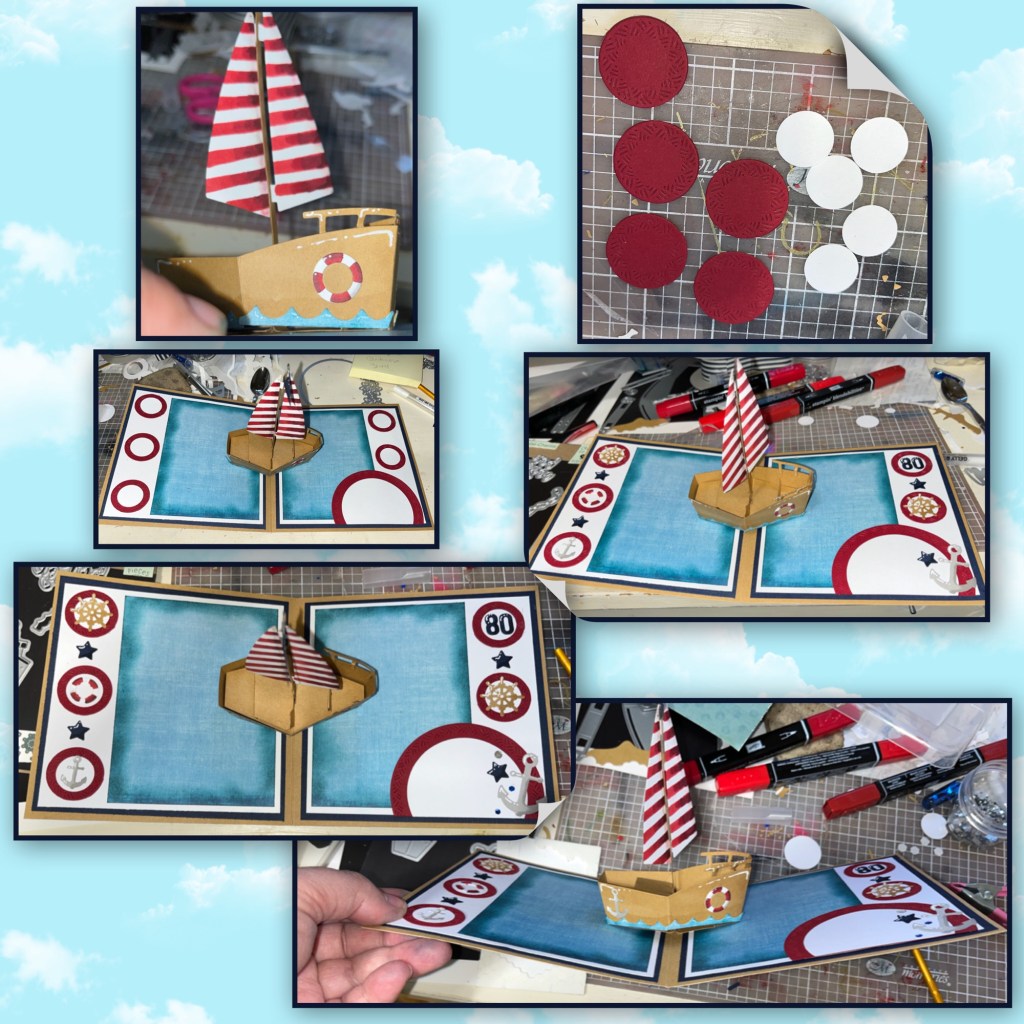
I die cut the pieces from the Boat Pop up and the Sailboat add on, I rubbed Versa Mark ink along the boat pieces to add texture. I made a mistake on the first sail. I tried to do an ombré look using the stencil feature in the die with alcohol markers and as you can see it didn’t work. So I used a red pen with the die then coloured with alcohol markers. I used a white gel pen to add highlights. Assemble the boat (Karen will have a video tutorial on the product page at the link ⬆️ )

So I had to figure out how to make the Happy Birthday Lorna Label add on into a shaker card. It took some tweaking but it turned out great.
I cut 4 labels from Kraft cardstock, and 3 from white, cut the centers out of all but one of each colour. I adhered the labels one on top of each other starting with a Kraft one and ending with a white with the words still attached (see ⬇️)
I die cut the “Happy Birthday” from white, and used the same red alcohol markers and coloured the words with an ombré effect. I layered the “Happy Birthdays” that I cut out of the centers and added the red letters to those then added to the label. I added shading with a Versa Mark Marker, and highlights with a white Gelly Roll pen. I cut the acetate window using a die from the Lorna Label Pop up. This is where I made a mistake. I used the same liquid glue to add the acetate piece to the labels stack but it didn’t hold. So I used a thin sticky strip to add the acetate to the label stack. It was a bit tricky but I got it to work. But the sticky strip was hard to hide. Soooo it was going to be even more visible if I added it to the top layer as well so I decided to cut a another label from Kraft cardstock WITH Sizzix double adhesive on the back. I added this piece on top of the acetate then the top label on top of this piece. Sorry so confusing. If I were doing this again I would have had the double sided adhesive on both pieces that would be in contact with the acetate.

I diecut a large red, and the next down in white of the Circles Crosshatch. I cut the centre out of the red one as it will be covered anyway. I dug in my stash and found blue and silver sequins, and covered with the label shaker lid that I made. It bothered me that I could still see some of the adhesive around the label so I added twine around the frame. I actually really think it adds to the nautical look. 

The cardbase is 5 1/2” x 11” scored @ 5 1/2”. The 4 navy squares are 5 1/4” square with the centers cut out. The 4 white squares are 5” square. Layer and add to the front back and inside. The anchors and ships wheels are from the Set Sails Borders. I added shading with a Versa Mark Marker, and highlights with a white Gelly Roll pen. The shaker is the center of attention and I added the floaty from the Cruise Charms and a few of the blue and silver sequins.

I wanted to use this blue paper but I only had this much of it so I cut 2 panels to 3 1/2” x 4 3/4” and I sponged the edges with a darker ink, then added the boat.

I punched out 5 sets of red and white circles, 1” and 3/4” and layered. I added them and a layered a set of circles crosshatch as shown. I added them to the card with pieces from the Set Sails borders, small floating from the Sailboat add on, the “80” is cut from the Mini Alphabet & Numbers. The Large anchor is from the Cruise Charms. The Stars are from the Surprise Ball pop up. I added a few of the sequins around the anchor.
Die Sets Used
Happy Birthday Lorna Label Add on
Other Tools used
To See All The Other Amazing Blogs check these out
Nicky Foden – You are here

Fabulous card! Thank you for the step by step of how you made it.
LikeLiked by 1 person
Such an adorable card
LikeLiked by 1 person
Love your card! (I love all of your creations in your blog posts!) The red, white and blue is just gorgeous!
LikeLiked by 1 person
Great card, makes me want to sail away.
LikeLiked by 1 person
You created a beautiful card anyone would love to get!!
LikeLiked by 1 person
Hi Nicky. I love your card. The Sailboat is so pretty and all your red and white stripes on the sail match perfectly 🙂
I love how you darkened the edges of the blue paper to ground the water. That is a great tip.
LikeLiked by 1 person
Another amazing masterpiece! Thank you for sharing your work and all the details!
Lisa_monken@cox.net
LikeLiked by 1 person
Really love the boat die and you have rendered it really well! gagricla@hotmail.com
LikeLiked by 1 person
Love all the details! Makes a very unique card
LikeLiked by 1 person
Love the sailboat and shaker xame out great !
LikeLiked by 1 person
WELL DONE! This is a great card, thanks for sharing with us!
LikeLiked by 1 person
So cool how you have a shaker on the front which is already really fun and then the sailboat just takes it to the next level!
LikeLiked by 1 person
This card is very beautiful.
LikeLiked by 1 person
The sail boat is great but I really like how you made the front of the card. So time consuming but really worth it, Thank you for all the details.
LikeLiked by 1 person
I love your card’s gorgeous details!! The shading and the beautiful red stripes on the sails, with the detail of your cruising card are great! The great jute to the life savers and the shaker part are wonderful additions!
LikeLiked by 1 person
Love Shaker cards and those red striped sails just makes it
LikeLiked by 1 person
I love the card.
LikeLiked by 1 person
I love the card!
LikeLiked by 1 person
What a fun and Happy card. Looks very patriotic.
LikeLiked by 1 person
Anchors Away! What a fun card! Happy 4th of July!
LikeLiked by 1 person
Such a wonderful pop-up card! I really love the boat and all the fun details!
deniseb777ATgmailDOTcom
LikeLiked by 1 person
Stunning design and most great result. You certainly go to all measures on your blog to help each one of us to know how to do and use this die xx
LikeLiked by 1 person
What a beautiful card! I am loving the boat die and the Lorna labels that you used! Thanks so much for the explanation of how you created this beauty! I love the colors and whoever this is for will love it too!
joni
arcocha@yahoo.com
LikeLiked by 1 person
I love your inspirational colors and especially your shaker front! This card is so much fun!
LikeLiked by 1 person
Your card has so many details and is just fantastic. Who wouldn’t love to receive this card!
LikeLiked by 1 person
So many fabulous details! Thanks for the detailed instructions.
LikeLiked by 1 person
Wow, your pop up boat/shaker card is fabulous! Thank you for the tutorial, I appreciate that you take the time to explain how you create your cards as I always learn so much!
LikeLiked by 1 person
I love shaker cards! This evokes the idea of the ship rolling over the waves!
LikeLiked by 1 person
I do enjoy and like to make nautical cards, thank you for sharing such good instructions!
LikeLiked by 1 person
Wow, a shaker and a pop-up! So awesome! What a perfect masculine card! lcunningham2@sbcglobal.net
LikeLiked by 1 person
Hi Nicky, wanted to hop on by and check out your beautiful card. I enjoyed watching how it all comes together. You did a wonderful job. Thanks for sharing it with the world. Hope this comment gets through it’s my 2nd attempt. ; )
LikeLiked by 1 person
Thank you sooo much for the step by step! I LOVE your sail boat and the RWB! Gorgeous card and details! meghan.kennihan@gmail.com
LikeLiked by 1 person
Wow!! Clear instructions. Lovely the Wooden pop up boat…
LikeLiked by 1 person
what a oretty card!!! cant wait til mine arrives!!! jeanmheming@aol.com
LikeLiked by 1 person
Like the way you accented pieces like the anchors. It really gives them a more dimensional look.
LikeLiked by 1 person
Wonderful boat creation.
LikeLiked by 1 person
Thank you for showing how to do a shaker card with the Lorna Label. I like that as an option. Great card.
LikeLiked by 1 person
Wow! The sailboat dies are a hit with me… so many ideas beginning to arise. Thanks for adding more.
LikeLiked by 1 person
Beautiful card! I love your colors and your highlighting!
LikeLiked by 1 person
I think I need to get the sailboat die after seeing your beautiful and creative card! Thank you for sharing all the details!
LikeLiked by 1 person
Very delightful card. We used to have a sailboat so my husband would love this card.
LikeLiked by 1 person
Love all your detail! And your determination to use the blue paper for the water on the inside of your card! Sounds like something I would do if I only had so much of the perfect paper. 🙂 A very nautical looking card in the end!!
LikeLiked by 1 person
I can’t wait to try to make a girl pirate! 😀 Too cute! I’m also interested in your Lorna shaker!!
LikeLiked by 1 person
I love seeing ideas for cards using the new dies. This card is definately one I believe I will be trying to copy. Thanks for the idea.
LikeLiked by 1 person
made me think of the song “Come sail away with me”….perfect shaker birthday..rockieriverrover@gmail.com
LikeLiked by 1 person