
Welcome back, today’s card is for the Karen Burniston design team challenge. This months challenge was “Vacation” and she asked us where we would like to go. I scratched my head a bit with this one because I don’t typically go on “Vacation”, not that I don’t go anywhere it’s just that I don’t typically consider it a vacation. Thinking back on the years of the vacations we went on while raising our children we typically went to my home town. But is “home” a vacation? And the more I thought about it, I decided yes, it was. I was raised in northern Ontario on the north shore of Lake Huron, but I’ve spent my adult life in the Prairies, so when ever I have taken my family there it has always been a fun time, hanging out on one of the many beaches or relaxing at my parents feeding the chipmunks, squirrels and a sneaky racoon peanuts and what ever other snacks that were handy. Once the seed was planted in my heard there was no turning back, and this is what I came up with.


I am not typically a colour artist, but I have been just drooling over some of the amazing cards by Jennifer Webster and thought I’d pull my markers out to add a little dimension to the some of the elements on this card. I don’t give directions as I am just winging it, lol. I used some older Stampin Up alcohols markers and some Chameleon Alcohol Markers
All the fun is in the reveal, to see this card in action please check out my FACEBOOK page, feel free to join if you would like to share your own crafty creations. You can also see a video of this card on my INSTAGRAM page.
For anyone who typically follows me you may notice that I will be making a few changes. I am trying to stream line my blogging a bit as I am finding it quite time-consuming. I have decided that since the majority of my cards, I use die sets from Karen Burnkston. Karen makes amazing videos, so if she has a video that explains the assembly of her mechanism or other dies I will link it. I will still give dimensions and helpful hints, and will definitely still explain any changes I make or other important info. The links I share are to her product page for that item, scroll down the page and she has video directions. Because of these changes I will add the links as I work my way through the post instead of at the end. So there in no mix up on what dies I used for each steps.
1- I cut the base to the dimensions shown and the 2 end pieces from the Slim Flaps and Frames set, instead of having 2 flaps in the middle as per the diesets direction I made one large flap, cut to the dimensions shown. ⬇️
2- adhere as shown

3- I wanted to make a permanent cloud template so I used the cloud die from the Natures Edges die set and a thin piece of plastic packaging. I used the lid of a Costco container that is used for baked goods 🥐
4- using Soft Sky ink and a sponge dauber I created a cloudy sky background

5- to make panels for the inside I used a small rectangle from the Slim Flaps and Frames for the side flaps, and the top flap measure as shown ⬇️
6- middle panels measures as shown ⬇️

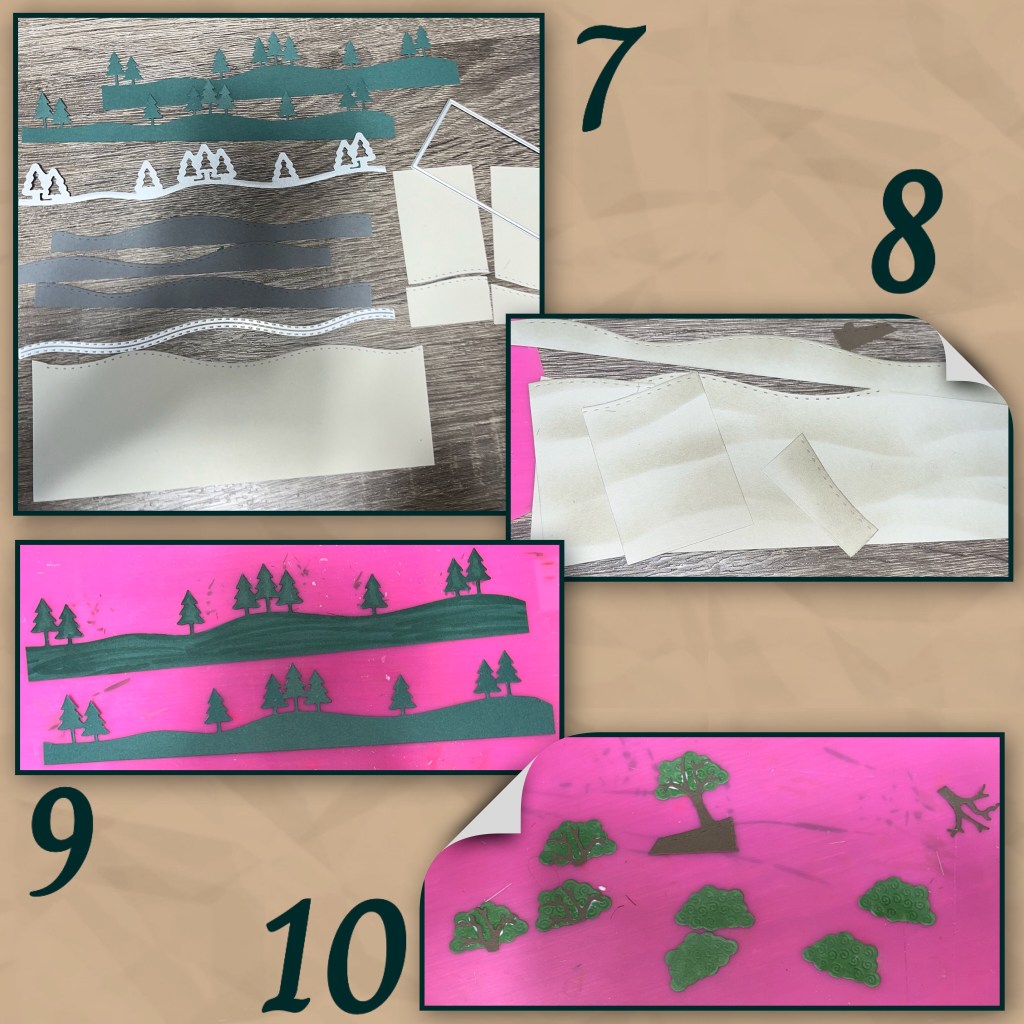
7- using the Long Nature edges die set I cut out the pine trees, hills, and beach sand.
8- I also made a permanent template for the hills, and sponged hills into the beach sand
9- using alcohol markers I tried to add some dimension to the green hills, trees and the grey hills
10- using the trees from the Natures Edges 2set, I cut and coloured the tree tops and trimmed them into bushes.
11- I added the green hills and trees to the grey hills then added them to the card. I added the first row of sand, then the second row of sand, and the side panels too

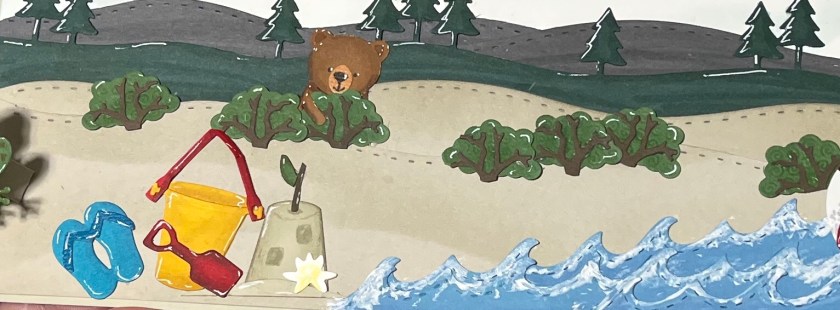
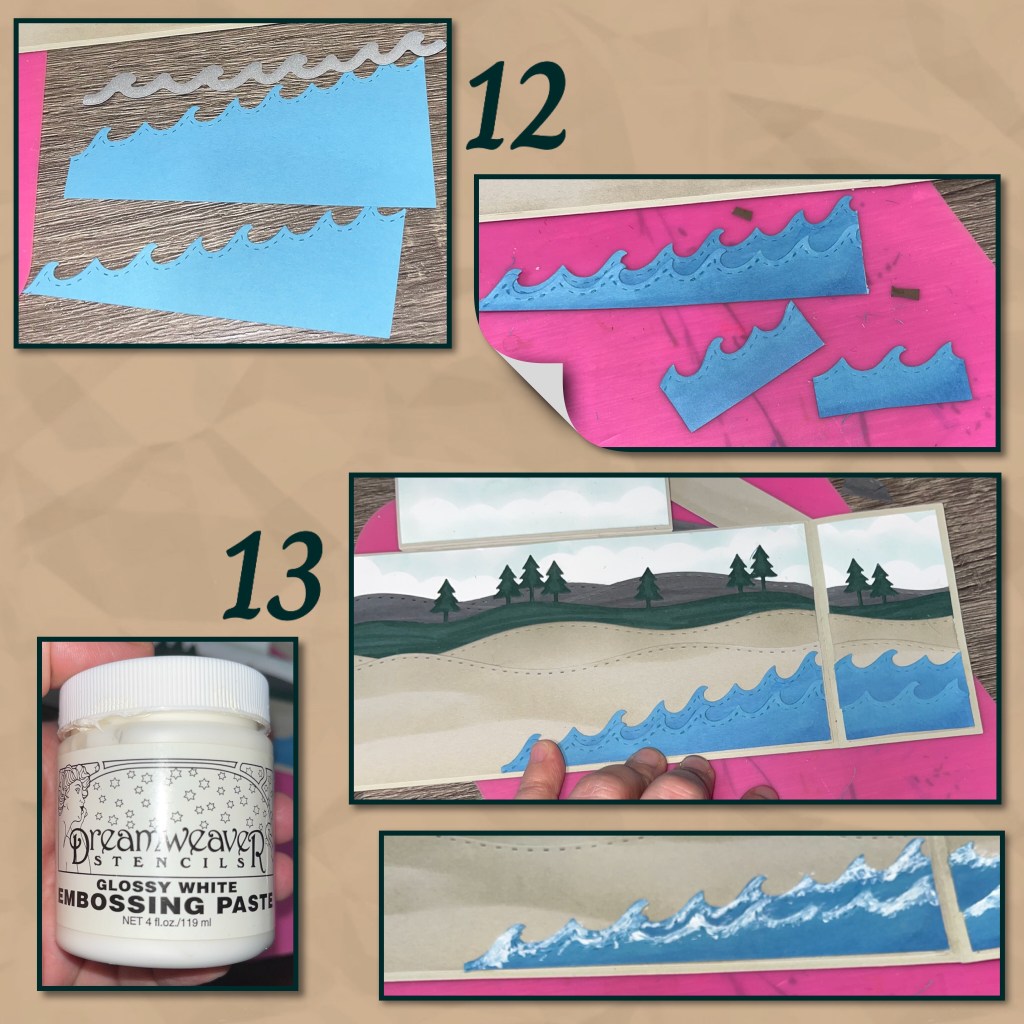
12- I used the waves die from the Tropical Scenes die set to cut out the waves, and I coloured them with alcohol marker to give some depth
13- using embossing paste, I added some white to the waves. Yes the great Lakes have white-capped waves.
14- I die cut the larger of the 2 mechanism from the Mini Pops die set and added to the card. The frog and cattails are from Bayou Animals, I added the frog to the mini pop.

15- I used the smaller mechanism from the Mini Pops dieset and the beach ball is from the Beach Charms dieset. I used alcohol markers on the ball and added to the mechanism. I couldn’t tell you how many beach balls have been lost to that lake. Lol.

16- it is not uncommon to see a bear at the beach, you usually want to change beaches if this happens, so I have the bear from the Winter animals dieset peaking out from around some bushes. The flip flops are from the Beach Charms set and the sand and pailmi have is from a previous release set, but the now come with the Adirondack Chair dieset. I added all these cute elements to the card.

17- ooops, now that I have added all the fun stuff on the inside, the sides flaps don’t meet up with the middle. I die cut the pieces for the side flaps from the smaller dies from the Slim Flaps and Frames. The middle pieces are actually the largest die from the Rectangles Crosshatch cut from green, then the next size down from white, then layered as shown.

18- I added mini magnets to the backs of the small white panels before adding them to the card, making sure that the magnets are on the inside next to the middle panel.
19- add a loop of twine to the middle of the middle panel. Then take 4 new magnets and sit them over where the other magnets are on the side flaps. Add glue dots on top of the magnets.
20- adhere the large rectangle over the the middle flap, it will hang over the edges, press the sides down so they make contact with the magnets, they magnets should now be on the sides of the large middle flap. I cut 2 thin strips to cover the magnets on the inside. There is one slightly peaking out.

21- using another die from the Slim Flaps and Frames set and some scraps from making the inside I am decorating the side flaps. I created the raccoon and squirrel using the Woodland Animals die set. The little peanuts are from the Safari Animals die set.
22- using the next size down of the Rectangles Crosshatch and matching cardstock I continued the beach scene and added it to the middle flap.

23- I added Happy Father’s Day and a flip flops and shovel to match the inside. The clouds are from Natures Edges 2 set
24- the XOXO is from Wordset 9 Love and the dragon fly is from the Flutter Charms , I made a bit of a mess on the waves when I was attaching the pop up, so I added another row of waves.

Other tools used
Tools

Awesome details! Love all the cute critters!
LikeLiked by 1 person
What a fun and interesting card, I love the critters. Thank you for all of the detailed info. on how this card went together.
LikeLiked by 1 person
I love how fun and colorful your card is Ms. Nicky! I loved camping as a kid, when I could get up and down off the ground with little trouble. lol. Now my favorite type of vacations is cruising on a ship. My dream would be a cruise to Australia, and home.
LikeLiked by 1 person
I love your little beach scene with the woodsy critters for dad!
LikeLiked by 1 person
Fabulous card, I am always in awe of your designs and ability to use those dies perfectly ♥
LikeLiked by 1 person