
Ooohhhhh it’s that time of year, and as we are gearing up for Halloween we have a Halloween themed challenge for the October Karen Burniston Design team monthly challenge. Our challenge was to have at least one Jack-o-Lateran on our cards. I have a few, but I also decided to make one of them the closure for my card 🎃
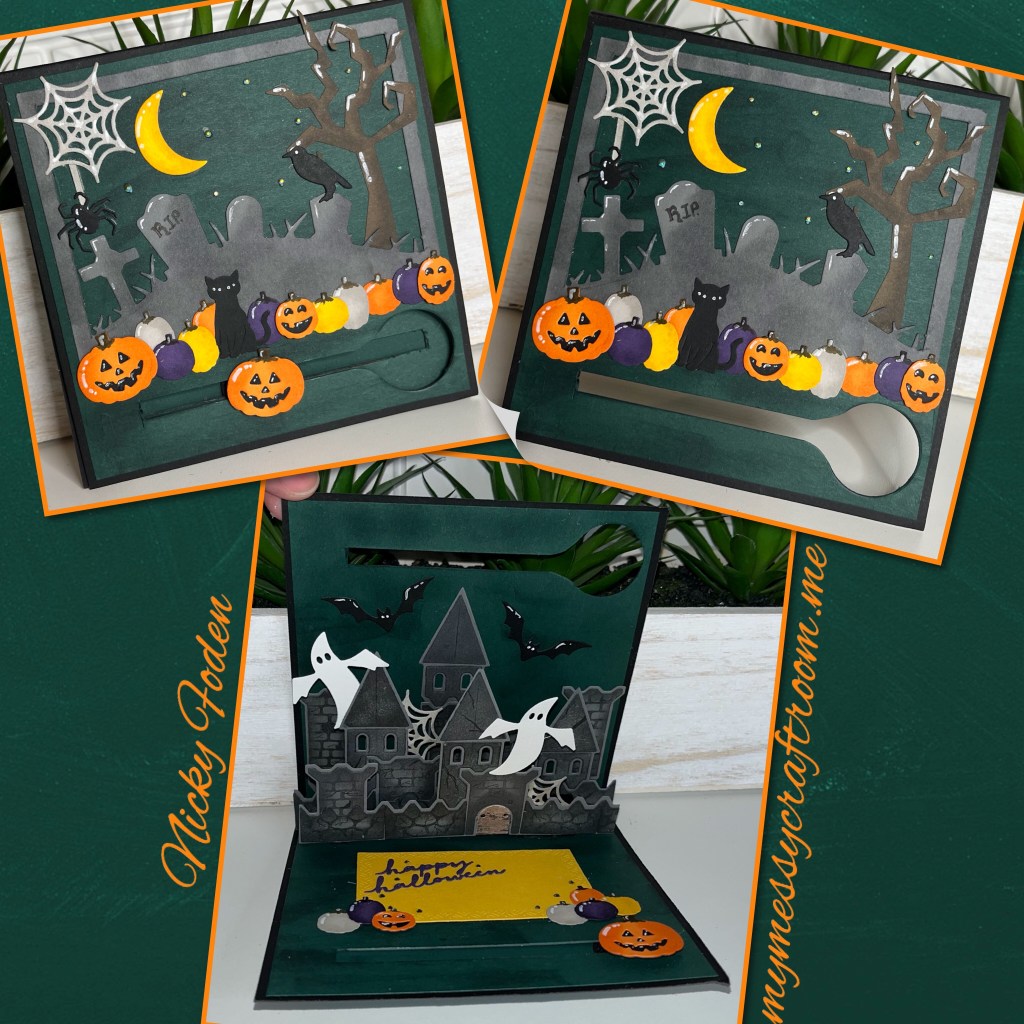
All the fun is in the reveal, to see this card in action please check out my FACEBOOK page, feel free to join if you would like to share your own crafty creations. You can also see a video of this card on my INSTAGRAM page.
I used quite a few different diesets I will list them at the bottom.
Soooooo like a lot of my cards this one started off ALL wrong. My original plan was to add all the castle pieces to the surprise cubes but with the mechanism I had in mind, there was no way that the boxes would fold AND not be in the way of the closure. But I wanted to use the closure to actually keep a card closed that has some pushback, so I decided to use Bam Boxes

1A- I cut out multiple castle pieces all from the same shade of grey, I like to cut apart different sections and make different combinations. HELPFUL HINT when cutting the castle pieces that have the brick and stone details, tap the die into a Versa Mark pad (it is very squishy pad) before diecutting, then when you cut the die acts like a stamp and the bricks and stones are stamped and the shape is cut in one pass through your diecutting machine. Note- some of Karen‘s dies have a feature to them that makes them so they are meant to stamp and cut at the same time. This is not one of those dies. So you have to use an ink pad with squishy pad. Some of the firmer ink pads will not work with these dies for this method.
B- I used a sponge dauber to add Versa Mark ink to the edges of the pieces that layer on top of the base pieces. This will make them darker. I also used a grey pen to draw cracks in the bricks and on the roofs.
C- layer the darker grey pieces onto the base pieces.

2A- cut the card base in black, dimensions below
B- cut 4 dark green panels, dimensions below
C- add the panels to the front and inside of the cardbase . NOT the back

3A- I made sure the pumpkin diecut would fit through the hole of the smallest Circle crosshatch.
B- using the smallest Circle Crosshatch I cut a circle into the bottom right corner of the card front. I should have used a small cutting plate like the used in step or putt a pice of paper between the cardstock and the cutting plate. The card front is three layers thick so I didn’t think it would fit in my machine with another layer of paper. So I took the risk annnnnnd I messed up the bottom of the card front. It if you follow me you know, I’m this far in so I’ll figure something out.
C- using my paper trimmer I cut out a channel from the circle to the left side as shown. I ended up making the trench a little wider

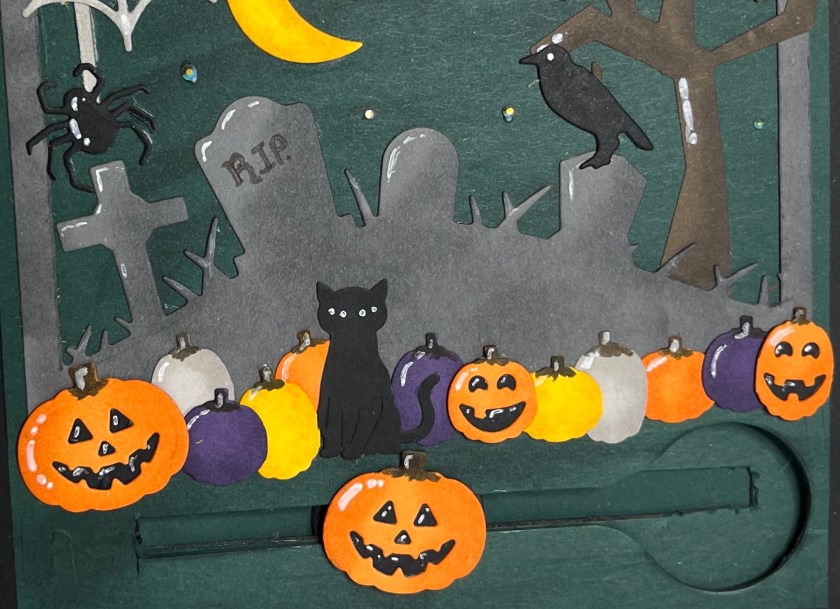
4A- I die cut a Jack-o-Lantern and a border, I added shadding with a Versa Mark Marker, and highligts with a white Gelly Roll pen
B- I diecut more borders from the different colours shown, and a cat and moon.
C- I will use the large Jack-o-lantern, the black circle that I previously cut, and a piece of foam tape that will fit and slide in the channel.

5A- with the card closed, use a pencil and trace out the channel on to the inside panel.
B- using my trimmer I cut a channel out of the inside back panel. Just the channel, not the circle. this is what it should like opened and closed.
C- add the black circle with the foam tape to the bottom channel with the black circle on the back of the card. Add the jack-o-lantern to the foam tape.
D- Make sure everything is centred so the Jack-o-lantern will fit through the hole when the card is closed.
E- now is the time to add the last green panel to the back of the card. Add the glue as shown making sure to leave space around the black circle so it can slide freely.

6A- I assembled 1 Bam box and 1 small Bambox WITHOUT the elastic bands. I was using them as a box pop up. I glued the larger one to the left and the smaller one on the right, glue them to base where the bottom meets the top.
B- add the wall and the short tower as shown to the small box
C- add the next section as shown. Wall, tower, and turret.
D- I used some of the individual pieces and glued them to the back wall of the card to fill in some of the spaces.

7A- make a small Bam Box, including the elastic and attach it to the space in front of the first small Bam Box.
B- I am going to attach the long castle piece with the door, I added a brace to the right side, and the left side will attach to the Bam Box.
C- this is how it should look now.

Now for the front
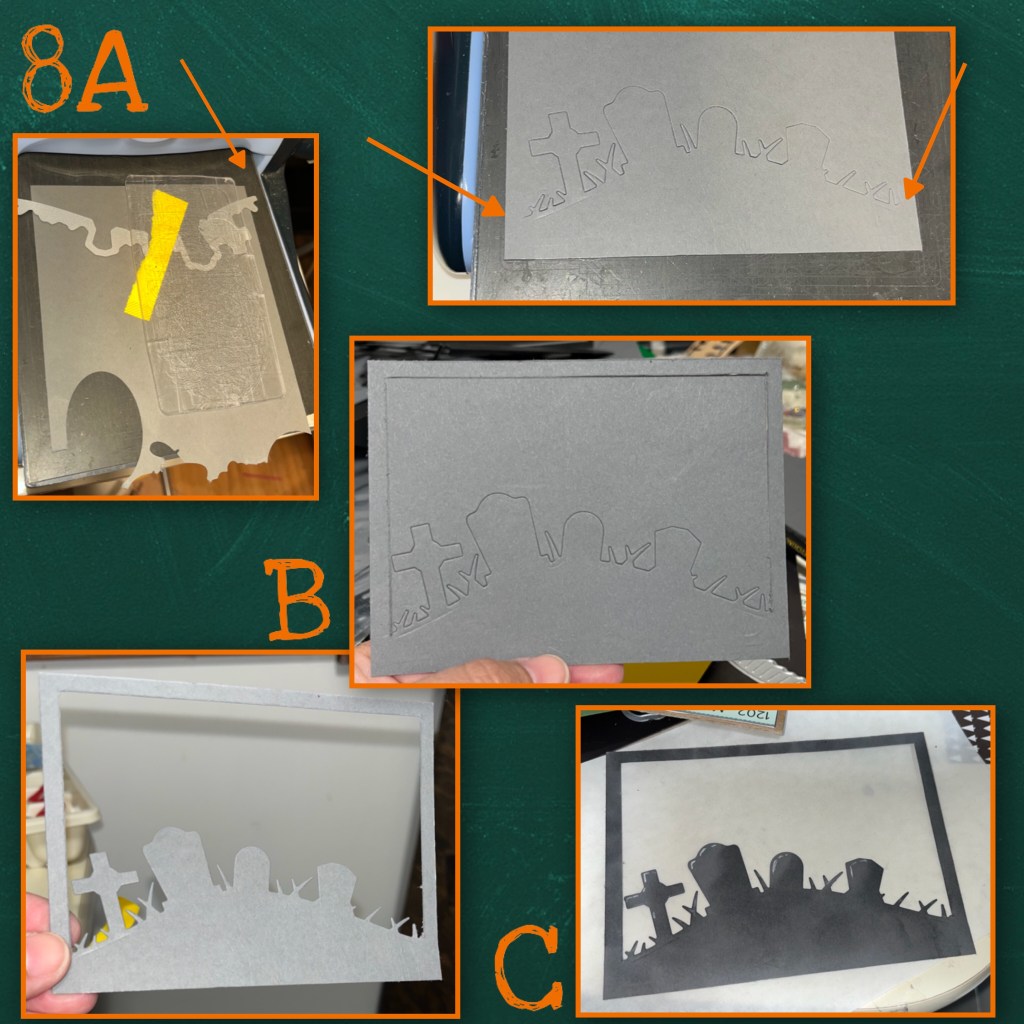
8A- using a piece of grey cardstock that is 5” wide lay down the graveyard die. I used a small cutting pad and made sure to leave a margin on the each side I did run it through for each side separately to make sure I had 1/4” margin
B- Using my trimmer I finished the frame. It is 3 1/2”high, 1/4” frame.
C-I used Versa Mark ink and dabbed it on the frame and grave stones.
9A- I cut out more pieces, Tree, web, spiders,ghost, greeting…(will all be listed at the bottom) I added shadding with a Versa Mark Marker, and highligts with a white Gelly Roll pen
B- I rubbed my Versa Mark Pad across the whole front of the card, make sure to go over the crease marks as well (more visible in the C photo)
C- Add all the pieces as shown,

10A- I added the greeting onto the yellow rectangle on the inside with a few extra pumpkins.
B- I added a few black gems randomly around. They look like stars on the front.


All The Die-sets Used
Circle Crosshatch small circle used for the slider
Bam Box used on the (Karen has a video tutorial on the product page at the link ⬆️ )
Small Scenes Bam Box used twice on the inside (Karen has a video tutorial on the product page at the link ⬆️ )
Halloween Scene Graveyard, tree, bat, spider, web
Halloween Charms moon
Halloween Elements ghost, crow, large jack-o-lantern on slide
Skeleton & Bat cat
Halloween Borders all the small pumpkins and Jack-o-lanterns
Small Script Halloween greeting on the inside
Rectangles Crosshatch yellow rectangle on the inside
Other Tools Used

What a fantastic card. Every detail is perfect. Love candy corn.
LikeLiked by 1 person
Such an awesome project! Love the scene with the cat and all the pumpkins and jack o’lanterns! Great colors and details!
LikeLiked by 1 person
Wow! This card really was a labor of love! (I love candy corn! )
LikeLiked by 1 person
I have never seen a slider card. It’s clever and hope to try one of my own soon. Thanks for such good instructions.
LikeLiked by 1 person
Great card! Love the haunted castle! and the closure is fantastic!
LikeLiked by 1 person
What a fun card! Love the 4 eyed cat!
LikeLiked by 1 person
Thank you for the step by step! I LOVE the haunted house inside and colorful pumpkins!!!!!!
LikeLiked by 1 person
Ooo! I’d love to have a play date with you! What an incredible card! How long it must have taken you to do this! Fantastic!
LikeLiked by 1 person