
It is the NOVEMBER KAREN BURNISTON DESIGNERS CHALLANGE and this months challenge is “Snowman”, so we had to make a card that incorporates a snowman. I decided it would be fun to make multiple snowman on one card, and show a different way to use the Snowman Add on dieset. The faces and other decorations could also be used on the Surprise Ball snowmen should you want to make a pop up card. This is what I came up with (I apologize if I’m missing anything thing, I wrote this post while flying in a plane. Lol)
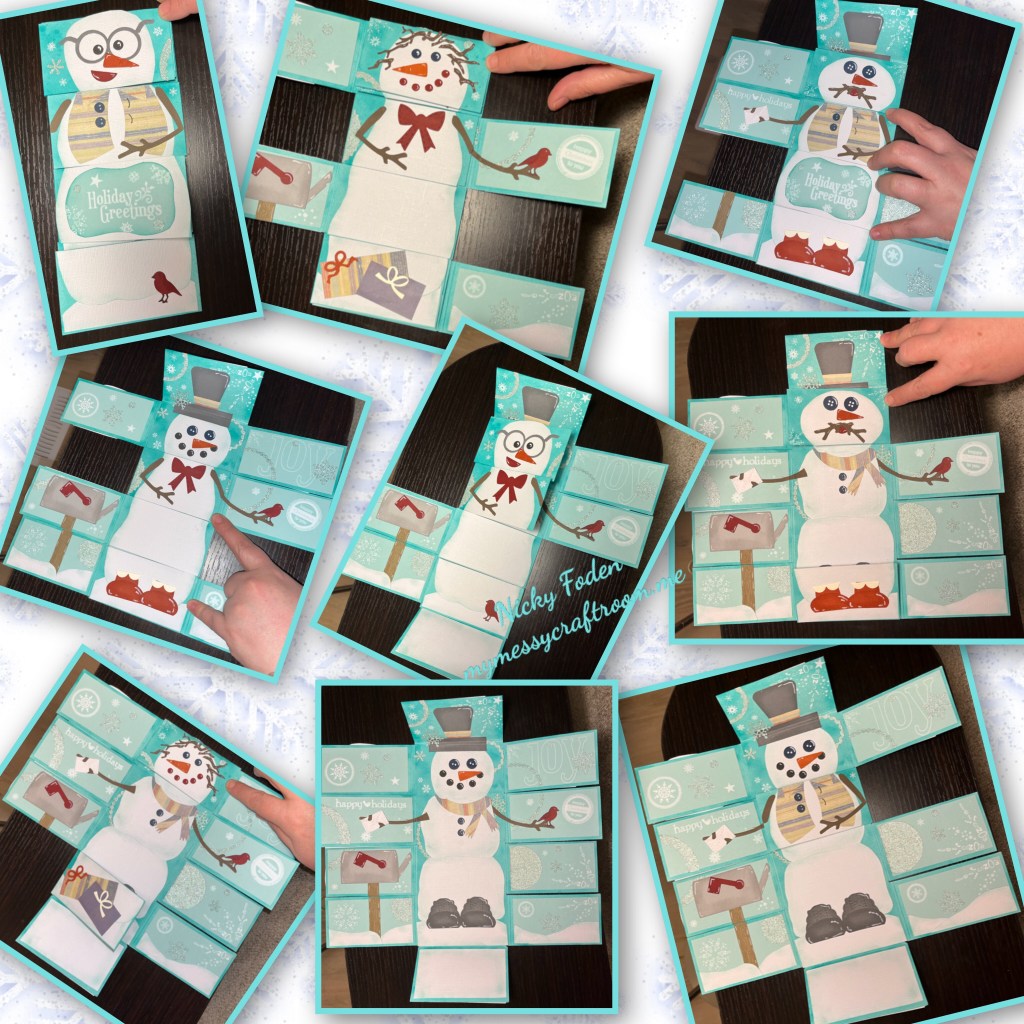
All the fun is in the reveal, to see this card in action please check out my FACEBOOK page, feel free to join if you would like to share your own crafty creations. You can also see a video of this card on my INSTAGRAM page.
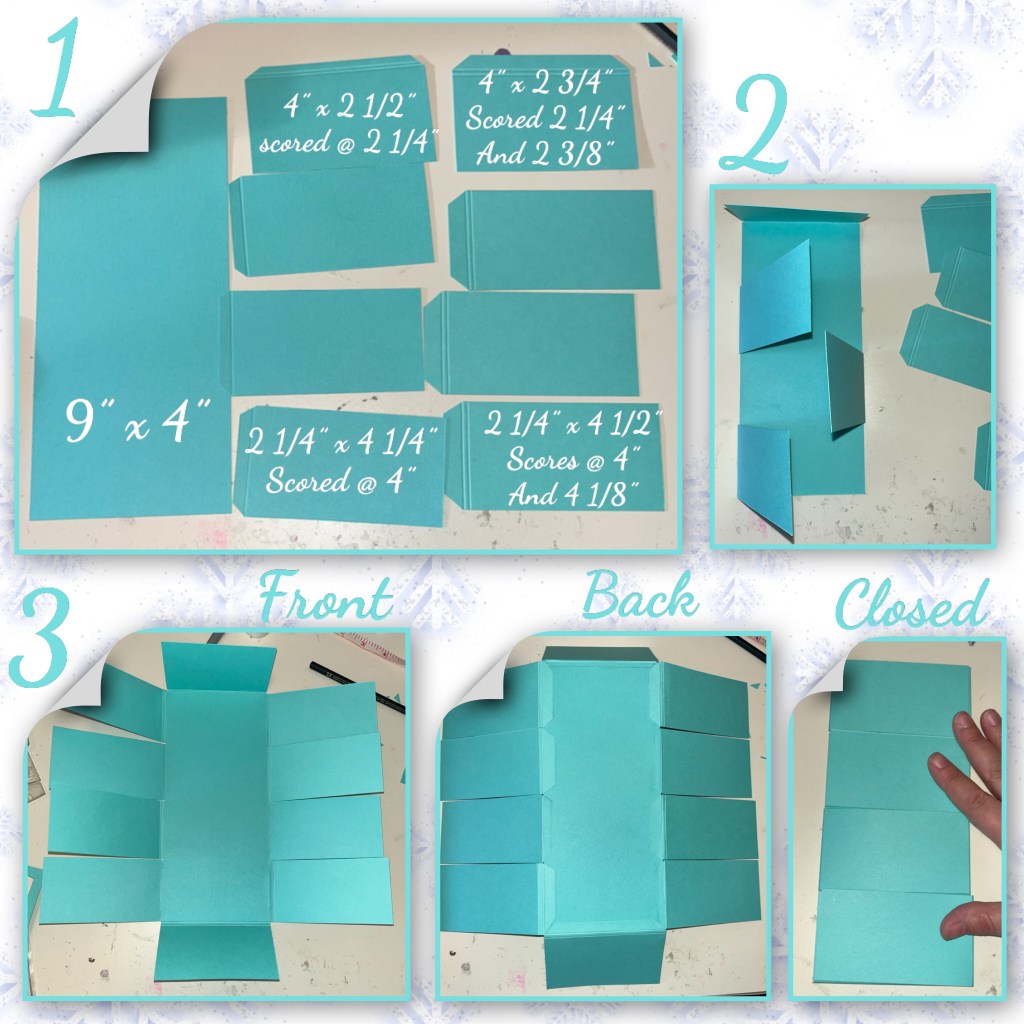
1- I started with the card base and I cut the pieces as shown below. The flams with the score lines closer together should go on closest to the card base. The flaps with the score lines further part should go on the front of the card.
2- I added the flaps as shown, like I was assembling the the Slim Flaps and Frames (link will be below)
3- I added the other flaps to fill in the spaces as shown. If I were making this card again I would do one side then the other, not opposite sides as it would close better.
4- I sprayed the whole card with a mix of liquid ink refill and rubbing alcohol. It left misty marks and a few splotches
5- I took a sponge dobber and inked all the edges. The photos make the ink look darker than it is

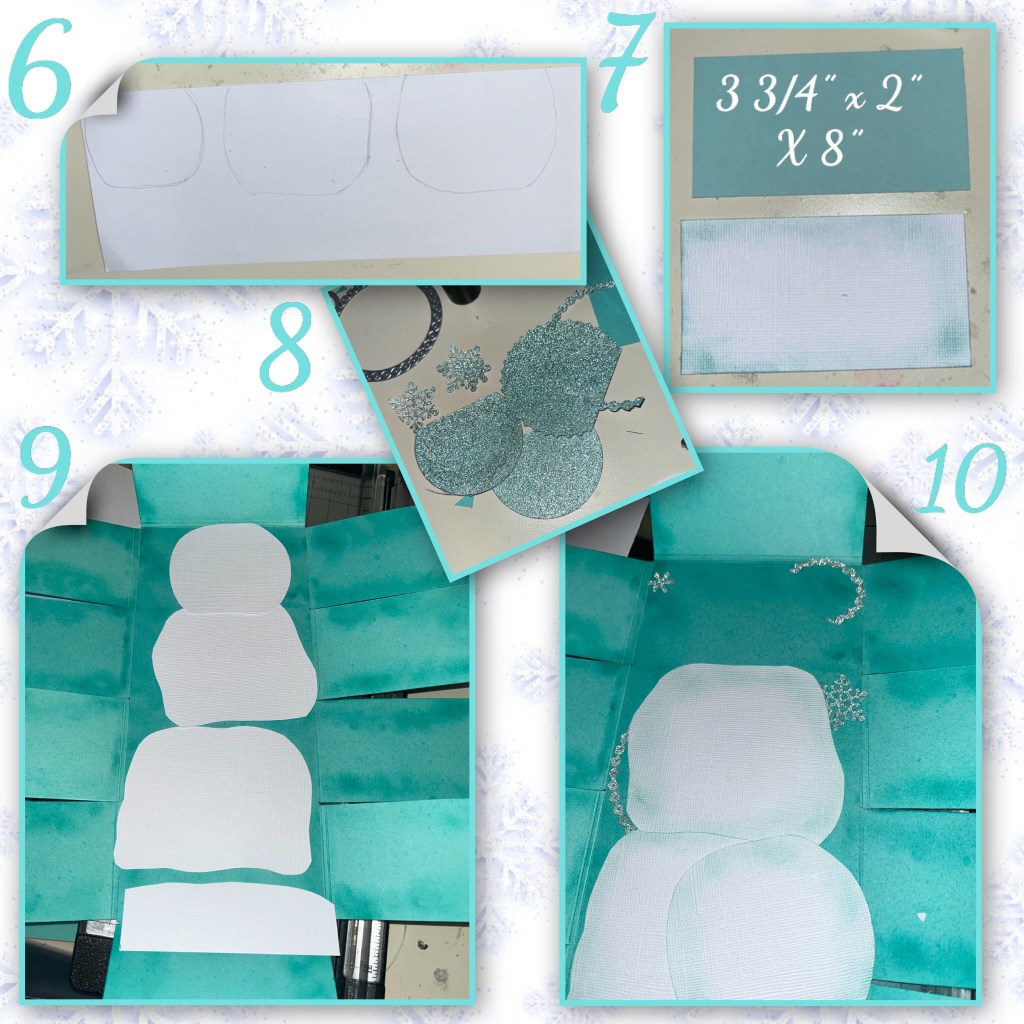
6- I started drawing the shapes to make the snowman for the bottom level.
7- I cut 8 panels for the side flaps and 1 white panel for the bottom flap.
8- I die cut snowflakes and circles and rings from glitter cardstock
9- I cut out the snowman sections
10- I sponged the edges with matching ink and started to add some glitter pieces that will be tucked behind the snow people.
11- start adding the panels and pieces

12- I was stash diving and found some Christmas themed rub ons from Stampin up. Also I picked a pattern paper for the snowman’s clothes. I didn’t want it too busy so I picked one pattern that different colours of cardstock would match with.
13- I double cut a circle to make the scarf, I also used the scarf pieces from the SnowMan Add on set
14- using pieces from the Snowman Add set set I added the face and hat, I used buttons from the Sewing Charms set for the eyes.

16-to make the boots I cut out a label and an oval for each one, I sponged the edges and trimmed as shown. I also drew on laces.
15- to make longer stick arms I cut the sticks but not all the way to the end, I drew how much longer I wanted them to be then hand cut the rest.

17- cut out The mailbox pieces from the Mail box pop up, I cut out 2 posts and sponged the edges
18-continue adding pieces and the rub ins and glitters elements.

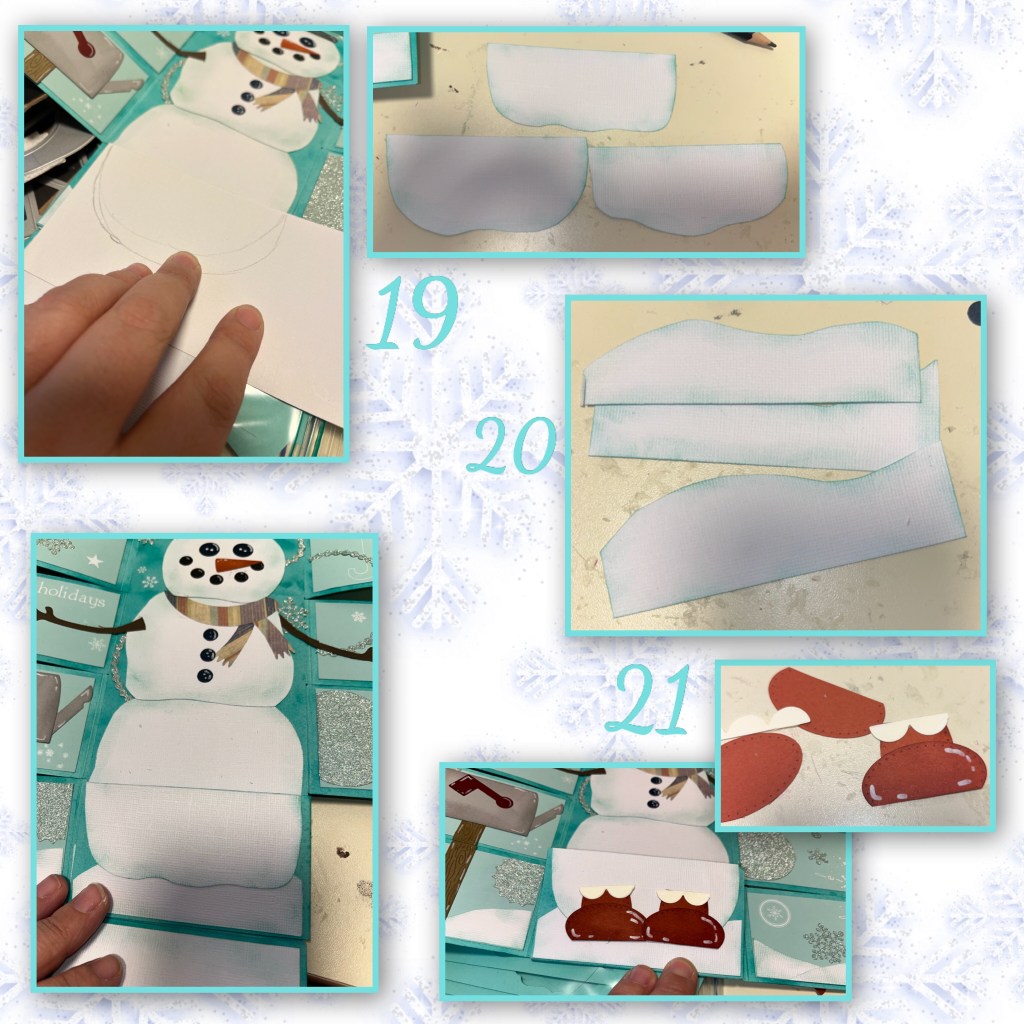
19-I used the bottom snowman as a reference to start drawing the pieces for all the snowman bottoms.
20- I cut out snow for the side flaps for all the bottom flaps
21- to make the orange boots I used 2 ovals and cut and assembled as shown
I also cut out gifts and die cut bows, show on photos at bottom
22- now for the next to the bottom panels. I tried to cut them a little differently to give each flap a different look.

23- now for the flaps under the head, again I had drew and cut
24- I made more arms. These will be longer and will have a bend so I made them in 2 pieces.
25- I hand cut the vest, added 2 of the larger dots and drew the button holes.
26- this is the bow from the Parcel pop up set

27- now for the heads. I made them all slightly different, I die cut many pieces from the Snowman add on set and the tree from the Tree pop up set (for hair)
28- to make the glasses I die cut circles inside circles and I trimmed the branches to make arms.
29- make faces as desired.

30- I found the hat band too small so a made a bit of a bigger one.

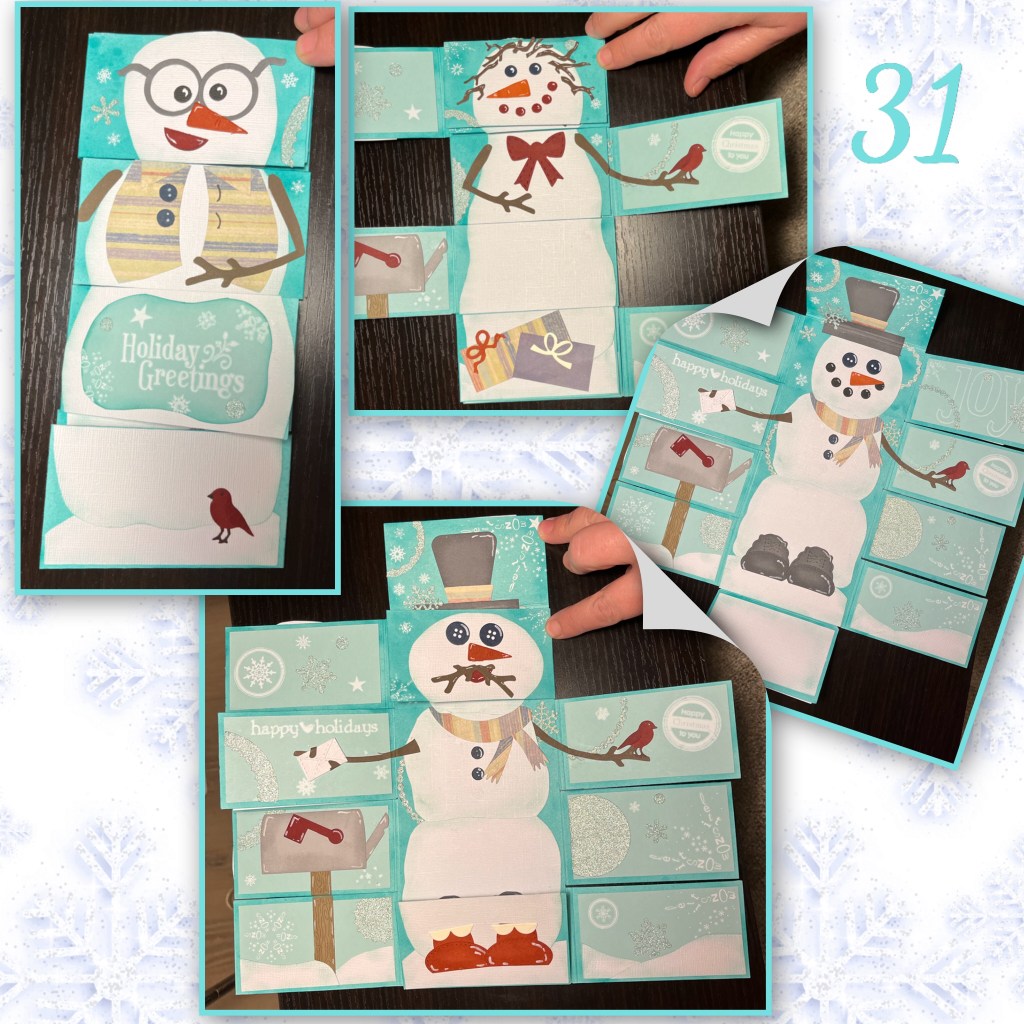
31- now flip the flaps and have fun.
32. Keep flipping lol

I used a pile of die sets here so hopefully I remembered them all. Lol
Parcel Pop up Red bow
Label Charms Pop up Grey boots
Gift Picot panels Bows in gifts
Tree Pop up hair
Frame Pull pop up birds
If I were making this card again I would use the Slim Flaps and Frames , it will do cutting and scoring of the flaps

Not sure if my first comment went through – I have difficulty getting FB to come up so I can comment – I will try again – Great inspiration and I am always delighted to see your next idea using KB dies! Fabulous! Stunning work!
LikeLiked by 1 person
So fun! Love all the variations!
LikeLiked by 1 person
This is a super clever card! So much fun to create.
Can
LikeLiked by 1 person
What a fun card!! That was certainly a lot of work!
LikeLiked by 1 person
OMG that is SO clever! I love it!
LikeLiked by 1 person
This is just too darling!
So fun to see all the
different Snowmen.
Carla from Arizona
LikeLiked by 1 person
WOW! n What fun!
LikeLiked by 1 person
So fun! Everyone would enjoy seeing all the possibilities.
LikeLiked by 1 person
Thank you so much for the STEP BY STEP! I am saving this! I have to try it! SO COOL!
LikeLiked by 1 person
This card is so much fun!
LikeLiked by 1 person
So adorable! It really helps to have your tutorial giving these great directions!
LikeLiked by 1 person
Absolutely stunning card you make so beautiful ones, the snowman looks so cute too xx aNNie
LikeLike
Love these!
LikeLiked by 1 person