

IT’S BLOG HOP DAY!!!!!!!!!
Welcome to our Karen Burniston Products – KB Riley LLC January Release Blog Hop. The Design Team have come together with Karen today for a fun blog hop to celebrate the release of 10 new dies and 5 new stamp sets. Sneak peeks of the new release started last week, and the dies are available to order NOW!

This release includes:
• 2 new Pop-up Die Sets
• 4 new Add-on Die Sets
• 2 new Lorna Add-on Die Sets
• 1 new Charm Die Set
• 1 new Stand Alone Die Set
• 5 new Clear Sentiment Stamp Sets
Dies are available to order now on the website.
GIVEAWAY:
To celebrate the release Karen Burniston and each of the Karen Burniston – KB Riley LLC Design Team members will be giving away a $25 Gift Certificate to some lucky person who comments on our blog posts, so make sure you join the hop and comment on everyone’s blog post. Winners will be randomly chosen from ALL of the blog hop comments received on our blog posts by Monday, 9th February. Lots of chances to win some goodies, so just leave a comment on this post or any other blog hop posts to enter! Don’t forget to leave some way for us to contact you, in case you are a lucky winner!

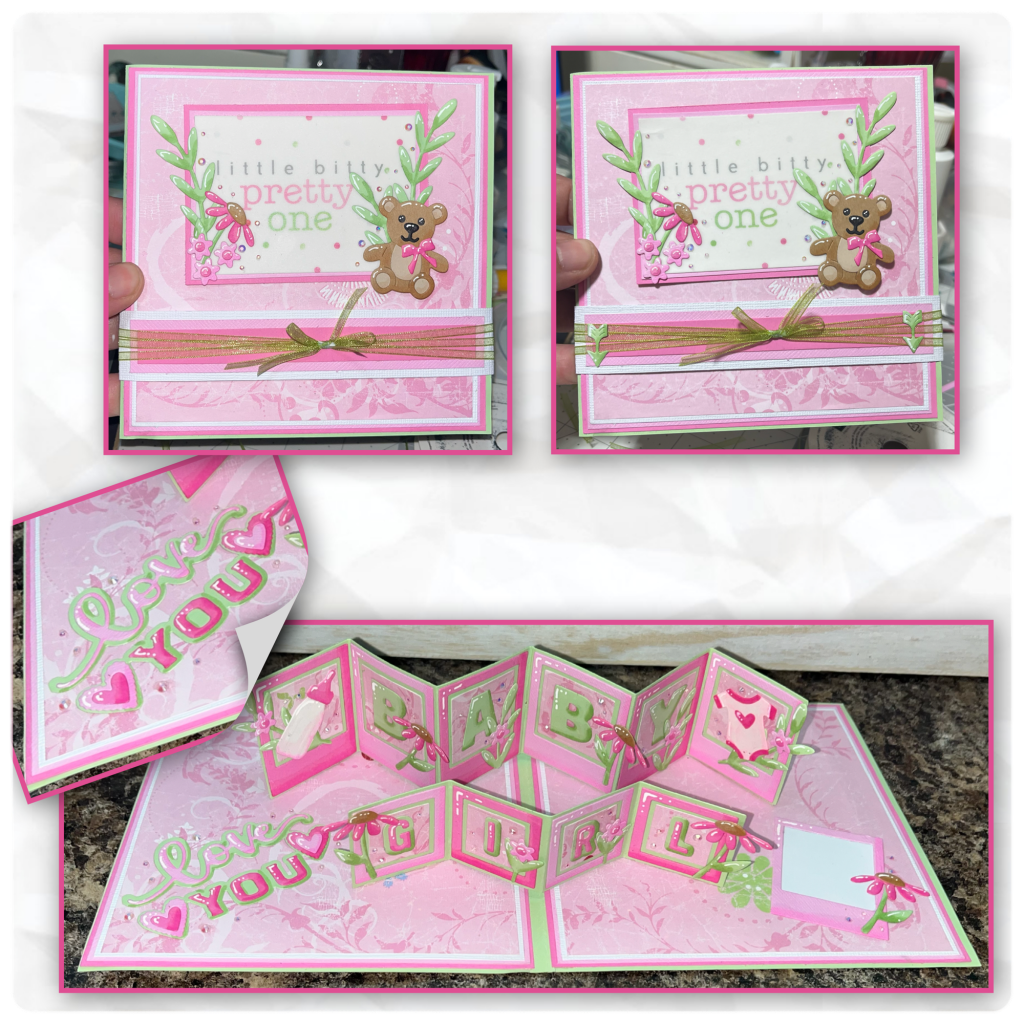
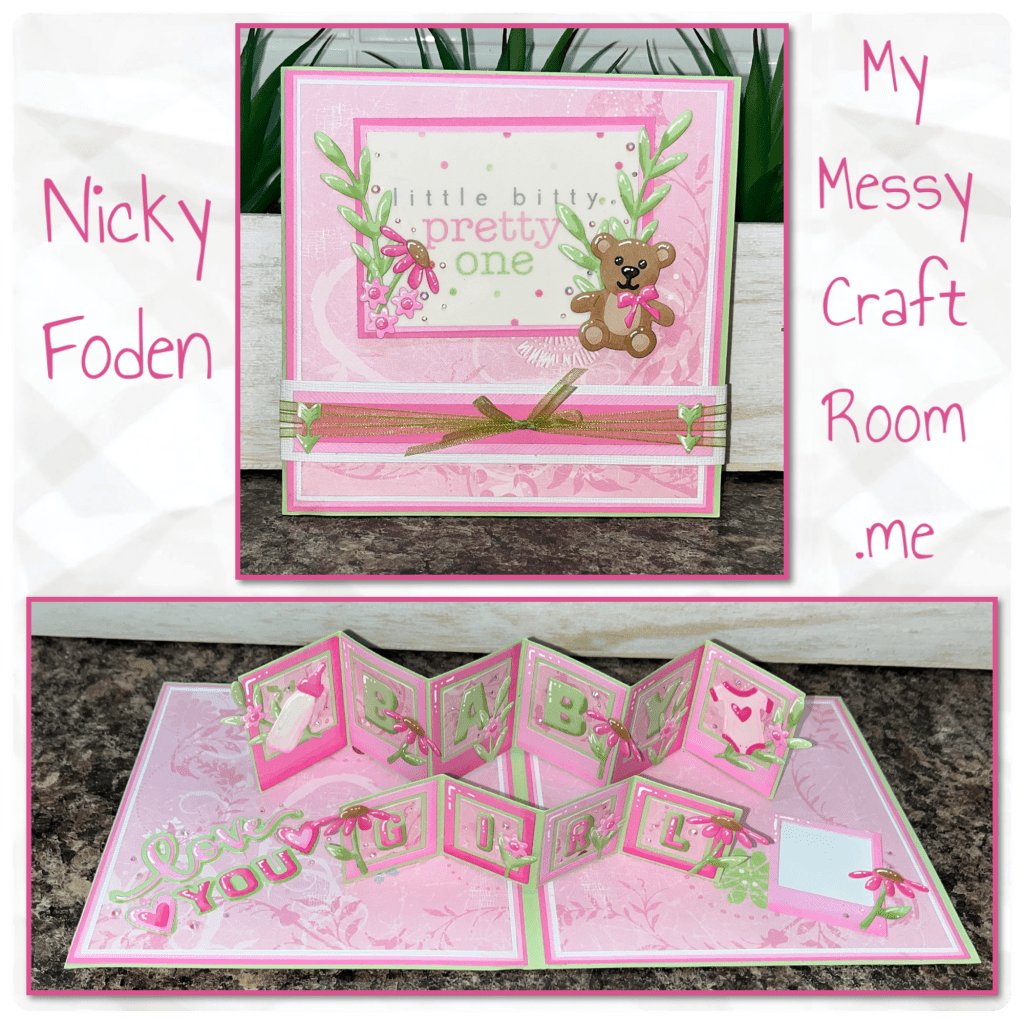
As soon as I saw the Photo Gallery set I knew I needed to make a card for my new granddaughter, I was even able to sneak in a few pieces from some of the other new sets as well, can you spot them.

All the fun is in the reveal, to see this card in action please check out my FACEBOOK page, feel free to join if you would like to share your own crafty creations. You can also see a video of this card on my INSTAGRAM page.
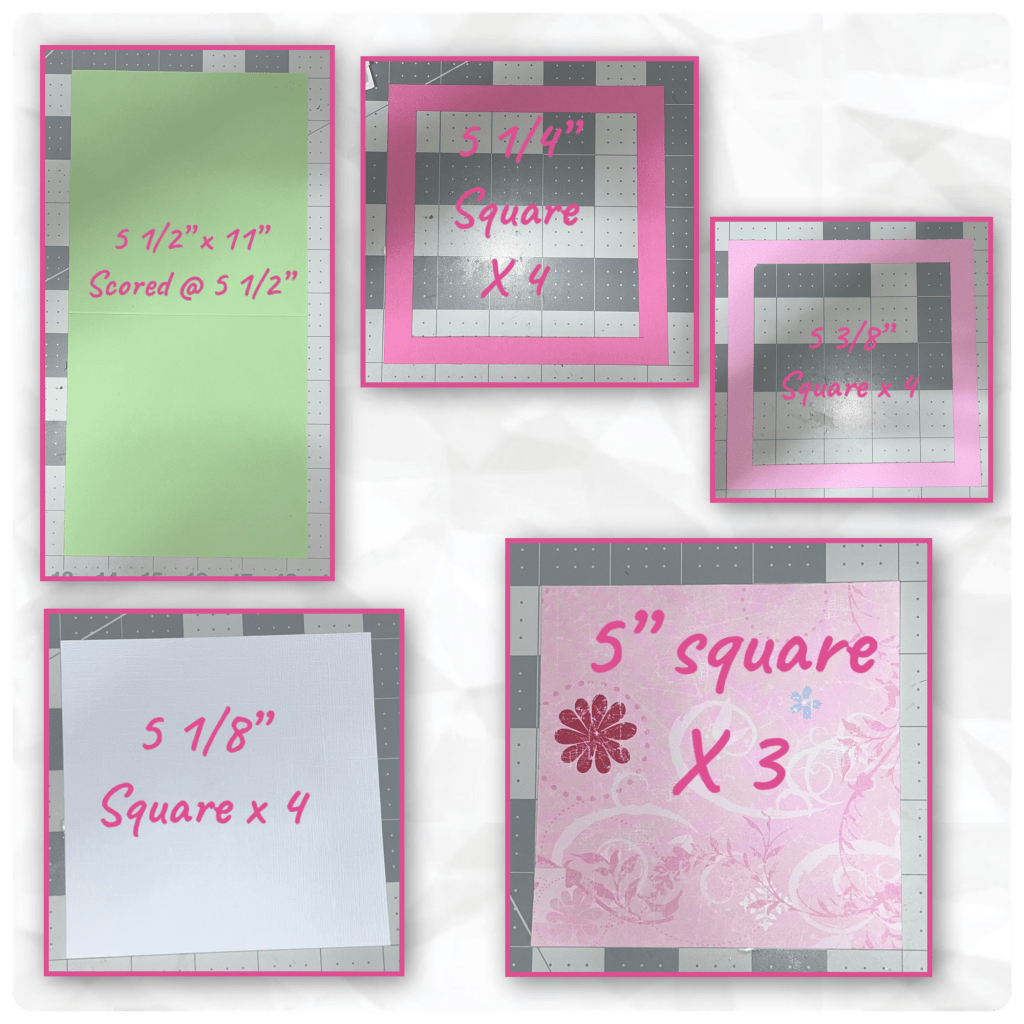
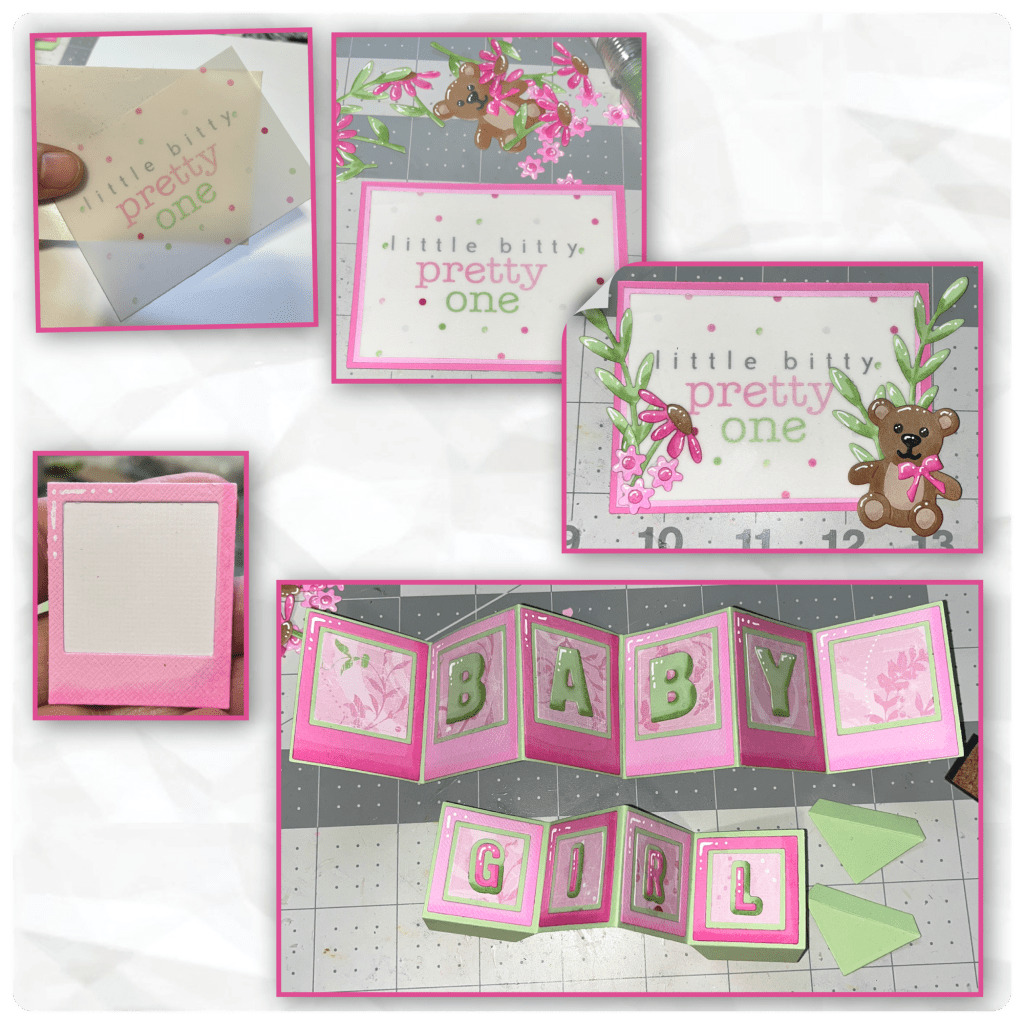
I’m not sure why but I am loving the square cards these days, so here we go… I cut the cardbase and panels as shown below, I cut the centers out of the pinks to conserve cardstock and lesson the bulk.
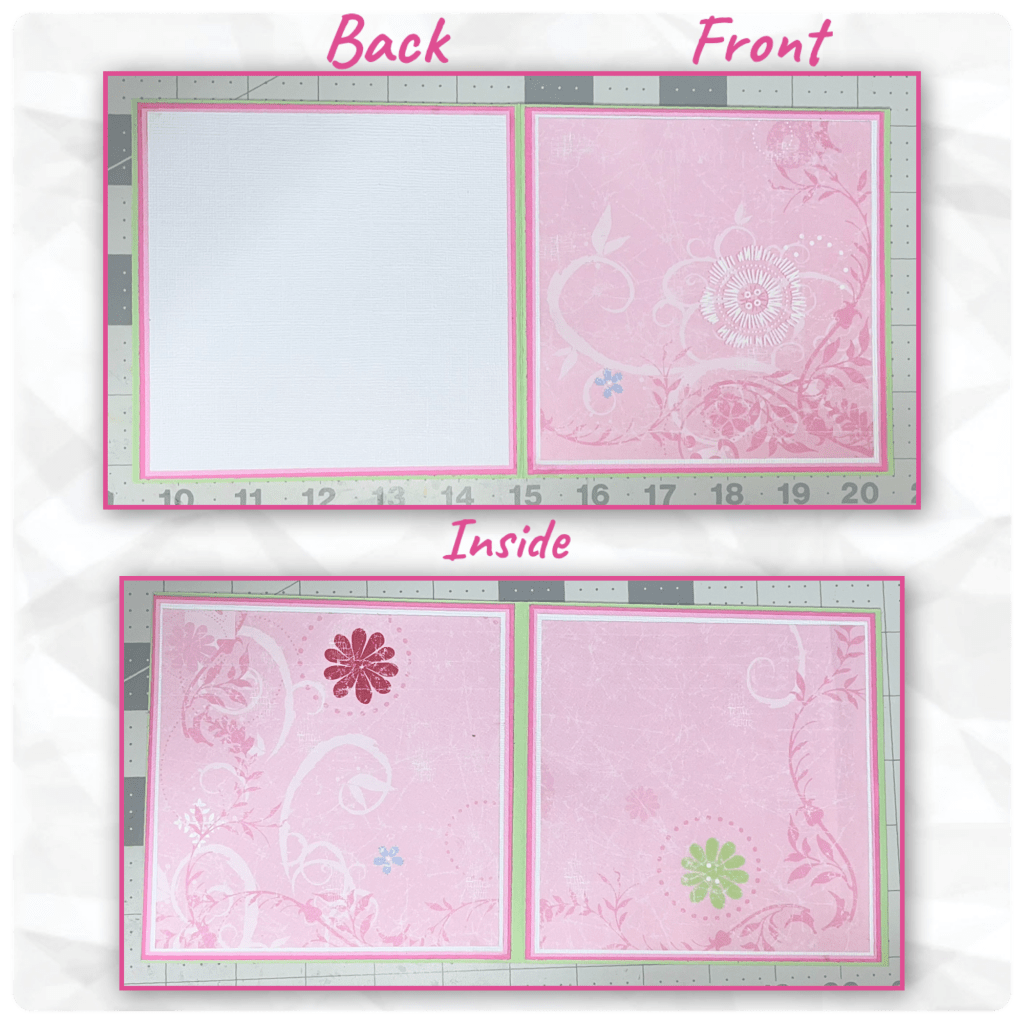
Layer the panels and add them to the cardbase as shown.
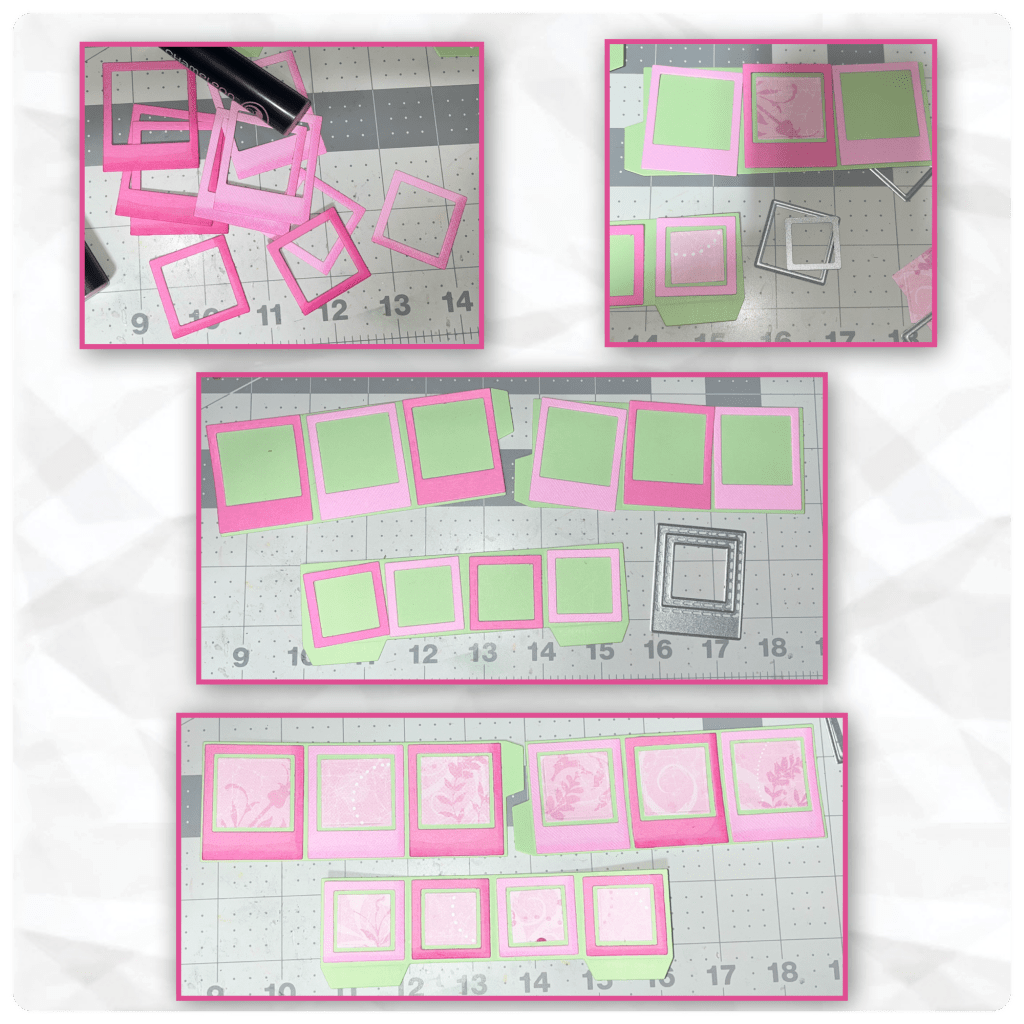
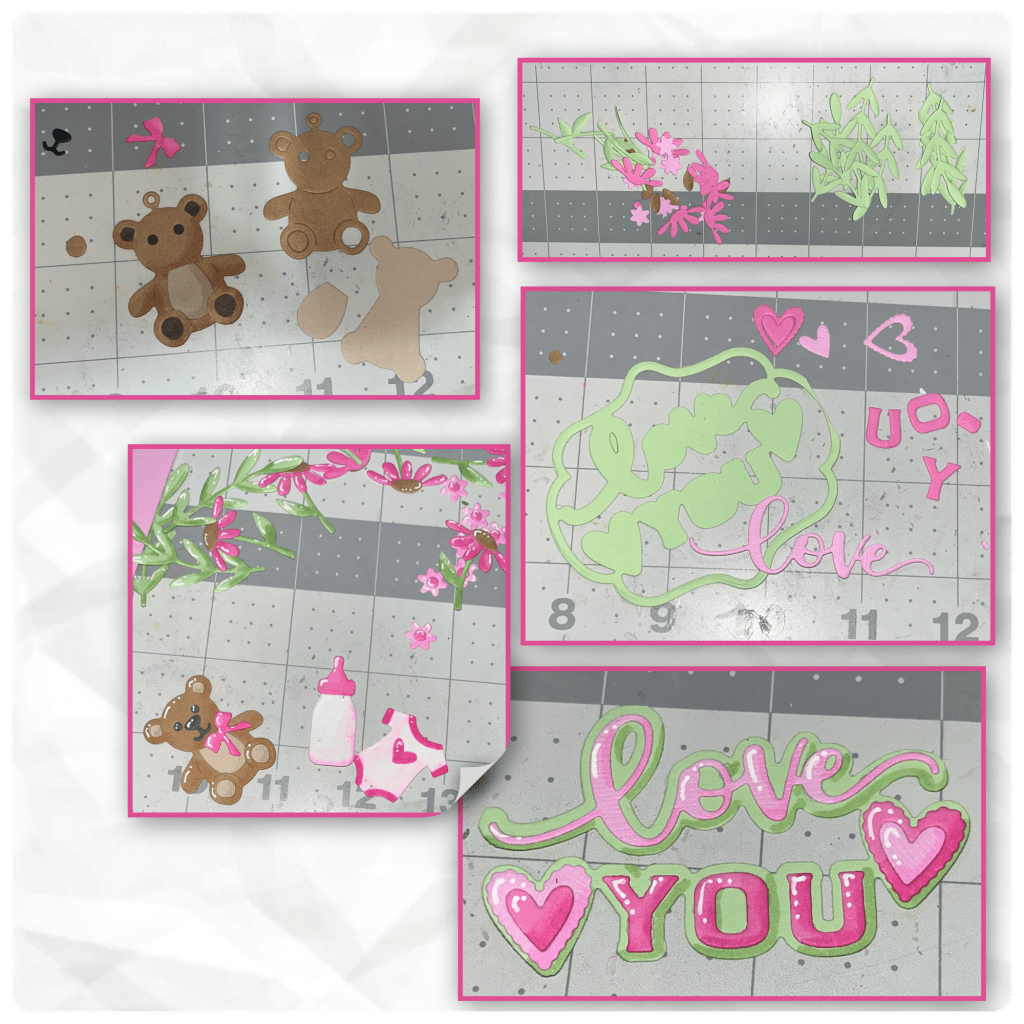
Using the dies from the Photo Gallery Pop Up, I cut out the frames from 2 shades of pink and cut out the centers from the patterned paper and assembled as shown below I added shading to the bottom right corners using alcohol markers. I added the frames to the panels from the same dieset (they are in Green)
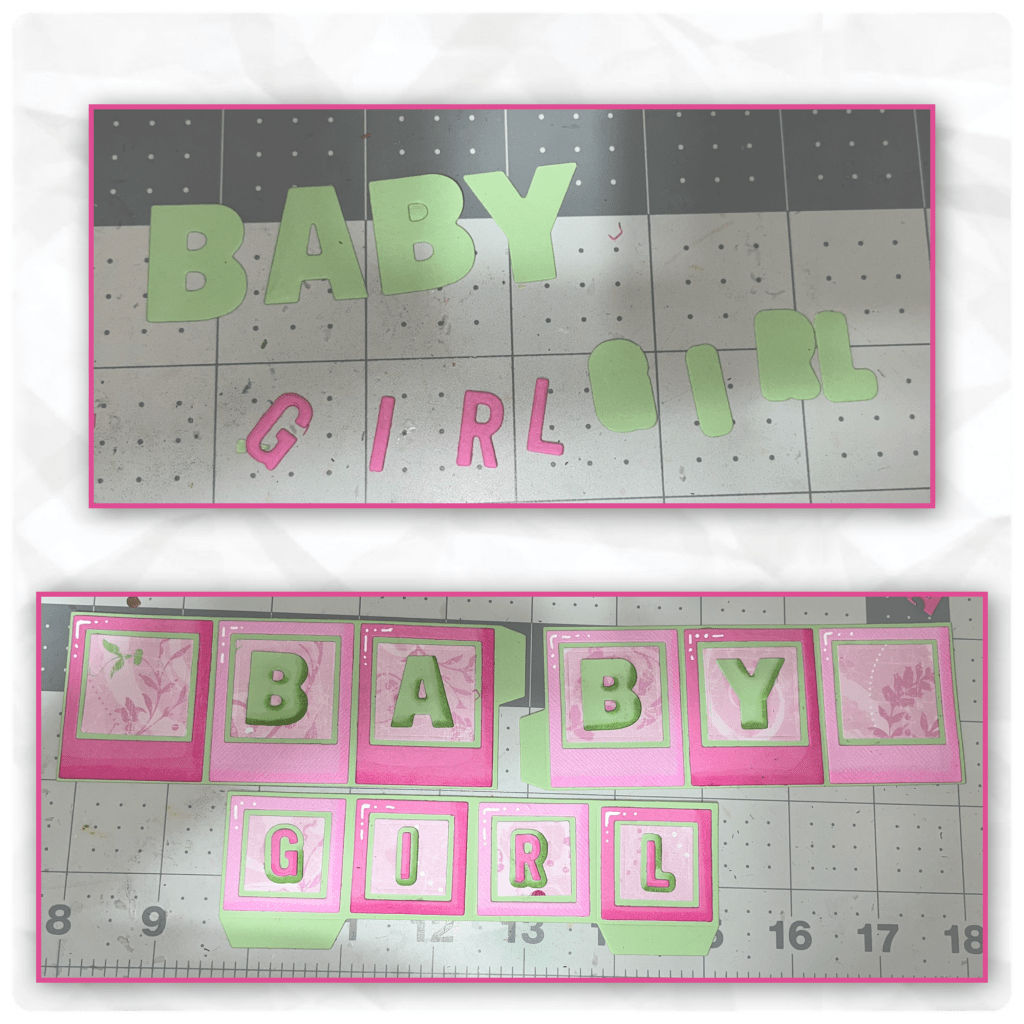
I cut out the large letters using the Alphabet die set, and the little letters and the shadows from Mini Alphabet and Numbers. added shading with alcohol markers and highlights with a white gelly roll pen.
I used a few new diesets to decorate. The teddy bear is from the Love is in the air charms, the flowers and the stems are from the new Grass Stage Add On, the Love you is from the Love You Lorna Add On The bottle and onesy are from the Baby Charms. I assembled and added shading with alcohol markers and white highlights with a Gelly Roll Pen. (I was going to make the teddy bear a bit darker but decided to go a bit lighter.)
This greeting is one that I had in my stash, it was on velum so I added double sided adhesive to the back then added it onto the white cardstock then onto the layers of pink cardstock. Each layer is 1/4” larger than the previous. I decorated the greeting as shown. I diecut and assembled another photo frame to add a signature to. I attached the panels for “Baby” together and cut the triangle pieces to add them ,to the card.
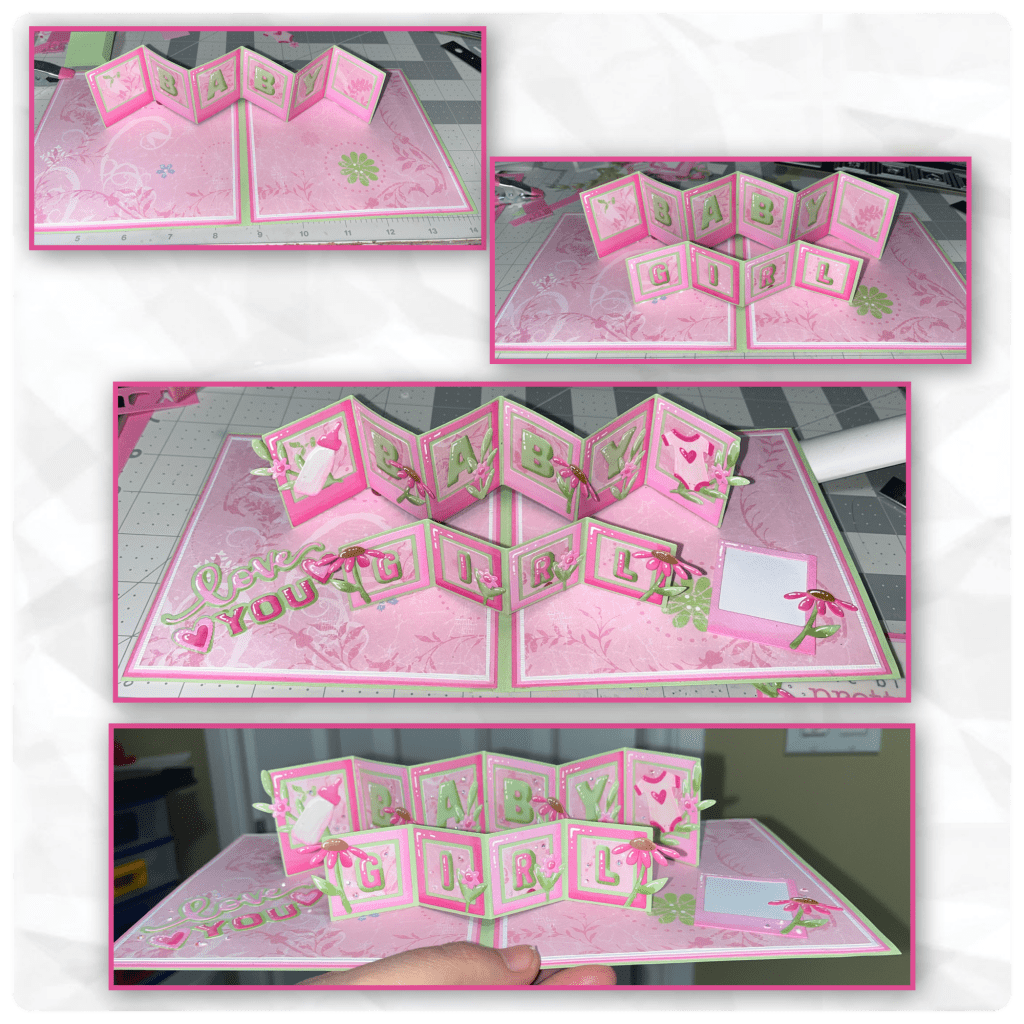
I added the panels to the card as shown (Karen will have a video tutorial on the product page at the link fairly soon ⬆️ ) I added the other pieces to the card as shown.
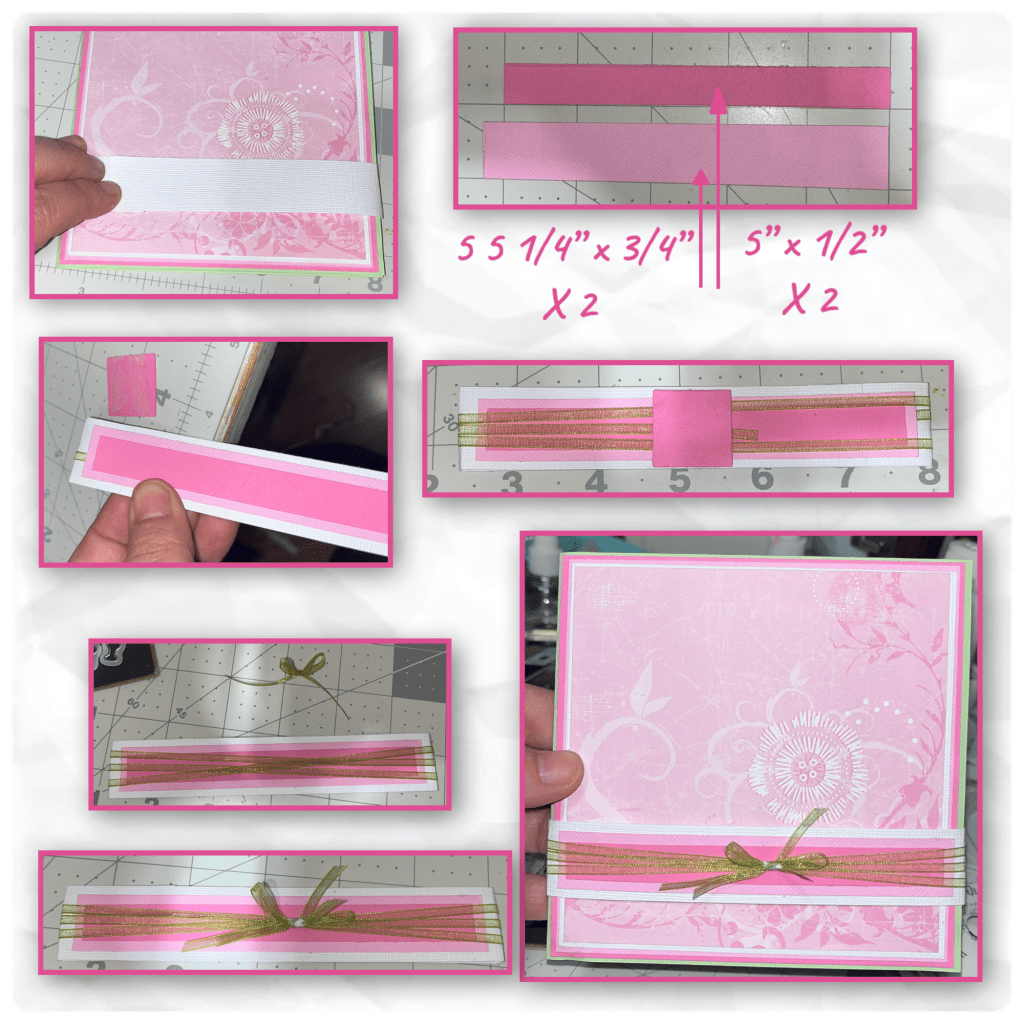
The card is thick so it needed a little help staying closed. I didn’t really measure the white band but it is 1” wide and wraps around the card and it overlaps to be glue down with one end overlapping the other. I cut the pink layers as shown, one for the front and one for the back. I have a pretty green ribbon that I glued under one of the layers and wrapped around the band 3 times and then added a piece of cardstock to ensure the ribbon doesn’t come unglued. I made a small bow and attached it to the front of the band. I like to add a little dot of glue to the knot on the top of the bow to ensure that it doesn’t come undone.
I added the panel with the greeting to the front and added the little arrows that are part of the Photo Gallery Pop Up set. I added some itty bitty gems randomly around the card.
Other Tools used
Gelly Roll White Retractable Pen
TO CHECK OUT THE REST OF THE DESIGN TEAMS CARDS
Nicky Foden YOU ARE HERE
DON’T FORGET TO LEAVE YOUR EMAIL SO I CAN CONTACT THE WINNER!!!!!!!!

such a great card, I love it
LikeLiked by 1 person
What a great card! So cute! I think the photo gallery is my favorite from this release.
LikeLiked by 1 person
Beautiful cards and wonderful clear instructions! Any new mom would be excited to get one of these!
LikeLiked by 1 person
Absolutely adorable card to welcome a new baby girl!
LikeLiked by 1 person
I commented on FB. I love this card, new idea for baby cards.
It’s great how your lay out the steps.
LikeLiked by 1 person
wow wow wow this is amazing and ever so stunning. Love this die and your designing of it. xx
LikeLiked by 1 person
WOW! Beautiful, absolutely beautiful …. set the bar high, now every year the birthday card is going to have to top it slbt17 on yahoo
LikeLiked by 1 person
The card is amazing! I love it.
LikeLiked by 1 person
Congratulations on your new baby granddaughter! This adorable Gallery Pop Up card for her will definitely become a keepsake for her. As always, thank you for all the links to the products and detailed how to instructions. All the time you spend on the shading and highlights on each die cut piece really makes your cards extra special. Thank you for all the inspiration!
LikeLiked by 1 person
Very sweet baby card with such pretty details! Love the Photo Gallery dies! Congrats on your new granddaughter!
deniseb777ATgmailDOTcom
LikeLiked by 1 person
Such a great way to use the photo pop up.
LikeLiked by 1 person
Adorable baby girl card design!
slrdowney at hotmail dot com
LikeLiked by 1 person
You always have the BEST cards and you did not disappoint with this one either!! Too cute! feliciakfd@outlook.com
LikeLiked by 1 person
So precious. Love all the details. Appreciate the step by step instructions with photos. vrc at prodigy dot net
LikeLiked by 1 person
What a perfect generic pop up set – so versatile. It’s easy to think of all kinds of uses!
LikeLiked by 1 person
WOW! The shading you added to the bear & words add so much. Thanks for the step by step instructions.
LikeLiked by 1 person
Great card!
LikeLiked by 1 person
Love your idea for the new release.
LikeLiked by 1 person
I ADORE this! Thanks for the step by step! The new dies are fabulous! LOVE your colors! meghan.kennihan@gmail.com
LikeLiked by 1 person
l love this idea!
LikeLiked by 1 person
I love this idea… perfect for a new baby card. For a boy, you could just add an exclamation mark. Love it!
LikeLiked by 1 person
Very pretty card!
LikeLiked by 1 person
I love the colors of this card, especially the fact that you used a shade of green with the pink instead of blue, which I often see. It’s lovely.
LikeLiked by 1 person
Such a pretty card! I think Im going to love this die.
LikeLiked by 1 person
a lovely card.
LikeLiked by 1 person
a lovely card!
LikeLiked by 1 person