

Finally, I got to play Craft Roulette this past weekend, it’s been months. I wanted to work in my new Riley Stamps with this week’s parameters, and this is what I came up with.

So it’s noticeably a square card, Dairy Aisle colours would be all the bright colours that can be found in the yogurt section, and chocolate milk of course. The leaves can be found in the bouquet that’s on the front, and I have several hexagons through out. I used 3 sets of stamps from Riley and company, they are the sets that were available during Stamptember the last three years, they are not currently available but there are several Adorable Riley Stamps to chose from.
All the fun is in the reveal, to see this card in action please check out my FACEBOOK page, feel free to join if you would like to share your own crafty creations. You can also see a video of this card on my INSTAGRAM page.
I chose this fun patterned paper because it reminded me of the bicycle wheels, I knew I was going to use the Riley on the bike stamps. I cut the cardbase and panels as shown.

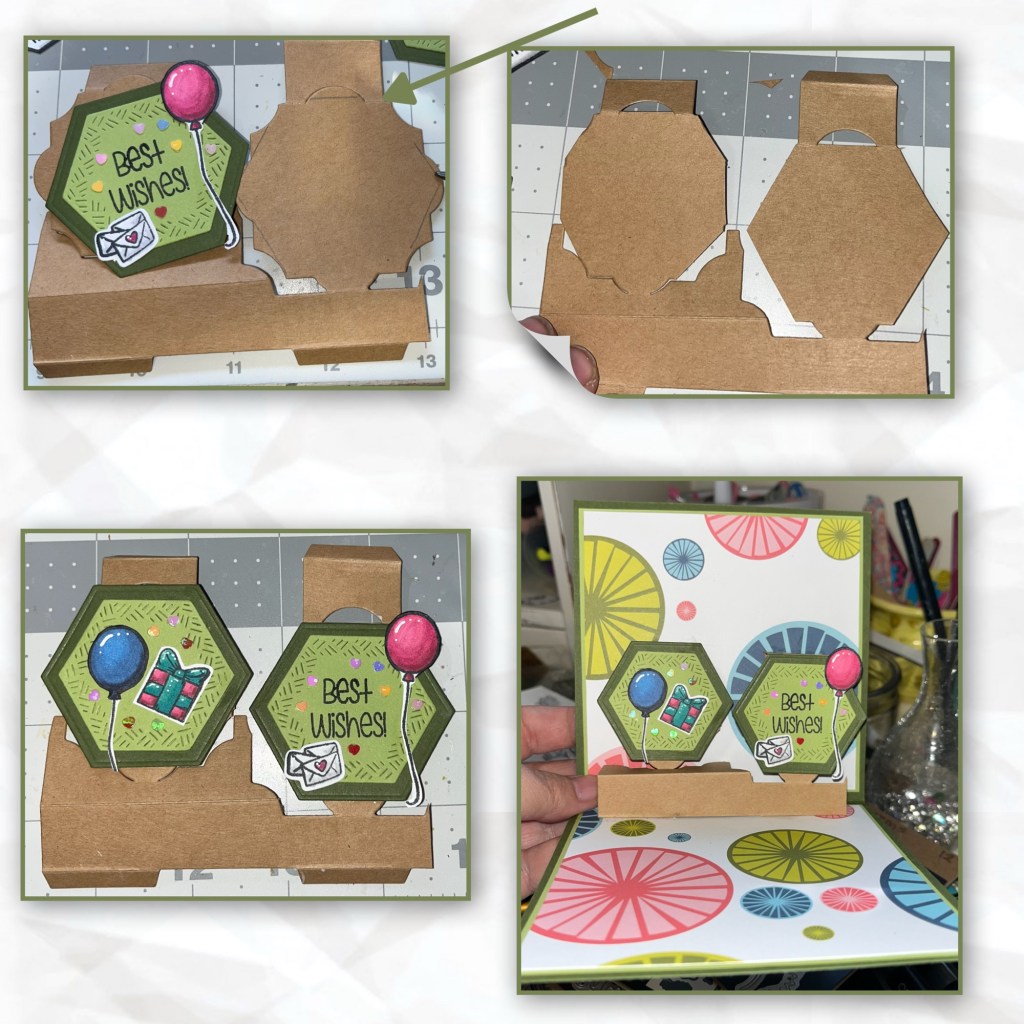
I pictured how I wanted the front and I wanted a shaker frame so I used the Hexagon Crosshatch and cut out as shown. A skinny kraft frame using the 2 largest dies, I cut a wave into the piece that came out of the center of the kraft cardstock. Using the same crosshatch die, and the die that is one smaller to cut 1 green frame, 3 kraft frames and one clear window. I adhered the clear window behind the green frame, and then I adhered the Kraft layers together then added them behind the frame.

I adhered all the layers together. The shaker was assembled by first gluing down the skinny frame and the hill. I added some little heart,and star shaped sequins. Then covered with the layered piece.

I stamped pieces from the 3 stamp sets shown. Like mentioned earlier they are no longer available but if you like through your products you might find something that will work. I coloured in the pieces with alcohol markers. I layered 2 sets of smaller hexagons, and stamped “best wishes as shown.

To make the pop up feature for the inside I used the Little Labels and cut off the third label as shown.

I wanted to change the labels on the pop up to hexagons so I traced the hexagons onto the labels and I trimmed them. I added the hexagons, and decorated with some of the smaller stamped images. I added the mechanism to the cardbase (Karen has a video tutorial on the product page at the this Link )
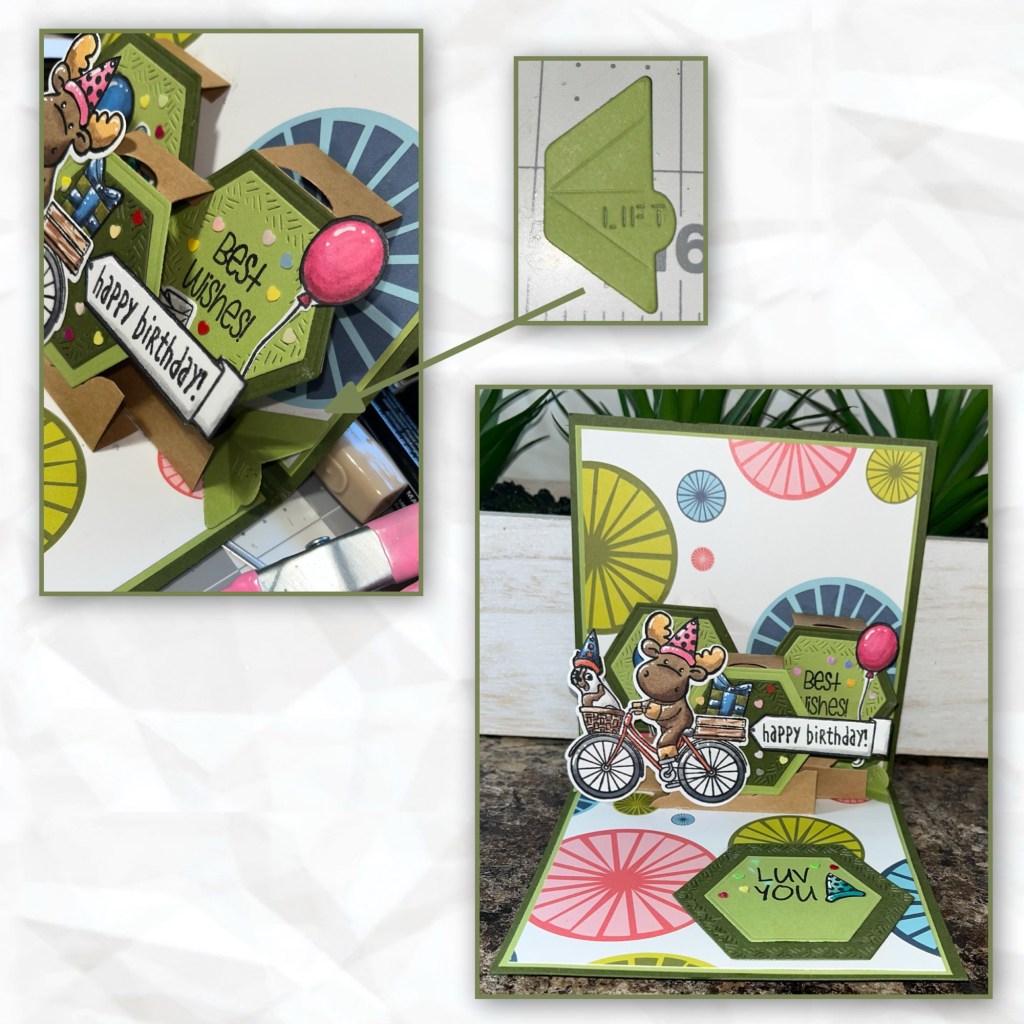
I needed to figure out how I was going to add the third piece of the Little Labels Pop up. I added a score line as shown in the photo, it is 1/2” from the score line that is right above it. Sorry it’s hard to see but in the second photo there are little xxxxx cut those pieces off. Also trim the label pieces so a hexagon can be added later. add glue as shown and lay it glue side down in front of the first part of the mechanism. Make sure that when it opens it will line up to glue the top right of this piece to the left side of the hexagon that is on the right. Because I cut off the little tabs I added a strip of acetate bend the label as shown to support the sides. I could have used matching cardstock as it’s not seen anyway.

Because there is such a small piece that has glue on it, I decided to take the skinny piece that I cut off earlier and used it to reinforce where the front tab piece attaches to the hexagon behind it.

I die cut another layered hexagon, but in opposite colours to the others and added to the front of the mechanism. I added Riley on his bike to the front. I added some of the same sequins that are used in the shaker, randomly around.

I needed a place to sign so I cut one more set of hexagons and decorated as shown and added to the inside of the card.

Waste not want not, I try to find ways to use up my mistakes. Below is the first Riley that I coloured but when I cut it the die shifted and cut it crooked. So I cut out the moose and the dog and added to the front as shown. I cut his hand/hoof so when I added the flowers it would cover the bike handle.

Since I have “Happy Birthday” on the inside I decide to add Celebrate! To the front. I cut it from the lighter green and the Kraft, and layered them slightly off. I added shading using an alcohol markers and highlights with a white gel pen. Then added as shown.

Because the card is so heavy it doesn’t want to sit open so I added the Display Helpers to both sides to help keep the card open.

Dies Used
Other Tools used

I love your card. Riley and Company are some of my favorite stamps.
LikeLiked by 1 person