

Hi Crafty Friends,
Welcome to our Karen Burniston Products – KB Riley LLC January Release Blog Hop. The Design Team have come together with Karen today for a fun blog hop to celebrate the release of 8 new dies and 4 new stamp sets. Sneak peeks of the new release started last week, and the dies are available to order NOW!

This release includes:
• 1 new Pop-up Die Sets
• 3 new Pop-up Add-ons Die Sets
• 4 new Stand Alone Die Sets
• 4 new Clear Sentiment Stamp Sets
Dies are available to order now on the website.
GIVEAWAY:
To celebrate the release Karen Burniston and each of the Karen Burniston – KB Riley LLC Design Team members will be giving away a $25 Gift Certificate to some lucky person who comments on our blog posts, so make sure you join the hop and comment on everyone’s blog post. Winners will be randomly chosen from ALL of the blog hop comments received on our blog posts by Monday, 3rd February 2025. Lots of chances to win some goodies, so just leave a comment on this post or any other blog hop posts to enter! Don’t forget to leave some way for us to contact you, in case you are a lucky winner!
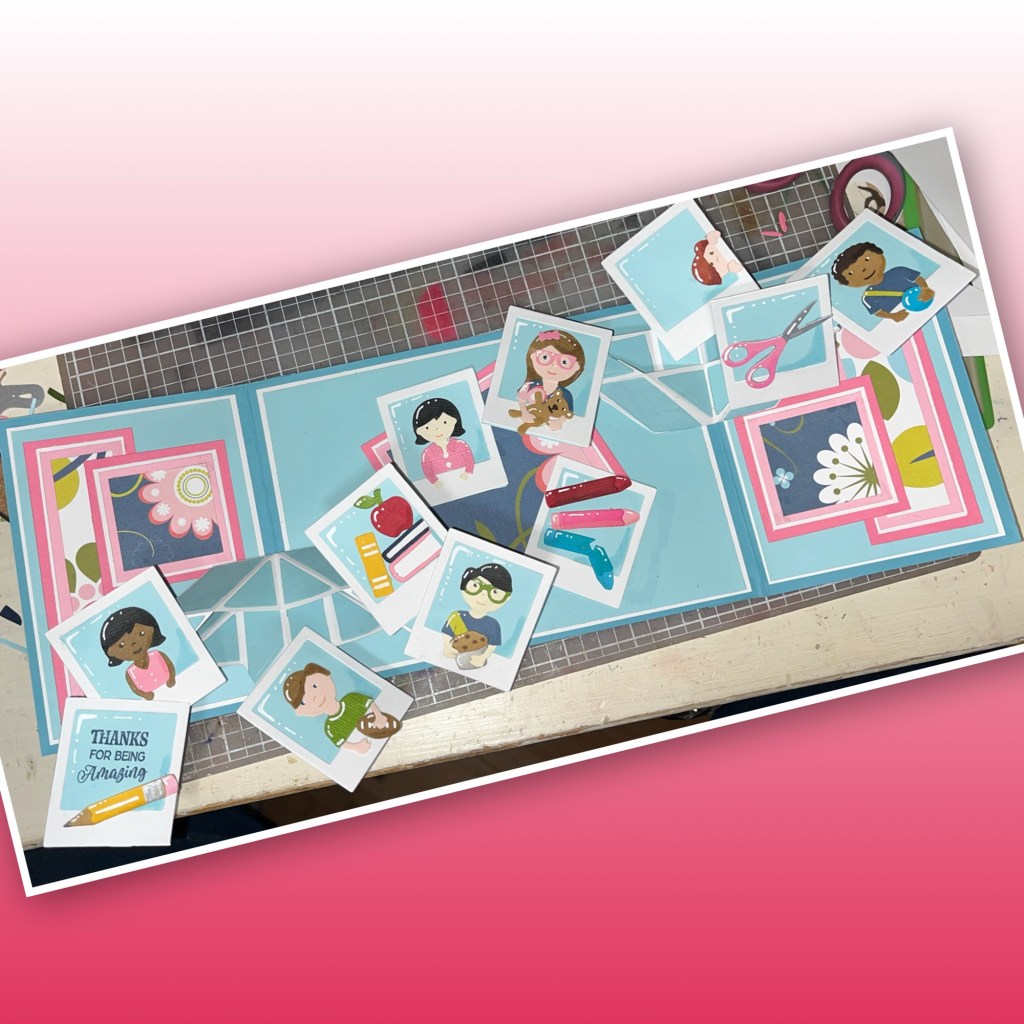
I decided to have a good play with the paper people and thought they would look good inside the photo frame. I also wanted to try to see if I could get 2 Triple Platform bases in a gatefold card. I personally have no need for a teacher card so decided I would send it to my granddaughters and realized I would need 3 cards. So l had a bit of fun making them.


All the fun is in the reveal, to see this card in action please check out my FACEBOOK page, feel free to join if you would like to share your own crafty creations. You can also see a video of this card on my INSTAGRAM page.
For those of you that follow me and know I typically attach my links throughout my post, because there are so many for this card I decided to add them all to the end of this post.
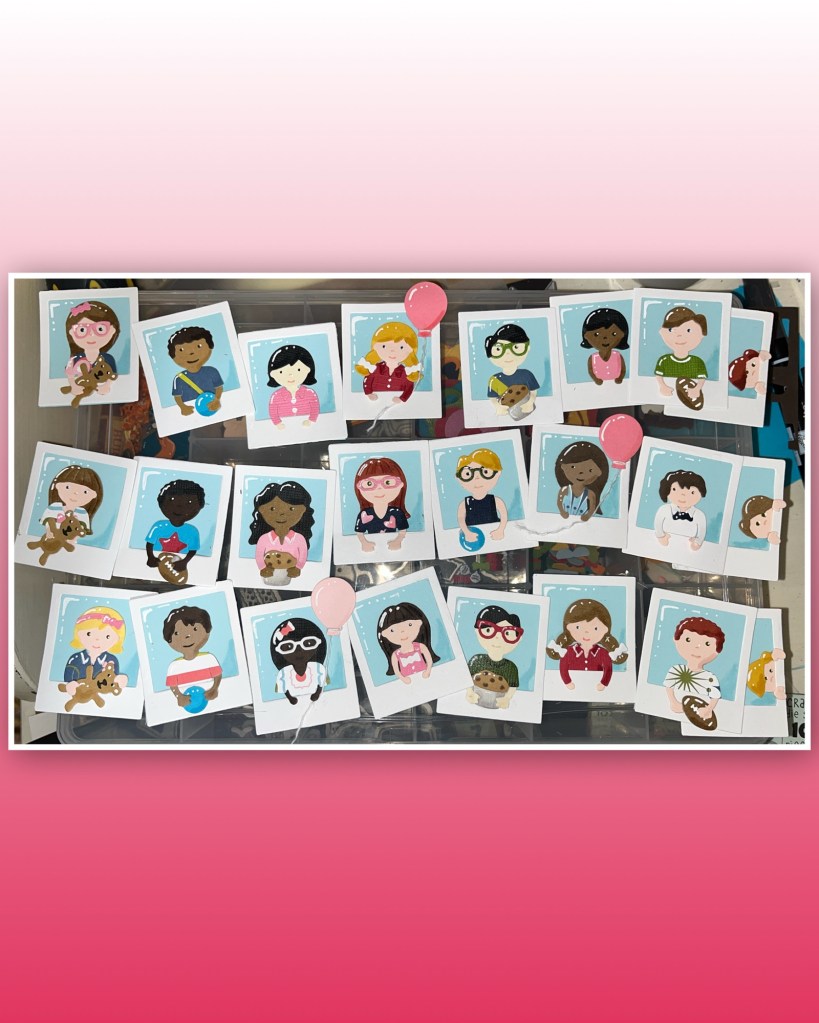
I choose a fun patterned paper from my stash for colour inspiration. I cut out several of the photo frames (13 needed per card) and blue backgrounds. When I diecut I try to cut as many pieces from a colour at the same time so I cut out pieces from the Paper People, Princess and Mermaid, and the Tiny gnomes, from multiple skin tone colours. I also chose multiple hair colours. The clothes and accessories were cut from colours in the pattern paper. Some of the shirts were even cut from coordinating paper patterns

I added shading with a Versa Mark Marker, and highlights with a white Gelly Roll pen. I thought it would be cute to let the characters have pieces of them coming out from behind the limit of the frame.
HINT******* the Princess/mermaid bodies are smaller than the paper people bodies so I had to tweak them to fit some of the clothes. So for this little cutie, I cut off her arms and attached them further down the sleeve, so her hands would come out the end of the sleeve. I trimmed the Tiny Gnomes braides and added it to the short mermaid hair to get this cute hairstyle..

As you can see, I played with multiple pieces to come up with all of these fun, configurations, I could have played all day lol.
I wanted to have some school like images so I used pieces from the Bookworm set and the Office Charms. I stamped one of blue backgrounds and added all the elements. I added shading with a Versa Mark Marker, and highlights with a white Gelly Roll pen

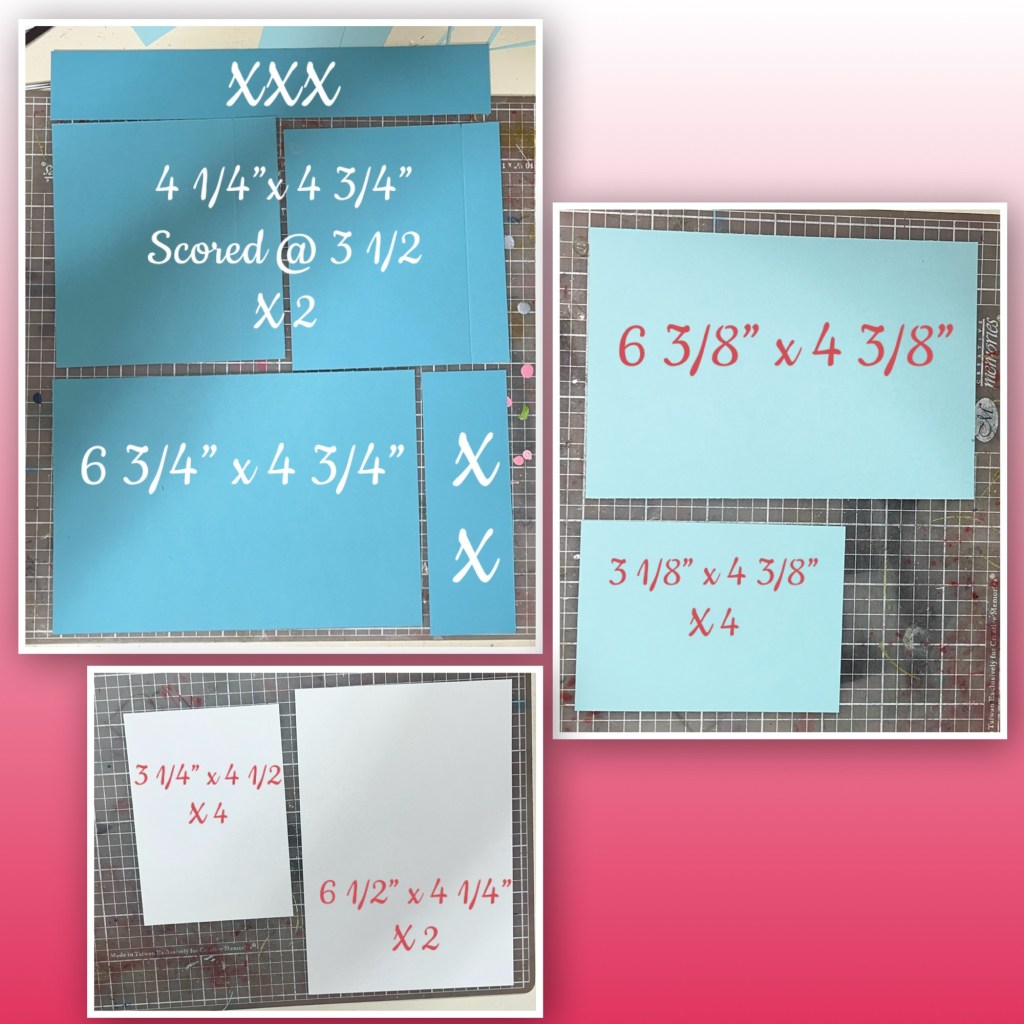
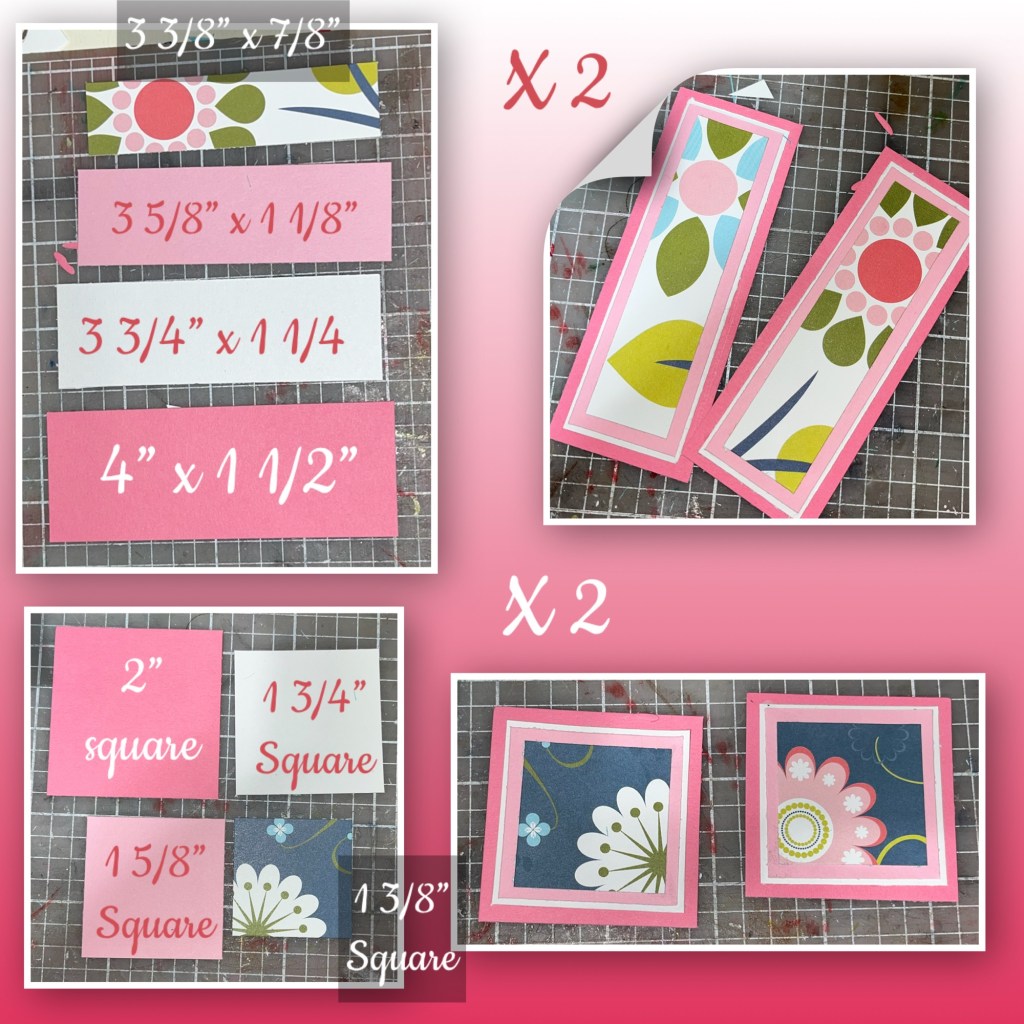
Now for the card base, with the directions below I was able to use one sheet of 8 1/2 x 11 card stock per card cut as shown for the card base. And then cut the panels to layer, dimensions below.
Put the panels on the front and back of the flaps, and the inside of the card. I then glued the flaps to the back of the card. Then covered the back with the white panel.
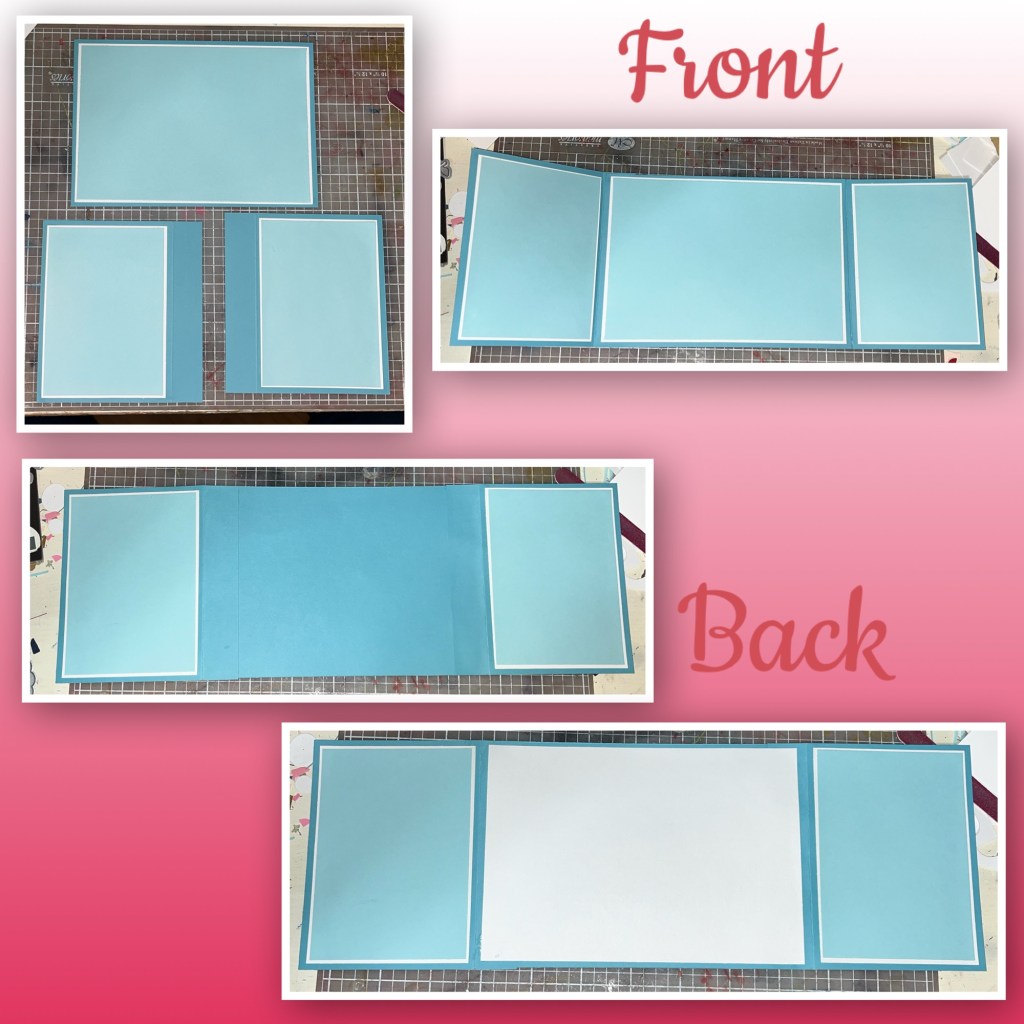
The  patterned paper below coordinates with the other pattern paper used. Cut the panels and layer as shown,and add to the card front.

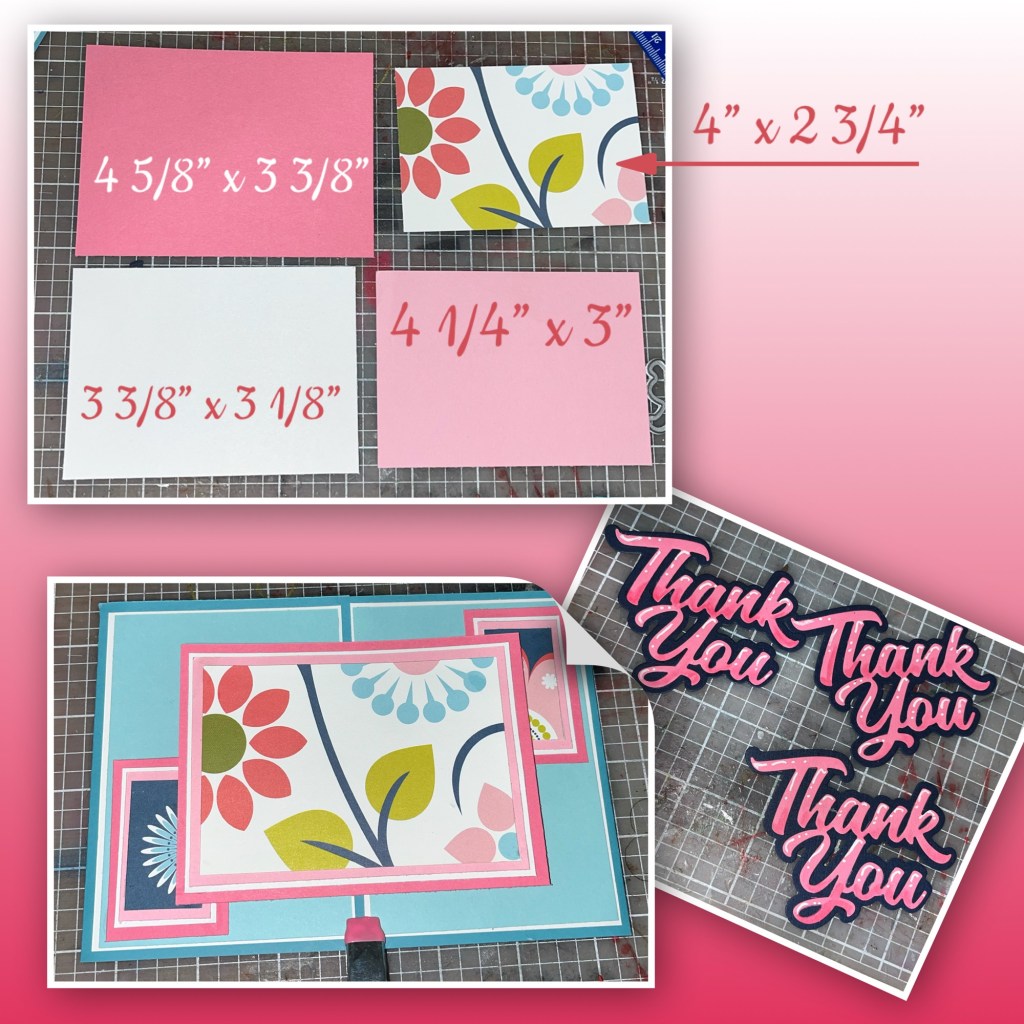
I wanted a large panel for the front that covers both flaps. I wasn’t sure how I was going to adhere it so it is not stuck down yet. I die cut and layered the “thank you”, I added shading with a Versa Mark Marker, and highlights with a white Gelly Roll pen
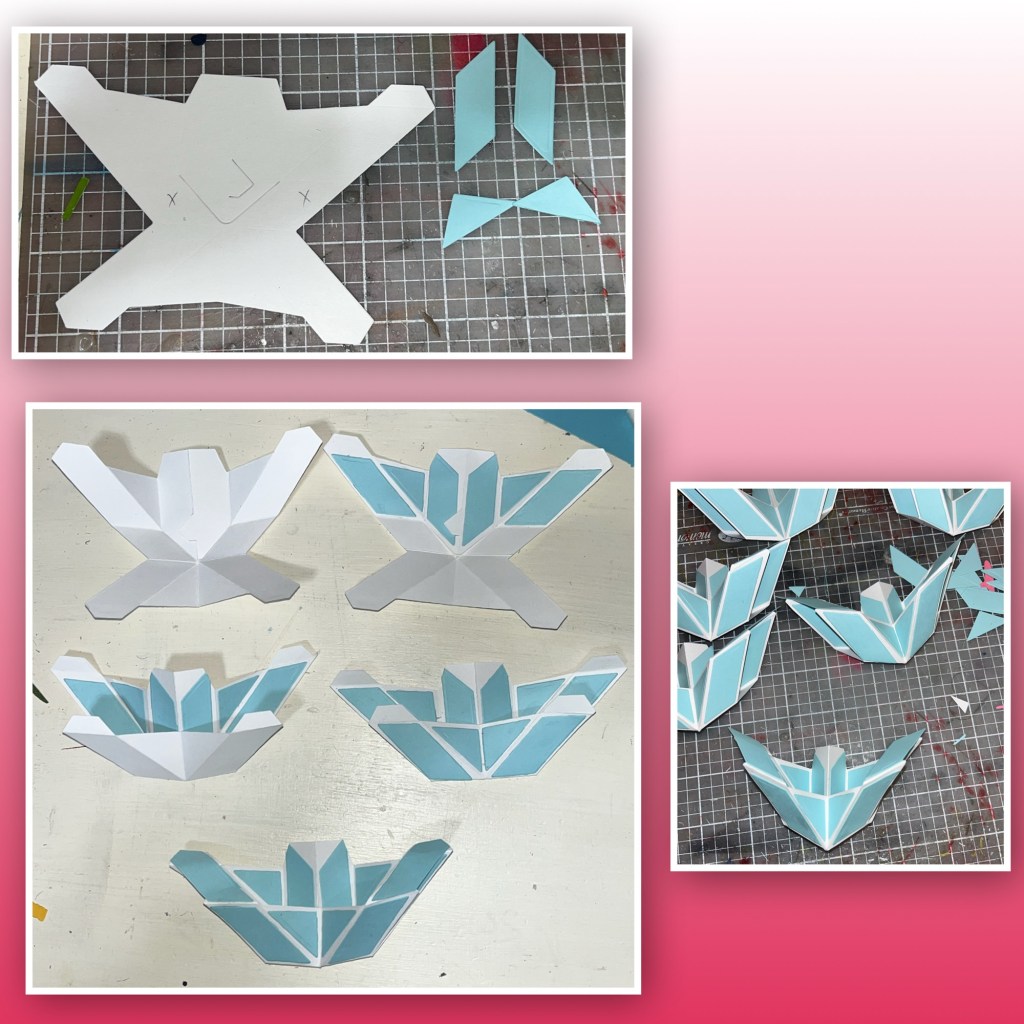
Now for the Triple Platform mechanism. Since I was making 3 cards with 2 mechanisms each, it gave me the opportunity to take photos of the different steps in creating the mechanism. Karen will have an assembly video soon.
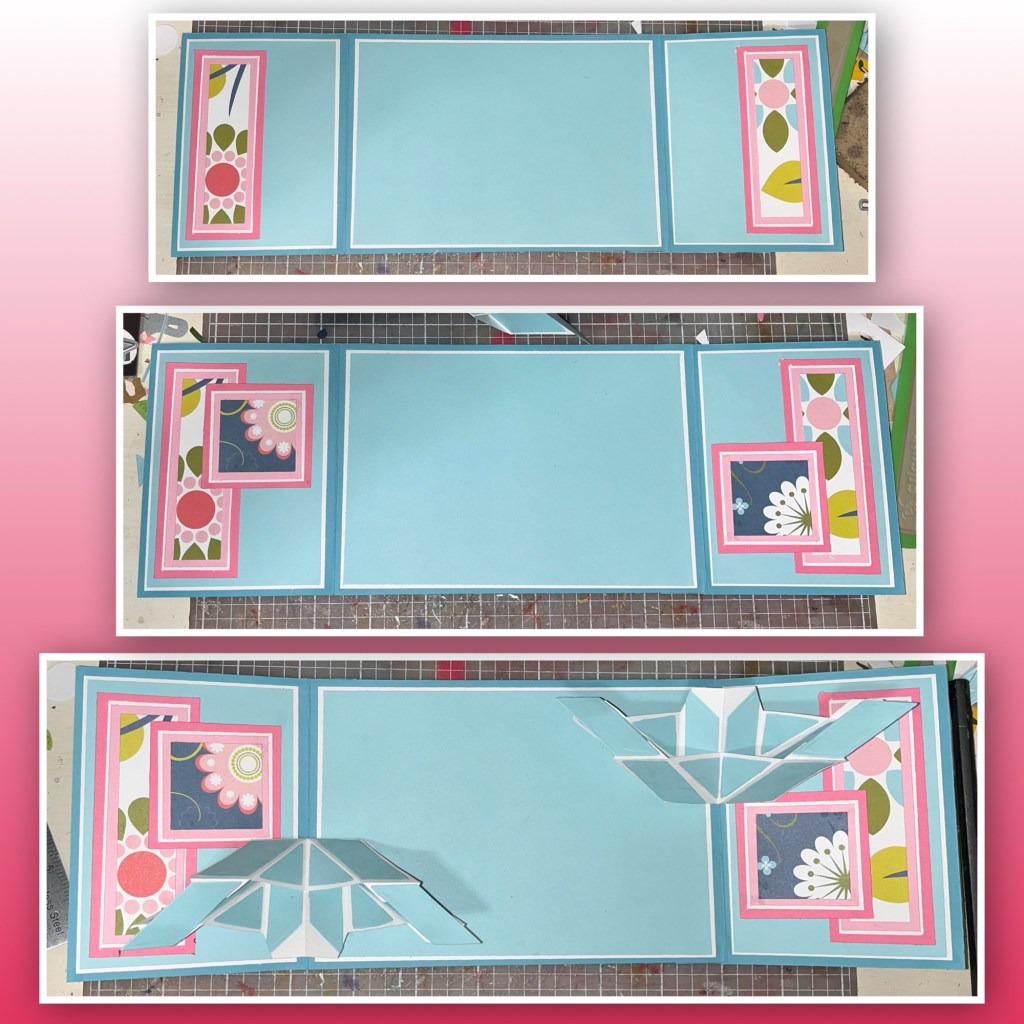
I wanted to have some layered panels for the inside as well so, I created them using the dimensions below.
I added the panels and the mechanism as shown. I had to put the one on the left upside down, to have it as low as I wanted it. Otherwise, the mechanism folded down, so it would go beneath the limit of the card. It will be visible when the card is closed. With having them added to the card this way the left one folds up, the right one folds down when the card is closed. 
I started adding my little characters and school supplies. Opening and closing the card after each to watch for catch points or jamming in the folds. I wanted a square in the middle so I cut one to the dimensions below. I wanted it bigger, but I had pretty much used up most of the dark pink card stock so I wasn’t gonna have enough and I wanted to follow the same pattern of colours that I had used so far. 
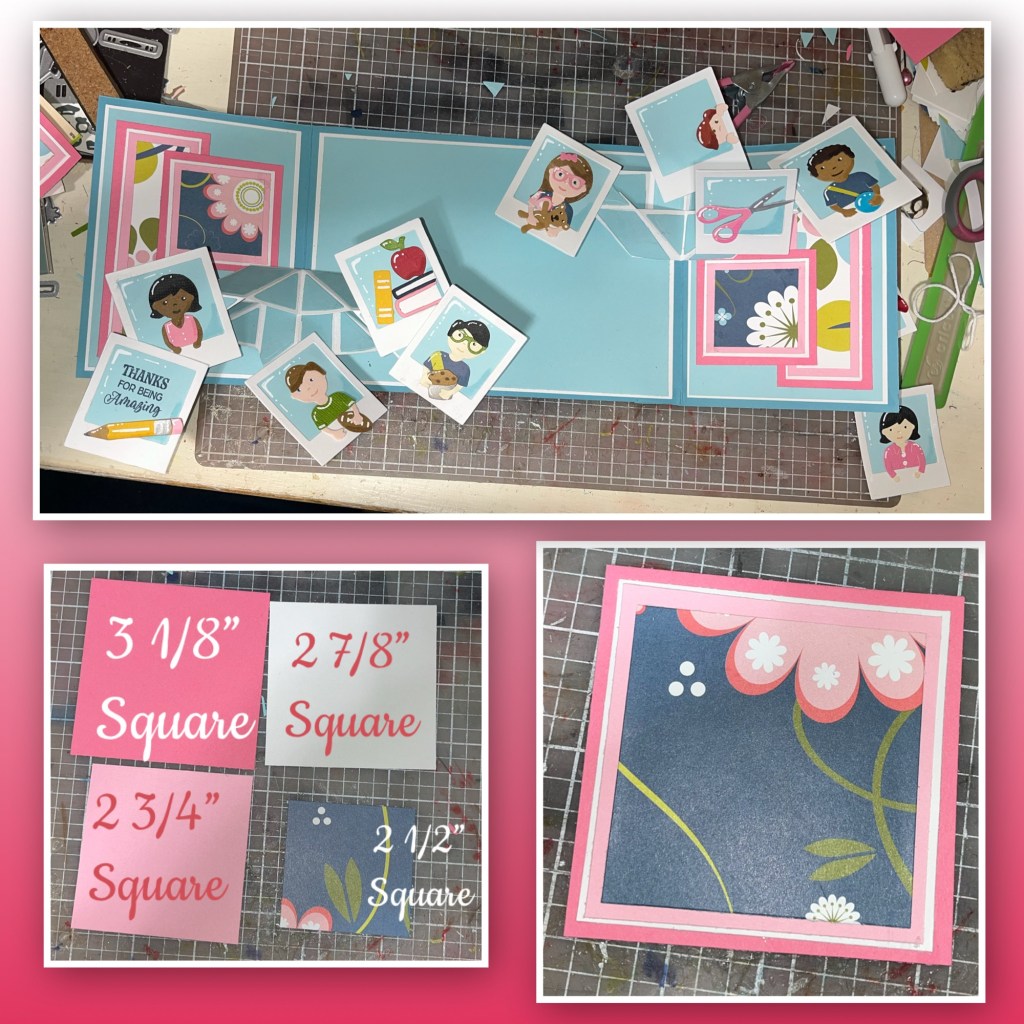
I added the square and a couple more photo frames.
I decided to add my front panel on a diagonal, being mindful to only add adhesive to what will be the left side. I added the last of the photo frames and the “Thank You”.
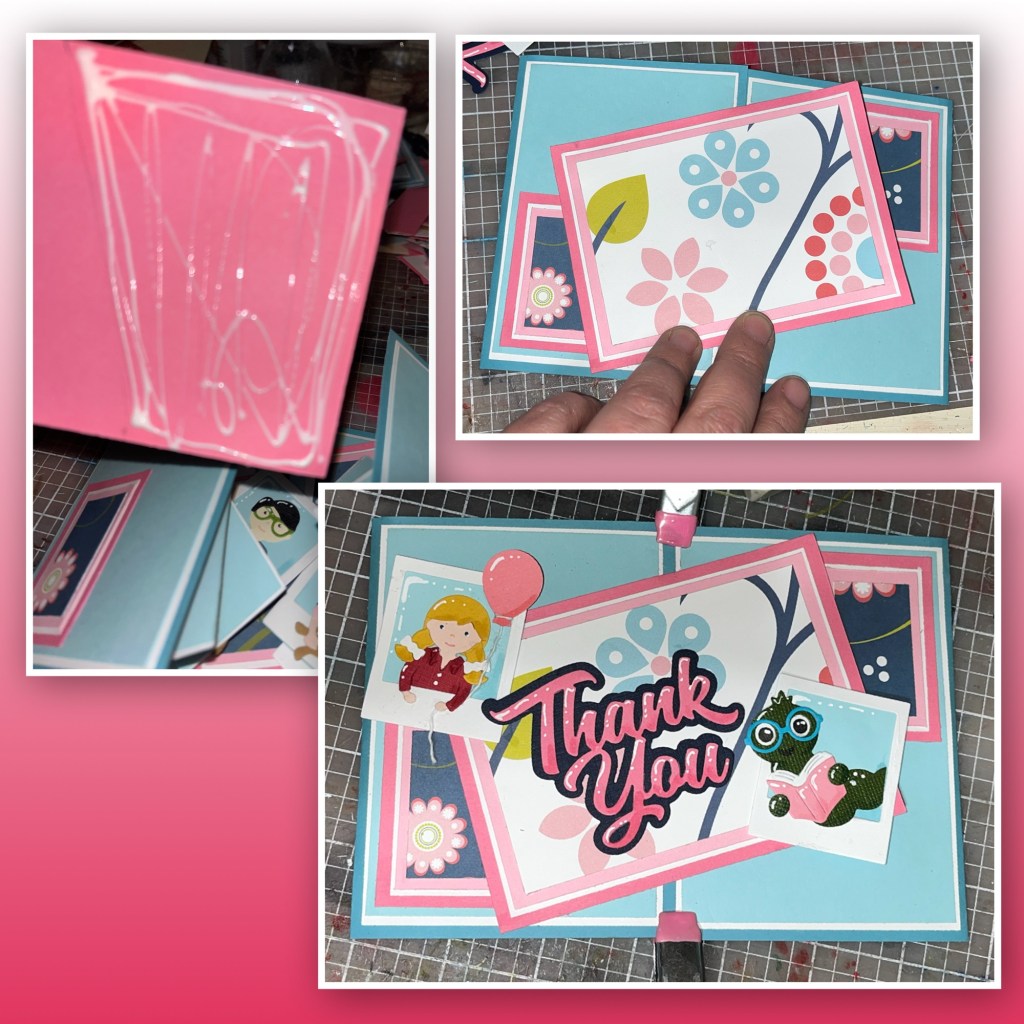
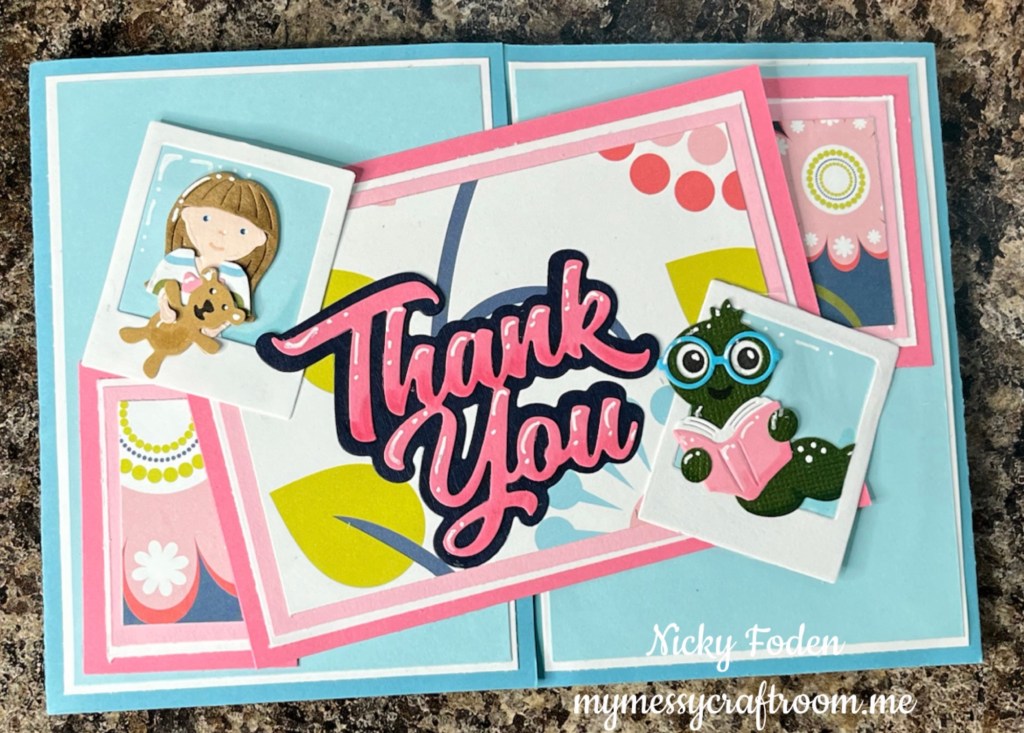
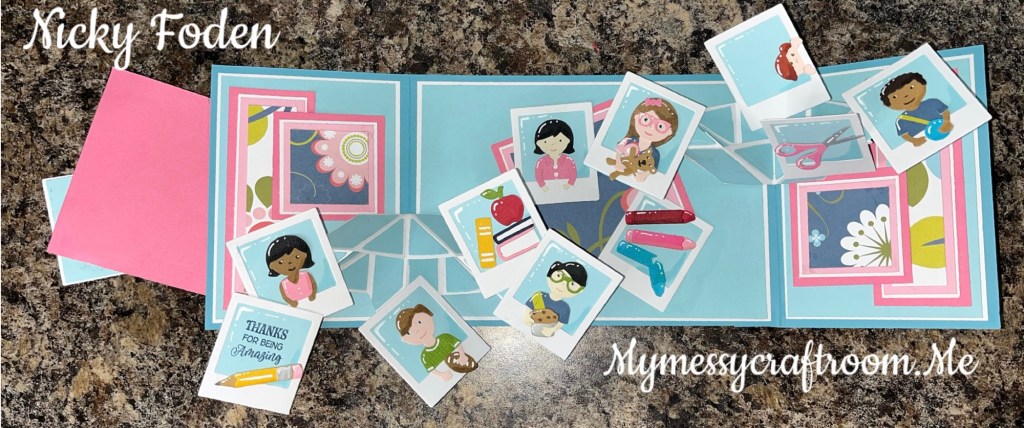
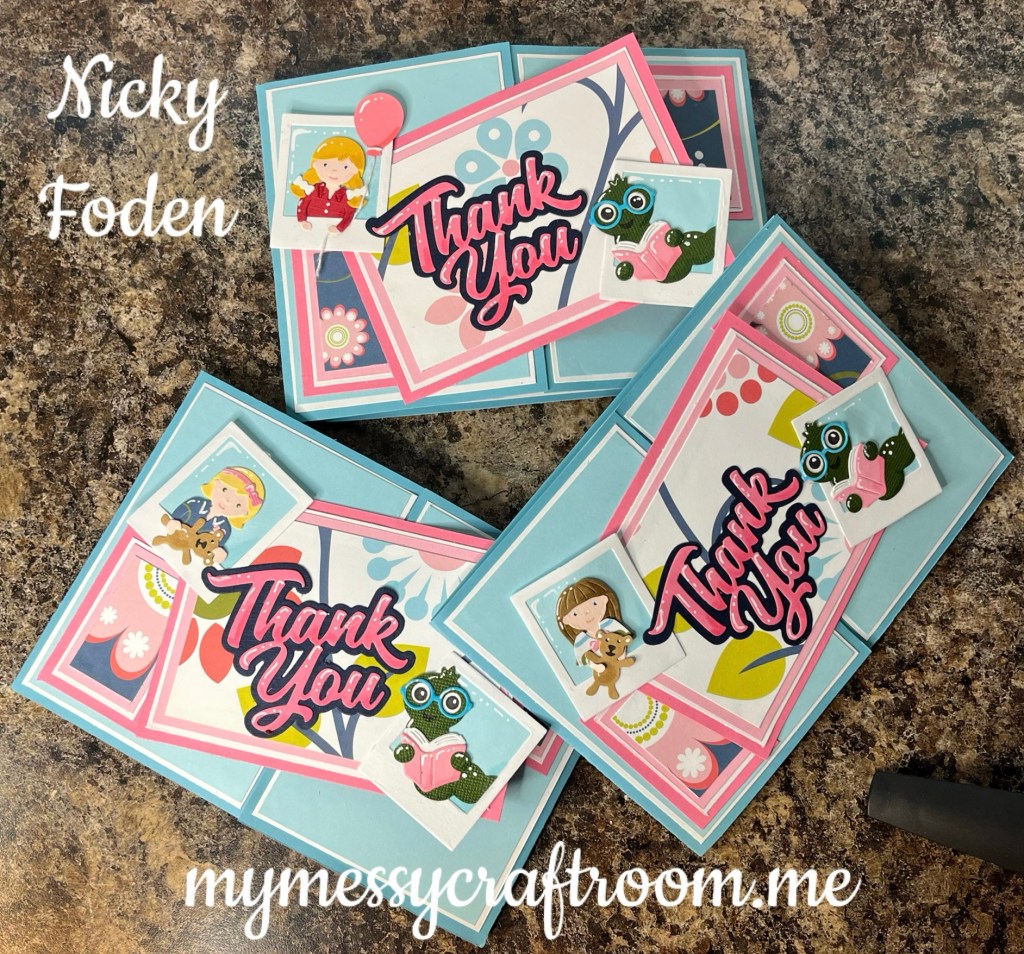
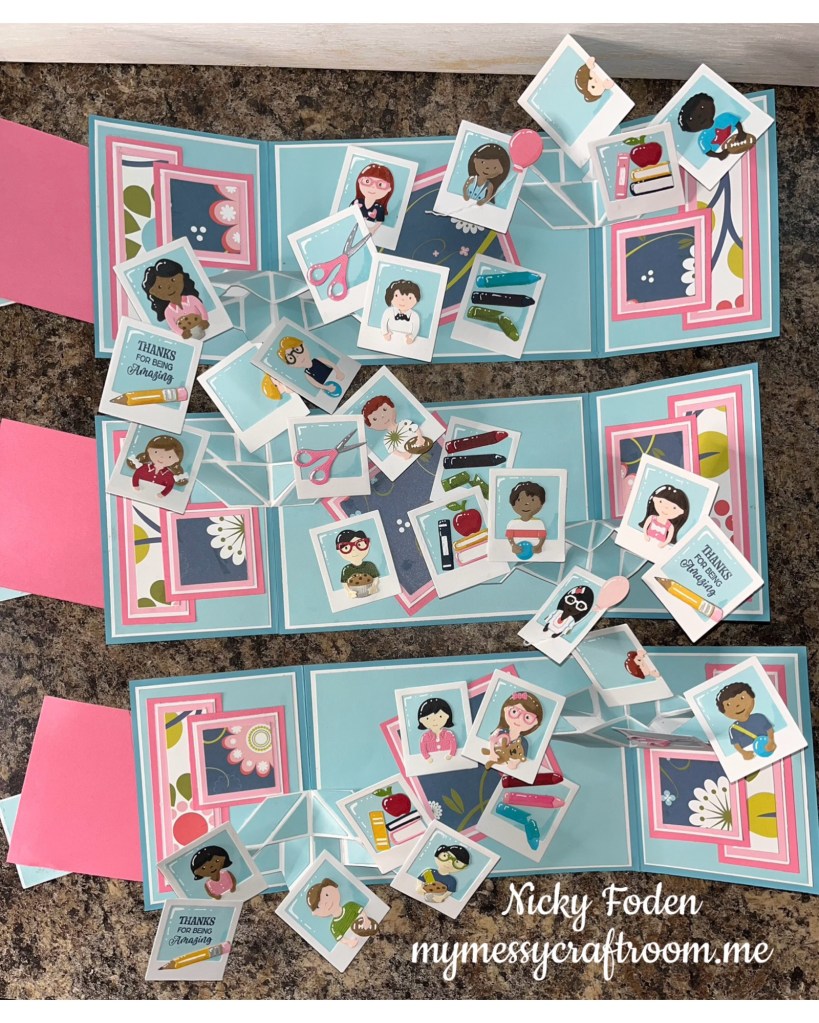
Photo Collage Popup – photo frames and blue background
Paper People – children, clothes, hair
Princess and Mermaid-children, hair
Tiny Gnomes – children, braids
Tiny Accessories 1 – glasses
Tiny accessories 2 – glasses
Tiny accessories 3 – football
Holiday Charms– Teddy Bear
Happy Birthday Lorna add on– balloon
Book Worm – bookworm, books, apple
Office Charms– scissors, pencil, crayons (altered pencil)
Photo Memories Stamps stamp used
Other Tools used
Gelly Roll White Retractable Pen
To see the rest of this fun Blog Hop and the other amazing design team members post check these out ⬇️⬇️⬇️
Me- you are here

Your card is GREAT. I love how you used the paper people and thank you for showing how you made your creation. You really did a great job of showing us how to recreate such a wonderful card.
LikeLiked by 1 person
This is a great card! I love how you put the people into “photos” 🙂
LikeLiked by 1 person
Your card is beautiful, I ordered the people… you made them so cute, I love the whole release!!! Love the triple platform!!! Tfs
LikeLiked by 1 person
That is such an adorable card.
LikeLiked by 1 person
Wow, wow, wow! As always your creative ideas are over the top; using two of the triple platform pop up made for such a super fun card! Loving all the intricate details you added to the paper people to make your card so special and one of a kind. Your granddaughter will be so excited to give these to her lucky teachers!
LikeLiked by 1 person
Magnificent!!! So many wonderful details! Love the gatefold with 2 triple platform pop-ups in it. vrc(at)prodigy(dot)net
LikeLiked by 1 person
Oh my!! This is so good! I am new to KB and just did my first card using the Bam dies…but yours is absolutely FABULOUS! How are you holding the card closed? I am really loving the little people and how you put them on a Polaroid picture frame I def am going to try that! Thanks for inspiring
LikeLiked by 1 person
The card is just closed with the weight of what is on top. The panel is only glued to one side. It doesn’t stay closed well, but good enough. 😀
LikeLike
love this card. I commented on Facebook page.
Thank you for providing details. Dies are ordered. Can’t wait to try.
Amy OSullivan
LikeLiked by 1 person
hi Amy, you won the gift card, I need the email you use when you place orders on Karen’s Website, they will add the credit there.
LikeLike
Thank you. Wonderful surprize. The credit is on my account.
email is Amyscott5@sbcglobal.net
LikeLiked by 1 person
I love the double triple pop-up!
LikeLiked by 1 person
Great card! My youngest son is a teacher. He would love to receive a card like this from a student. Very nice.
LikeLiked by 1 person
Fabulous gatefold with all the pop up photo frames. I like the variety of people you created.
slrdowney at hotmail dot com
LikeLiked by 1 person
your card design was amazing!
LikeLiked by 1 person
Wow, wow, wow!! Am so enthralled with your attention to each detail! The DOUBLE pop up is amazing!! Love how you were so creative with each of the figures and layered them beautifully! Even the arms and hands were in different positions! Great tutorial as well!! Love your pics and measurements! Add this to my LONG wish list!
LikeLiked by 1 person
Always love your cards and the amount of details you give us to recreate. Thanks.
LikeLiked by 1 person
Love, love, love this card. I can only imagine how much fun it was for you to put it all together. It is obvious that it was no small task to put this together, but what an inspiration. Thanks for sharing the cutting measurements with us.
LikeLiked by 1 person
stunning card an beautiful people!!! jeanmheming@aol.com
LikeLiked by 1 person
Love the photo frames and all the adorable ‘pics’ you created! Wonderful details on your awesome pop-up card! Love it!
deniseb777ATgmailDOTcom
LikeLiked by 1 person
oh wow! The work to put this card together is awesome!! You did such a great job. Love it!!
LikeLiked by 1 person
all I can say Nicky is WOW ! I thought of all my grands with this card
LikeLiked by 1 person
This is UNBELIEVABLE! I LOVE LOVE LOVE all the little portraits! HOW CLEVER!!!!!!!!!meghan.kennihan@gmail.com
LikeLiked by 1 person
WOW, that’s a lot of pieces and planning that went into that card.
LikeLiked by 1 person
Love this card and how you used other sets to complete it. A lucky teacher will enjoy your card!
LikeLiked by 1 person
I love this card and your easy to follow diagrams.
LikeLiked by 1 person
As always. Beautifully done!
LikeLiked by 1 person