

Hi Crafty Friends,
Welcome to our Karen Burniston Products – KB Riley LLC June Release Blog Hop. The Design Team have come together with Karen today for a fun blog hop to celebrate the release of 9 new dies. Sneak peeks of the new release started earlier in the week, and the dies are available to order NOW!

This release includes:
• 2 new Charm Sets
• 1 new Word Set
• 2 new Add-on Sets
• 3 new Pop-up Die Sets
• 1 stand alone Die Set
Dies are available to order now on the website.
GIVEAWAY:
To celebrate the release Karen Burniston and each of the Karen Burniston – KB Riley LLC Design Team members will be giving away a $25 Gift Certificate to some lucky person who comments on our blog posts, so make sure you join the hop and comment on everyone’s blog post. Winners will be randomly chosen from ALL of the blog hop comments received on our blog posts by Friday,30th June 2023. Lots of chances to win some goodies, so just leave a comment on this post or any other blog hop posts to enter! Don’t forget to leave some way for us to contact you, in case you are a lucky winner!
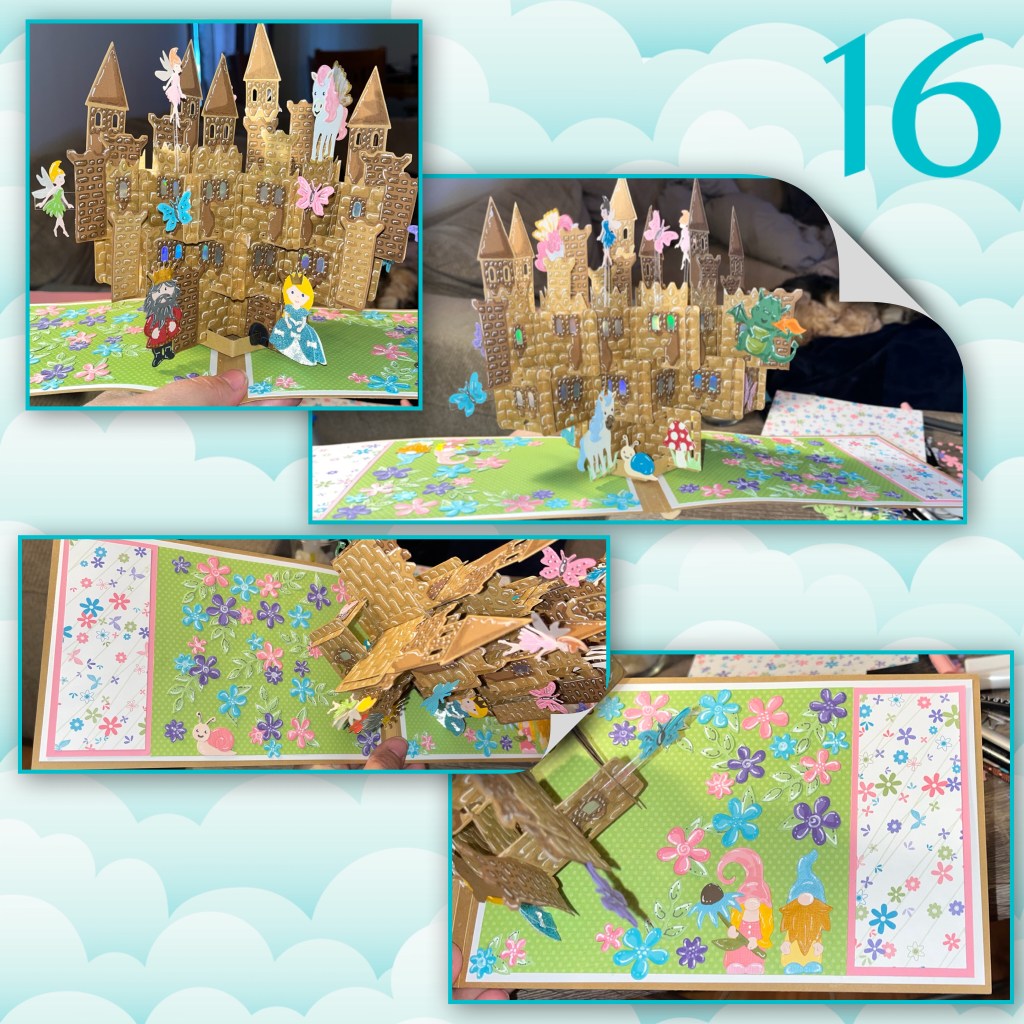
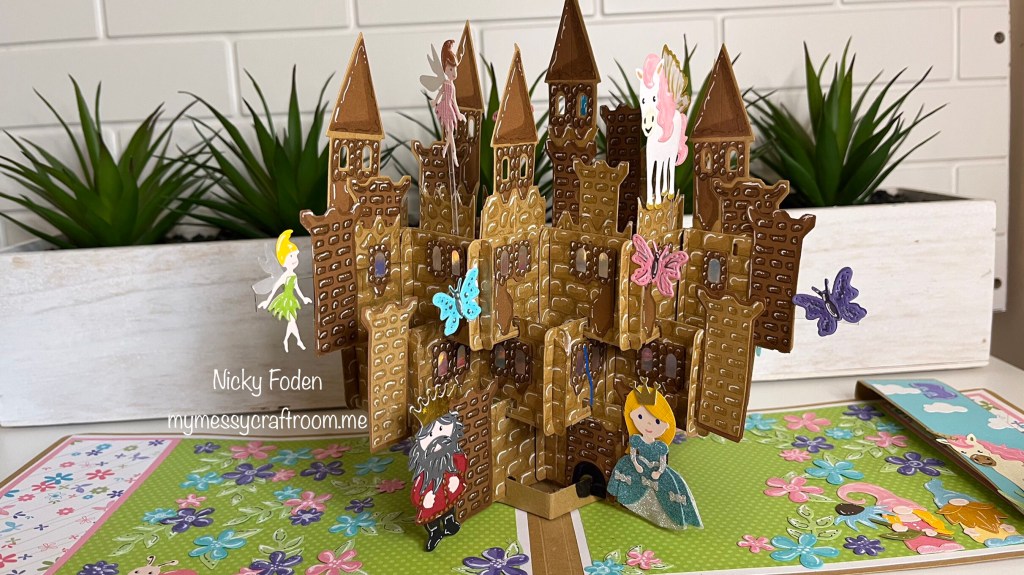
I absolutely love how there are so many ways to use Karen’s dies, can you believe that my castle was made using the House of Cards die set. You can most definitely use it to make a house of cards, but by adding a few pieces from the Castle Pop up dieset I made this over the top castle. It is an absolute wow card when opening to reveal the castle.


All the fun is in the reveal, to see this card in action please check out my FACEBOOK page, feel free to join if you would like to share your own crafty creations. You can also see a video of this card on my INSTAGRAM page.
1a- I started by cutting out the card pieces , there are 2 dies in the set for cutting out the cards. One of the dies cuts 4 cards, one of the dies cuts 2 cards. I ONLY used the die that cuts the 4 for this card. I used 28 cards to make the castle.
B- the die cuts 4, and all 4 are slightly different. Be mindful of which way the “golf club” cut out is facing, and that it is always at the bottom, the notches and the slots will either be on the inside or the outside.
2- Karen recommends a heavy weight cardstock, I did not have enough of any one colour of a heavy cardstock, so I used a lightweight but glued 2 together for each card.

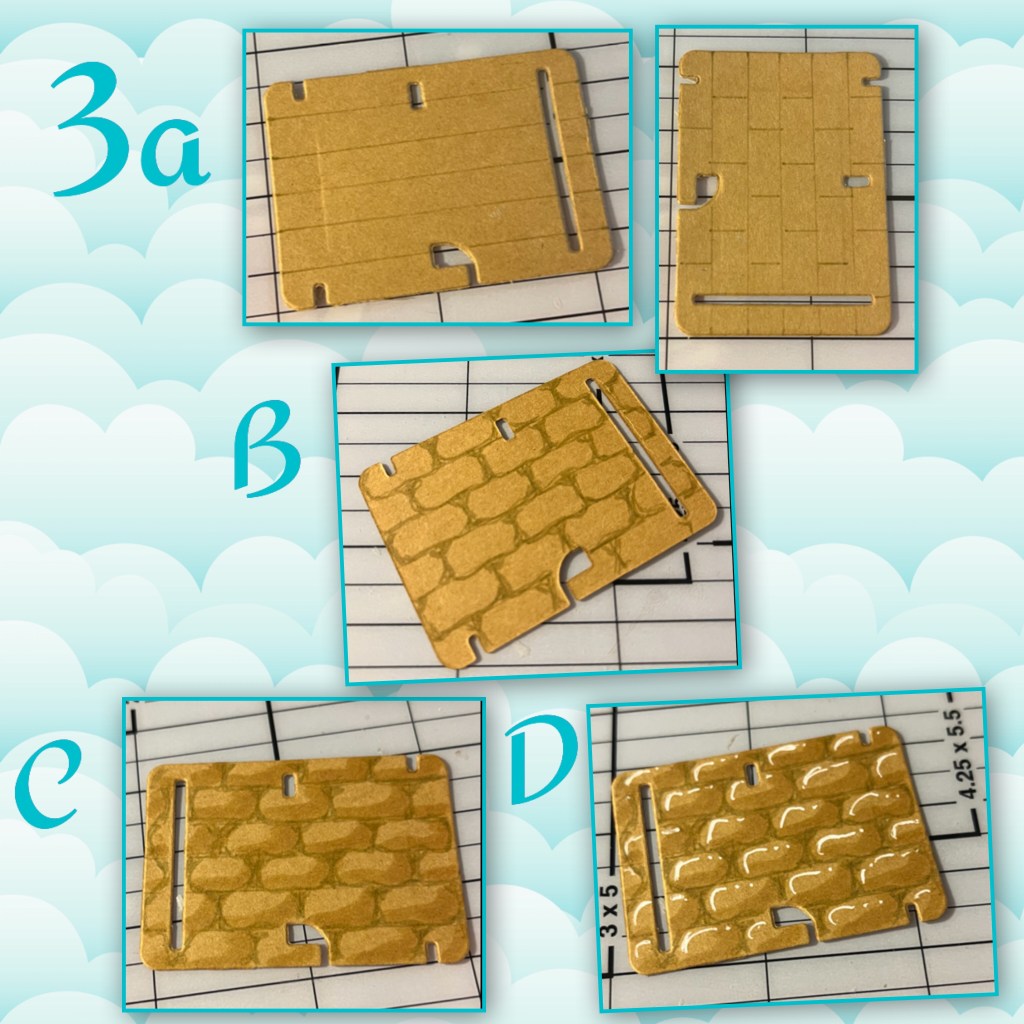
3a- I used a marker that is close in colour to my cardstock (I used a Crumb Cake Stampin Write Marker , I used my Fiskars Paper Trimmer and a ruler to measure the bricks.
B- I used the same marker to draw out the bricks to make them look more like stone.
C- I used a Versa Mark marker to add shading to the bottom and right side of each brick.
D- I used a White Gel pen to add highlights to the top and left of each brick.
I did this to the front and backs of all the cards. It was a lot of work, it’s pretty repetitive so I did it while watching tv. If this is too much work other options would be to adhere a brick patterned paper to a medium weight cardstock, or use a brick patterned embossing folder, or a brick stamp……
4a- to make the base, line up 4 cards exactly like this, “golf club” on the bottoms, facing away from the centre, overlap the slots on the center two cards, take the cards that are shown above and below the center cards and work the notches through the slots. You will have to bend one of the corners to do this. This will make a LARGE X
B- Make 2 more LARGE Xs and attach them together end to end, then add 2 more cards to each end, it will now look like 3 Boxes, and add to the original X that is the base. The notches on the tops link up with the “golf club” on the bottoms.
C- make 3 more LARGE Xs and connect them end to end. Attach them to the top of the other 2 rows.

5a- cut the panels to make the card base, adhere them end to end, making sure to have a 1/8” gusset. I added so any pieces I should have made it a 1/4” gusset.

6a- cut out the panels as shown and add to the card base as shown.

7A- I started cutting out castle pieces in the same Kraft colour, and a darker colour. To make the door I used the door piece from the castle, and coloured the opening with black. (the reason I chose a darker shade is because if I used the same shade the windows and doors disappeared against the bricks)
B- I traced the stencil pieces and coloured the bricks the same way, I used a Soft Suede (NLA) marker.
C- the windows that will be on the castle I backed with holographic cardstock. I drew bricks around all the windows, and coloured them the same way.

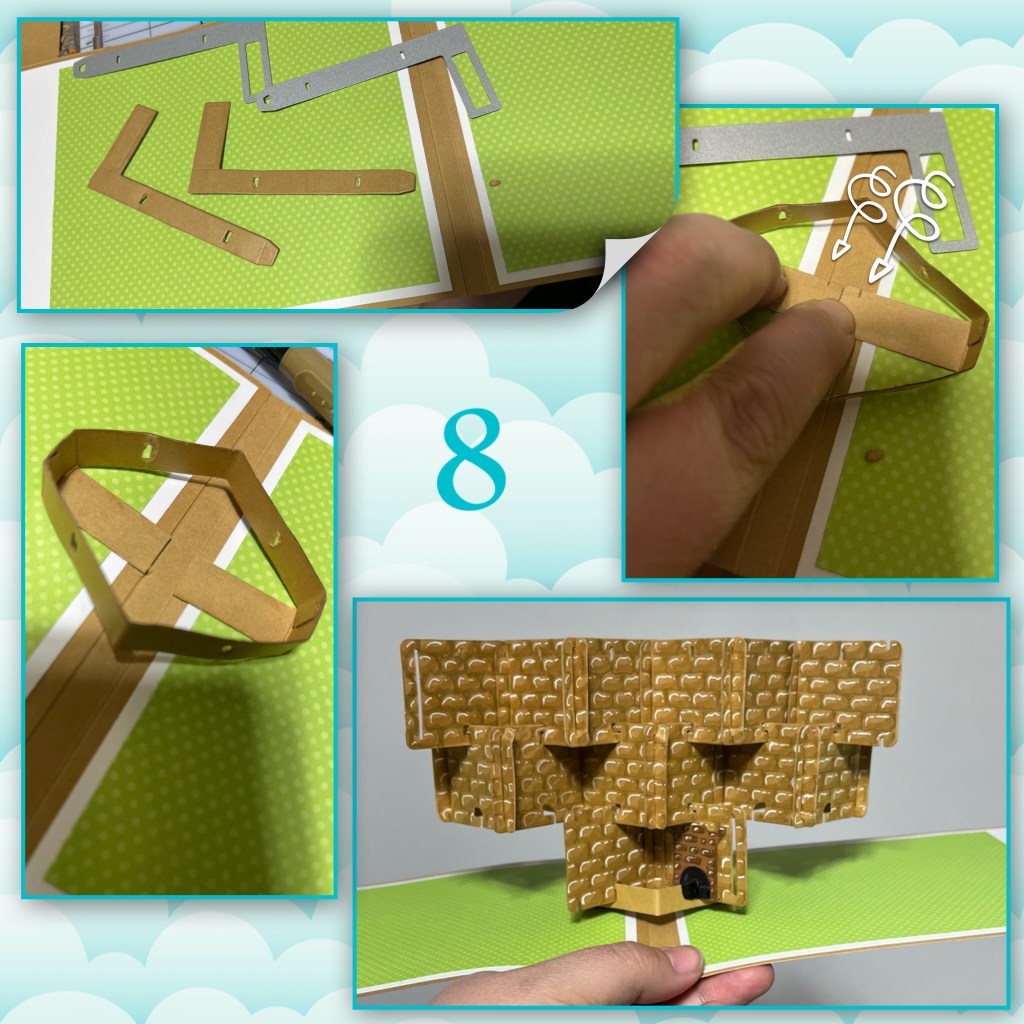
8- I die cut the 2 arms that make the mechanism, I used 2 layers of cardstock as well, because it is a thinner cardstock. I cut out a bit of the mechanism to allow for the gusset ( I’m pretty sure Karen will explain this in her assembly video) Add the castle to the mechanism. I blacked out part of the mechanism where the door is.
9- if you keep the strips that fall out from cutting the cards they can be used to keep the layers of the castle from coming apart. It’s not necessary, I thought once I add all my pieces, if the layers came apart they would be harder to put back together. Just add adhesive to the little strips and slip them through space and close the space at the “golf club” opening. It will lock the notches shut.
10- I added clear strips randomly around the castle and covered them with castle pieces.

11- I kept cutting castle pieces and adhered them together in different ways. And added them around the castle. Front and back.

12- progress so far, I didn’t get a photo when I added the towers to the back side. I have 7 towers. It is best to add the adhesive to the bottom front of the castle pieces and attach them to the back side of the card facing forward.

13- I wanted to cut flowers to match a pretty paper that I have (retired Stampin Up) I cut Flowers from the new Fun Flowers , and the flowers and grass from new Fence Add On I added shading and highlights the same way as the bricks. I used a dark grey marker to add details to the butterfly’s. I added grey to the leaves as well so they stand out from the green background. I trimmed the stems off the leaves.

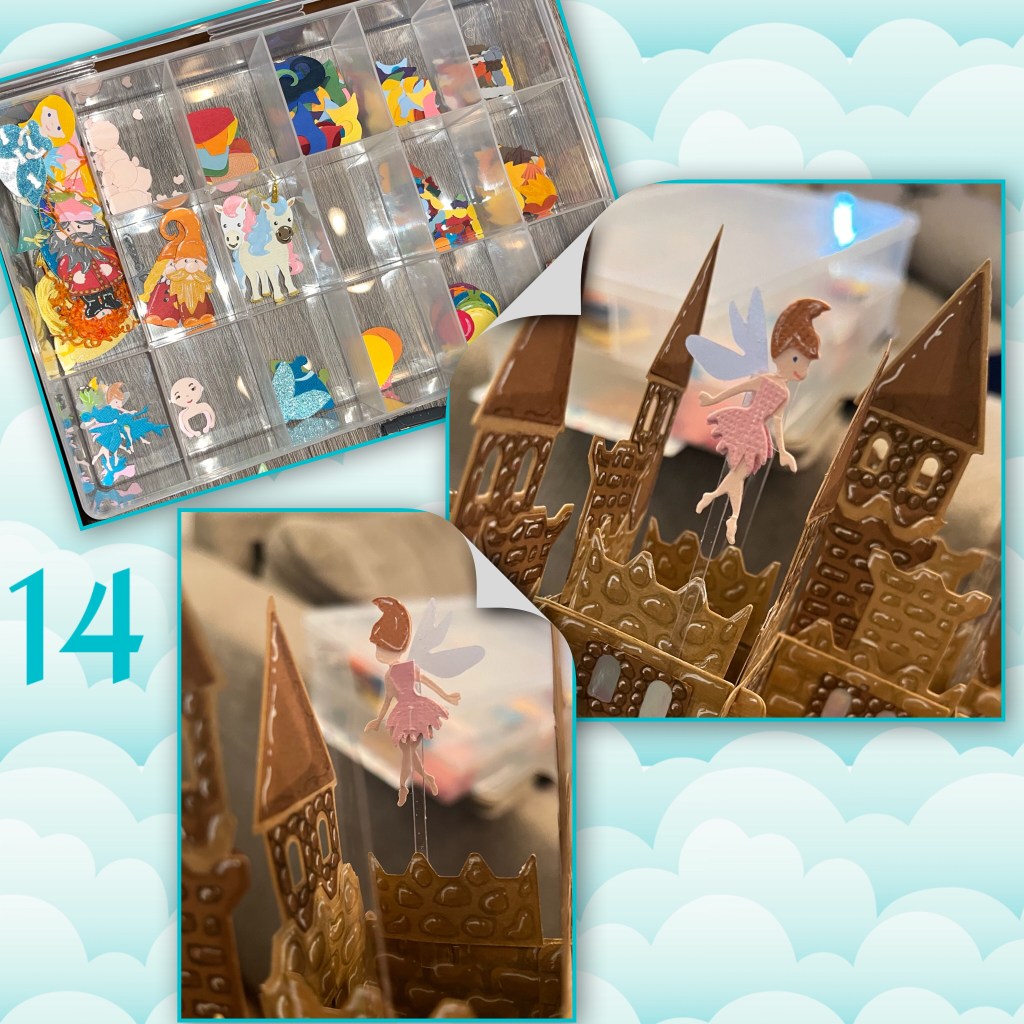
14- I keep a stash of pre cut pieces, some were premade (for this card) and I started adding them to the card. I sand-which the clear acetate strips between the diecut piece. Pieces that I used are from the following sets. Princess and Mermaid, Tiny Gnomes, Horse, Unicorn, and Zebra, Gnomes and Santa (king), Knight and Dragon (dragon), Backyard Charms ( fairies, snail, mushrooms, large flower being held by girl gnome) Butterfly Collage add on (wings on Pegasus, I used gold wink of Stella on the wings ), Tiny Accessories 1the crown on the king
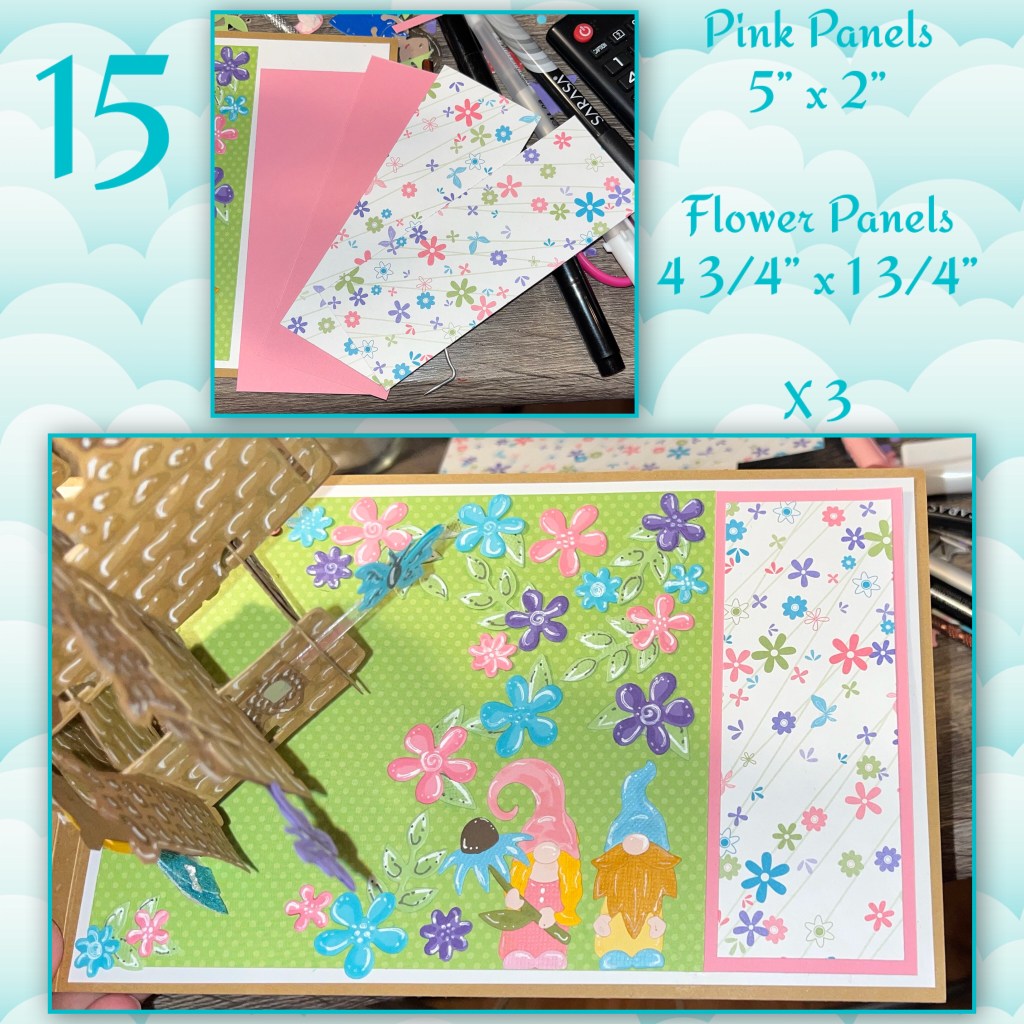
15- I cut the panels to the dimensions below, and added them to the inside and front of the card. I started adding the flowers and other pieces.
16, I added details to the front back and both sides
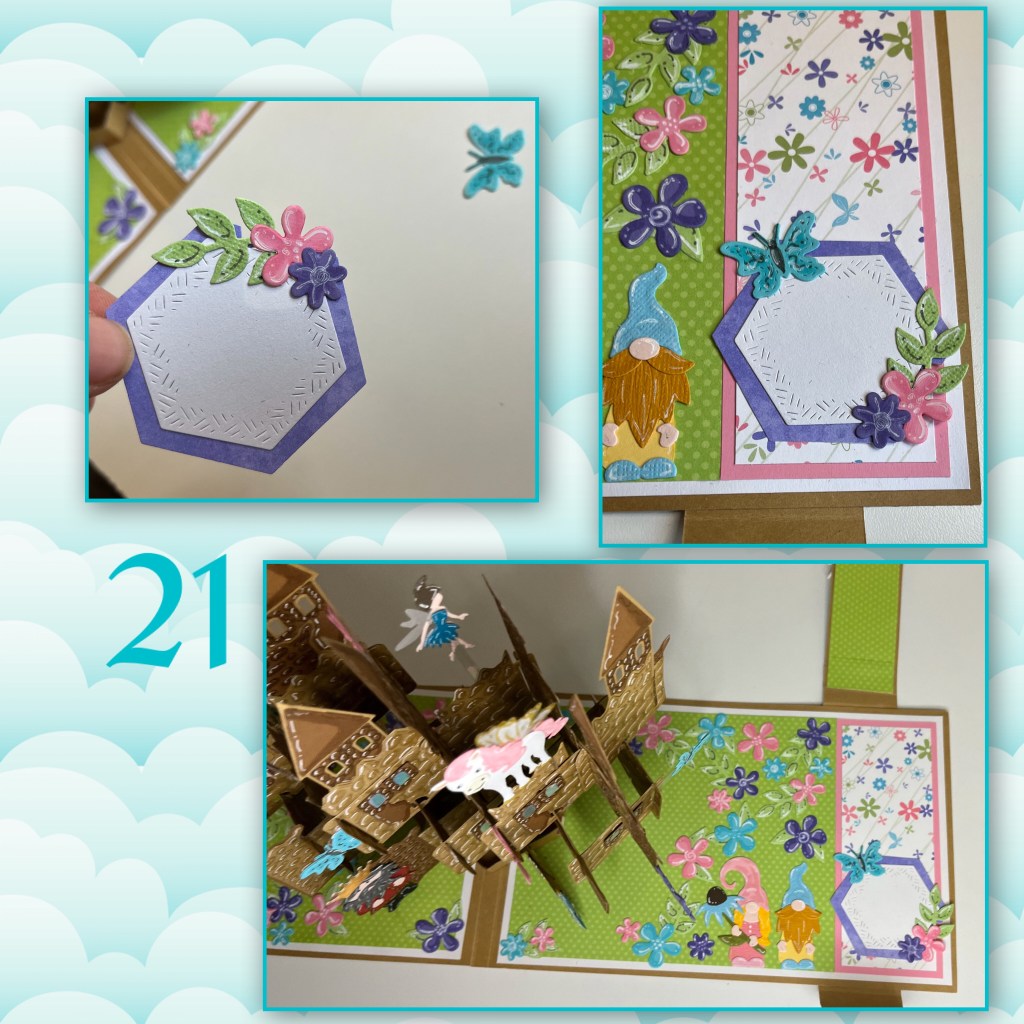
17- diecut Happy Birthday , and the Happy Birthday Shadow, I also diecut 2 hexagons from the Hexagon Crosshatch. I layered them as shown.

18- I decided to make a belly bend with a magnetic closure. I cut a Strip to the measurements below. I added magnets as shown and then covered with paper. I adhered the back of the band to the back of the card.
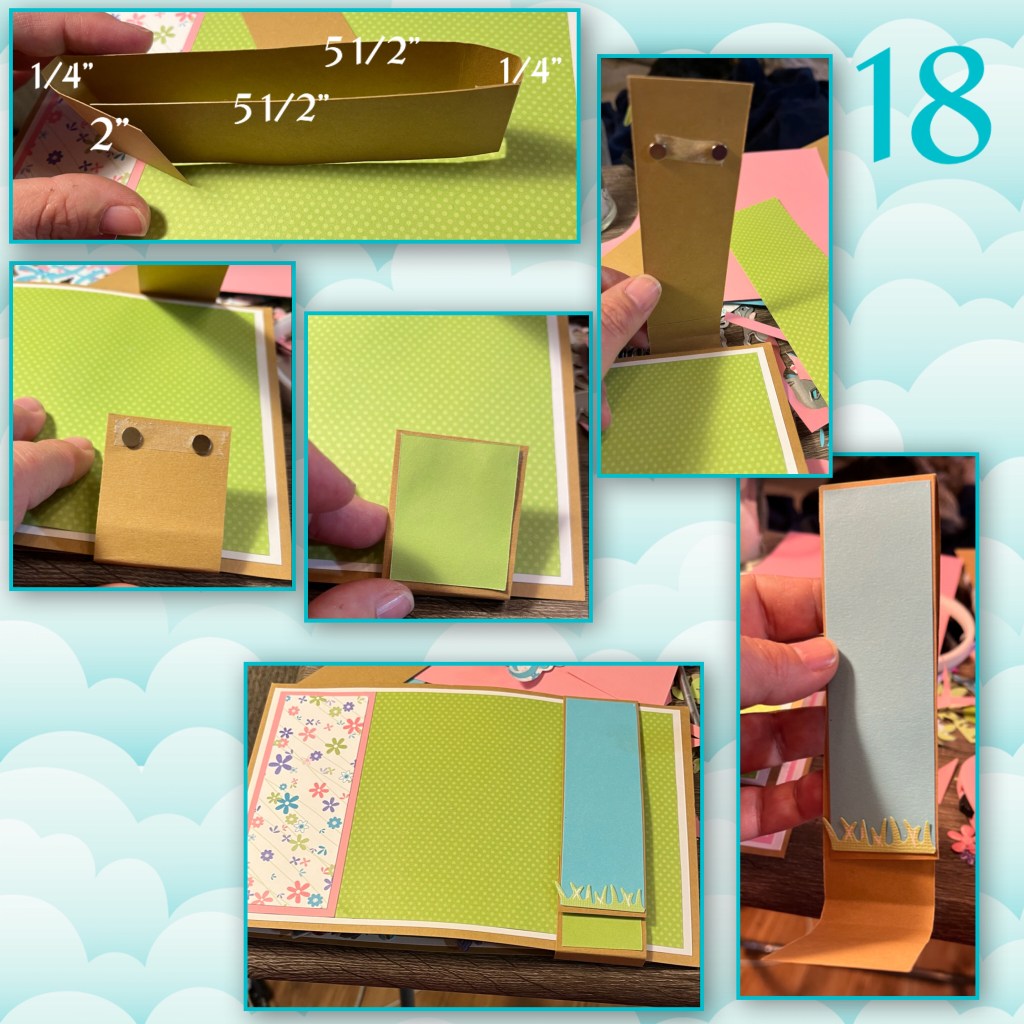
19- I decided to make it easier for a three year old to open by adding a ribbon to the closure. I took a loop of ribbon, and a strip of sticky strip to add to the top flap of the closure then covered with another piece of paper. I then added a unicorn to the band.

20- I added all the pieces to the front as shown. I also added a purple 3 from the Numbers dieset.

21- I added a few of the small hexagons for a signing block.
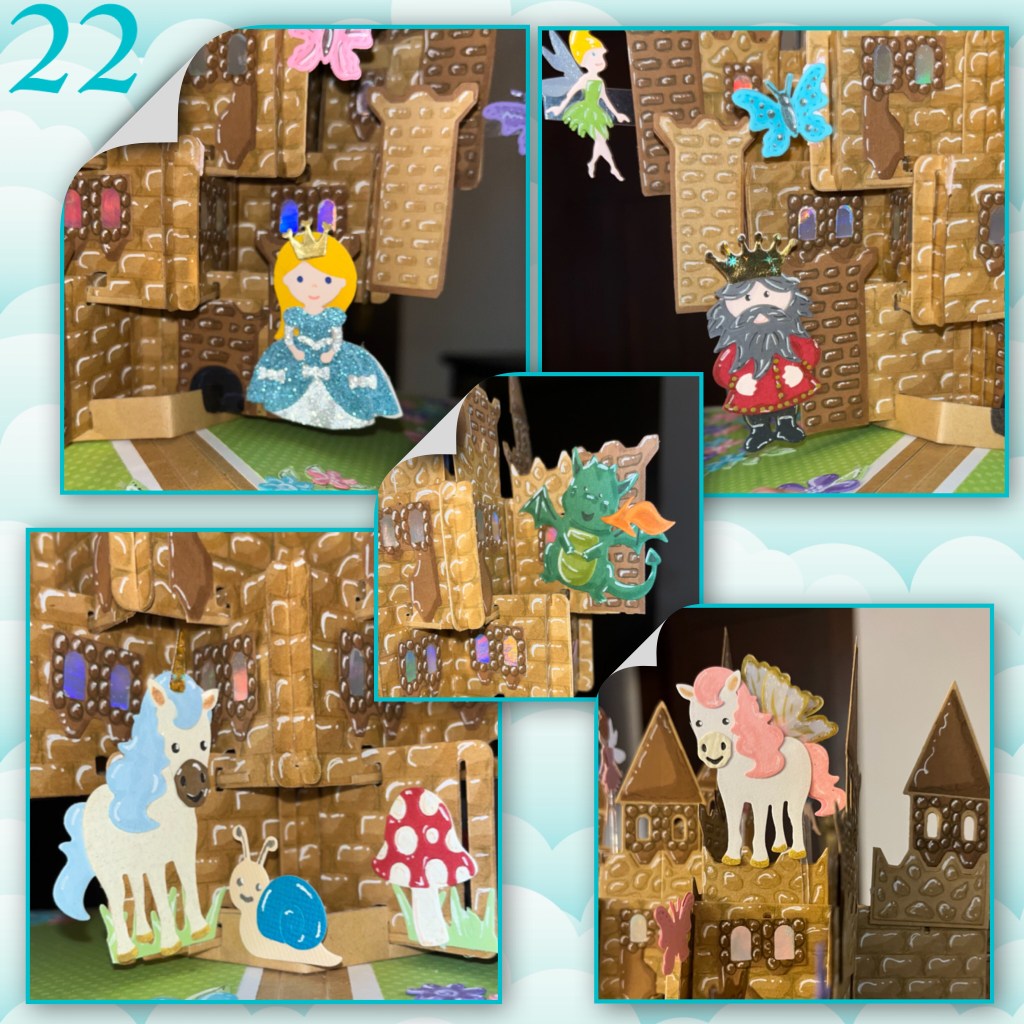
22- here are a few close ups of some of the characters

Other Tools used
To see the rest if this extraordinarily talented design team please check these out ⬇️⬇️⬇️
Lois Bak https://clownmomcreations.blogspot.com/2023/06/karen-burniston-new-release-blog-hop.html
Sue Small-Kreider – https://ullysworld489442913.com/2023/06/23/american-as-apple-pie/
Frances Byrne – https://stampowl.blogspot.com/2023/06/karen-burniston-kb-riley-llc-june-2023.html
Jennifer Webster – https://www.jlwebstercreations.com/2023/06/karen-burniston-kb-riley-llc-june-2023.html
Fran Sabad – https://fransabad.com/cards/karen-burniston-june-2023-release-and-give-away/
Suzanne Smit – https://knutselsuus.blogspot.com/2023/06/karen-burniston-june-2023-release-blog.html
Nicky Foden https://mymessycraftroom.me/?p=5894

I love this card so much! The details are just amazing. I feel like I learned so much from reading what you did. (Especially the tip about doubling the card stock when it’s not heavy enough) I love all the shading and details that you used on everything it just went the extra mile. I seen the house of cards design and I thought how much will I actually use this one in my card making..….and then I seen this card and now it opens up a lot of possibilities. Great job!
LikeLiked by 1 person
I have a granddaughter due in September and I know I’ll find a use for this castle! I wasn’t going to buy the house of cards but this convinced me that I need it! Thanks for sharing this creative idea!
LikeLiked by 1 person
I forgot to add my email to my post: cerbinh@gmail.com
LikeLike
This card is astounding! You have a wonderful talent.
LikeLiked by 1 person
This is such a awesome card. Great detail.
LikeLiked by 1 person
Such an amazing card! The attention to detail is remarkable!!
LikeLiked by 1 person
I commented but forgot my email for the blog hop!
cerbinh@gmail.com
LikeLiked by 1 person
Wow–this is fabulous. My granddaughters would love to receive a card like this.
LikeLiked by 1 person
This is FANTASTIC! What a great use of the house of cards die! And this is such a FUN Birthday card. So much detail. Great inspiration!
LikeLiked by 1 person
Holy Moly! You have such a creative imagination. This is absolutely beautiful. 💖
LikeLiked by 1 person
I’m awe struck!!! Your card is AMAZING! The way you did the bricks is stunning. All the details make this a masterpiece. vrc@prodigy(dot)net
LikeLiked by 1 person
Girl, you knocked it out of the park. I saw it and first think I said to my husband was, I need to make this for my niece and her daughter (Disney fanatics) but WOW!! I’ll admire from afar. Absolutely amazing! Xo
LikeLiked by 1 person
This is simply Amazing! I love what you did. I ordered all the new dies can’t wait until they get here. Thanks for sharing your AMAZING card!
LikeLiked by 1 person
Woo Hoo! You really went outside of the box with your House of Cards transformation to an amazing pop up castle! Thank you for sharing all the details of your creative process… all the intricate detailing from the drawing of the bricks to adding all the die cut embellishments really makes this card a treasure.
LikeLiked by 1 person
Great release and such fun projects!!
LikeLiked by 1 person
Wonderful wonderful. So creative and fun. Thanks for sharing your talents
LikeLiked by 1 person
Unbelivably creative! Great job. I can’t wait to play with this die.
LikeLiked by 1 person
OH. WOW. This card is over the top wonderful!!! I am going to try this for my granddaughter’s next birthday. It is in May. I just need to stay focused and finish! Thank you so very much for this inspiration!
LikeLiked by 1 person
OMG, how spectacular and creative!! All the details you put into this are simply jaw dropping. So much fun for a little girl to receive. It’s just pure joy!!
rebyah1@gmail.com
LikeLiked by 1 person
OMG that’s a spectacular card! Thanks for the in-depth tutorial. Love the magical horse with the butterfly wings.
LikeLiked by 1 person
AMAZING AND MOST STUNNING work of arty designing just love this card and you are truely amazing lady xx
LikeLiked by 1 person
I am so amazed by your castle card! Incredible card with beautiful details and great colors and textures!
deniseb777ATgmailDOTcom
LikeLiked by 1 person
Coolest card ever!! What a thrill for anyone to recieve!
LikeLiked by 1 person
I see your projects everywhere, you are so talented! Thanks for sharing this.
LikeLiked by 1 person
You definitely out done yourself. This is a show stopper, you put so much detail into this card. You did a fabulous job. Just WOW!
LikeLiked by 1 person
Some imagination!
LikeLiked by 1 person
WOW! Just WOW! I have most of the dies you used. Would love to attempt a similar card. Thanks for sharing!!
LikeLiked by 1 person
Wow! This card is amazing! Lots of work went into making this one! What a masterpiece! Love, love, love it!!!!!!!!!!!!!
LikeLiked by 1 person
This is UNREAL! I love how you did the castle pieces! Soooo creative and gorgeous!!!!!!!!!!!!! meghan.kennihan@gmail.com
LikeLiked by 1 person
WOW! I just love this card. Sooo much work went into this. I love all the details. I have all the other dies you used to make this card so as soon as I get my house of cards set I’m gunna give this a try. Thank you soo much for all of the detailed instructions.
LikeLiked by 1 person
Thanks you so much. I would love to see your take on it 😀
LikeLike
WOW! Amazing! So clever! I could never come up with anything like this. And your detail is unbelievable! I will be following you on Facebook to see what other unique designs you come up with. Thank you
LikeLiked by 1 person
This is amazing, Nicky — such a lot of work, but made with love!
LikeLiked by 1 person
Amazing!
LikeLiked by 1 person
Wow. This is so beautiful, it’s like magic. Love the detailed process.
LikeLiked by 1 person
WOW! just WOW! I’m speechless
LikeLiked by 1 person
So clever
LikeLiked by 1 person
Wow! Wow! Wow! Your castle is a masterpiece.
Carol bu
LikeLiked by 1 person
Wow amazing how younused the new pop up die. What a great card!!!!
LikeLiked by 1 person
Absolutely BEAUTIFUL and SUPER cool!! Nicky, you do the coolest things with those castle dies – well, with all the dies, but I’m partial to the castle ones. Always very inspiring. ❤
LikeLiked by 1 person
Wow!! This Castle “House of Cards” BLEW ME AWAY!! Soooo freakin’ cool! I love your blog posts. So inspiring and very informative! Thanx so much! ❤
LikeLiked by 1 person
This is fantastic! So creatine – thanks for your inspiration!
LikeLiked by 1 person
I love your card. en thank you voor showing how to make it. Suzanne
LikeLiked by 1 person