

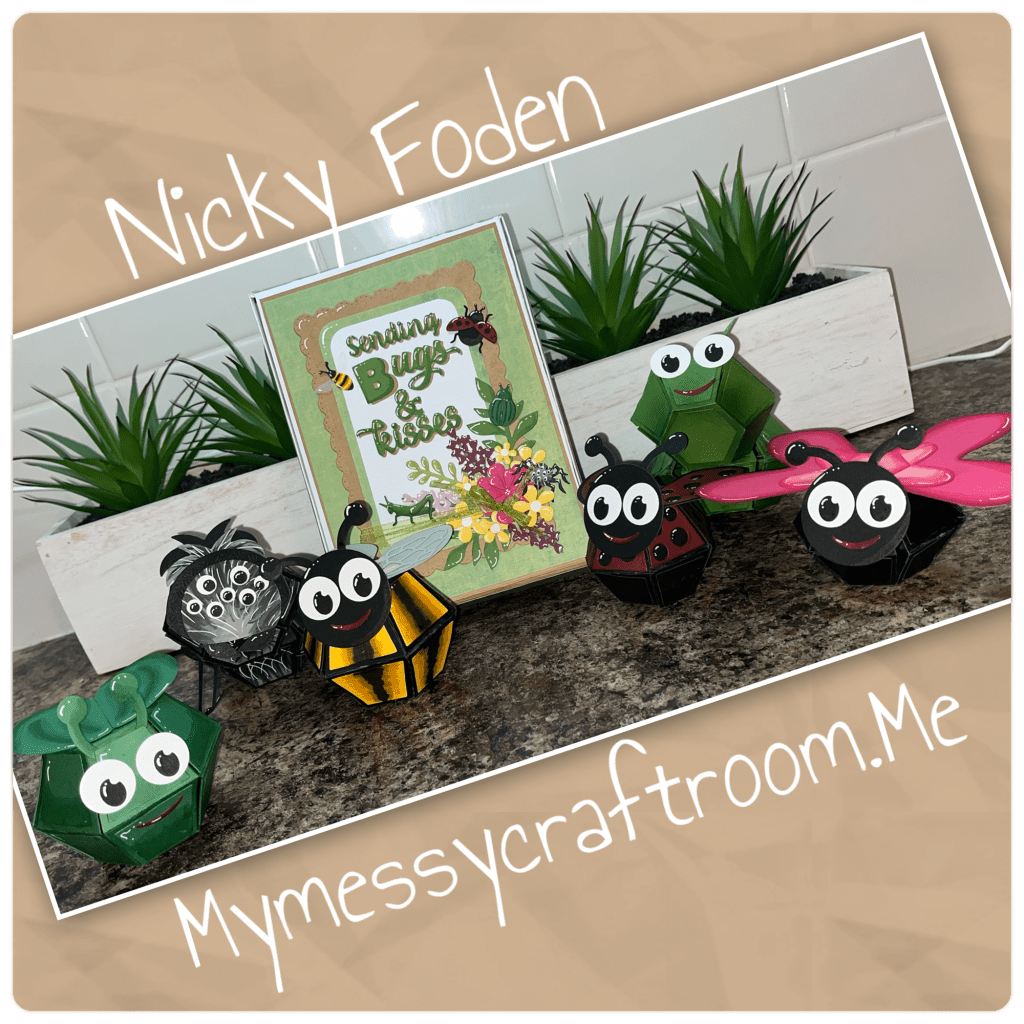
Happy New Year crafty friends and welcome back to my blog. Today I am sharing my take on Karen Burniston’s January designer challenge which is “Bugs”. For those of you that follow along (and actually read) my blog you know that when I make a project I typically figure it out as I go. This project is definitely one of those. I started with a loose idea and then I went completely down the rabbit hole and ended up with this. Typically I add links through out the post but because most of these use mostly the same die sets I will link them at the end. If you follow the link, Karen has video tutorials for each set (just scroll down a bit once you get to the product)
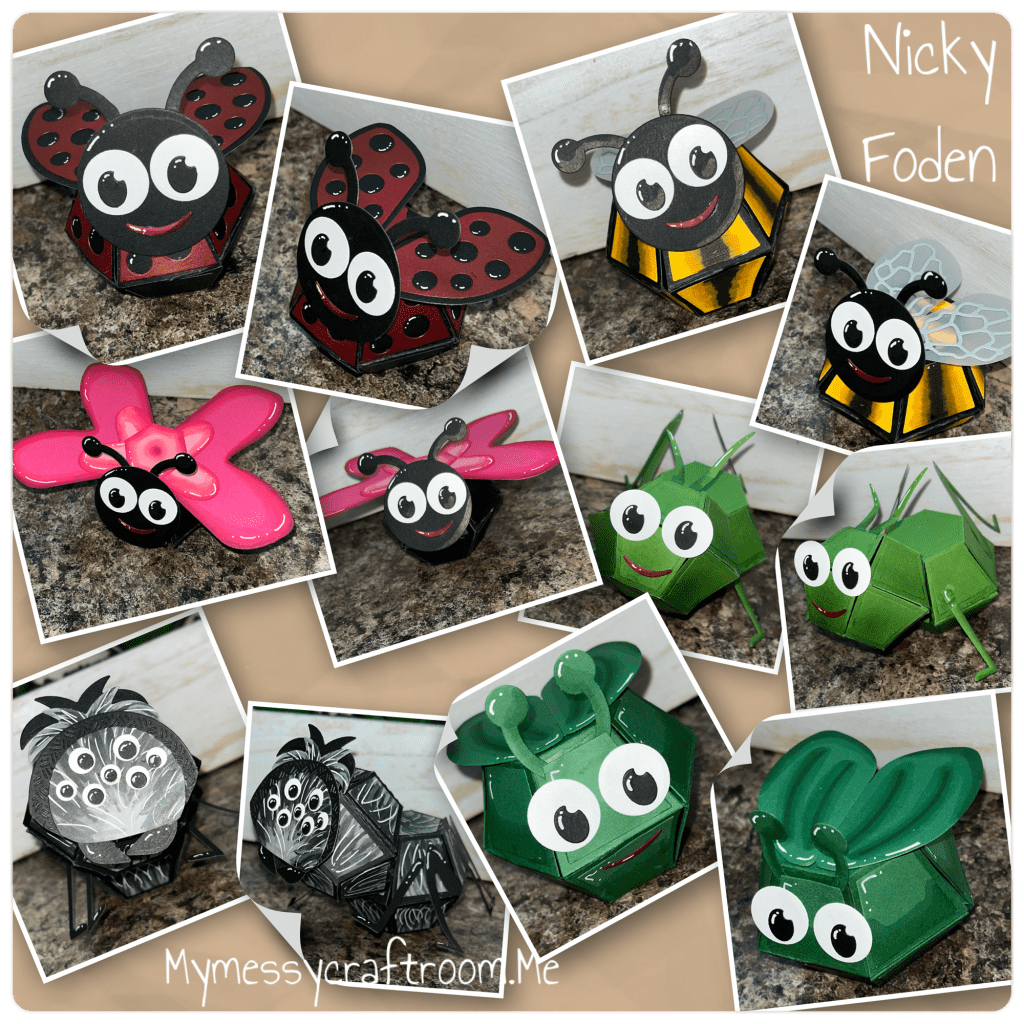
I have to say I think these little critters are adorable!!!!!
A close up of my buggy balls

All the fun is in the reveal, to see this cuties pop out of the box please check out my FACEBOOK page, feel free to join if you would like to share your own crafty creations. You can also see a video of this project on my INSTAGRAM page.
Like I said above I was really all over the place when making this project. To lesson the confusion I am going to write this blog in an order that makes sense even though it is not in order of how I made it. So you might see photos that seem out of order, just read to the end it should make sense.
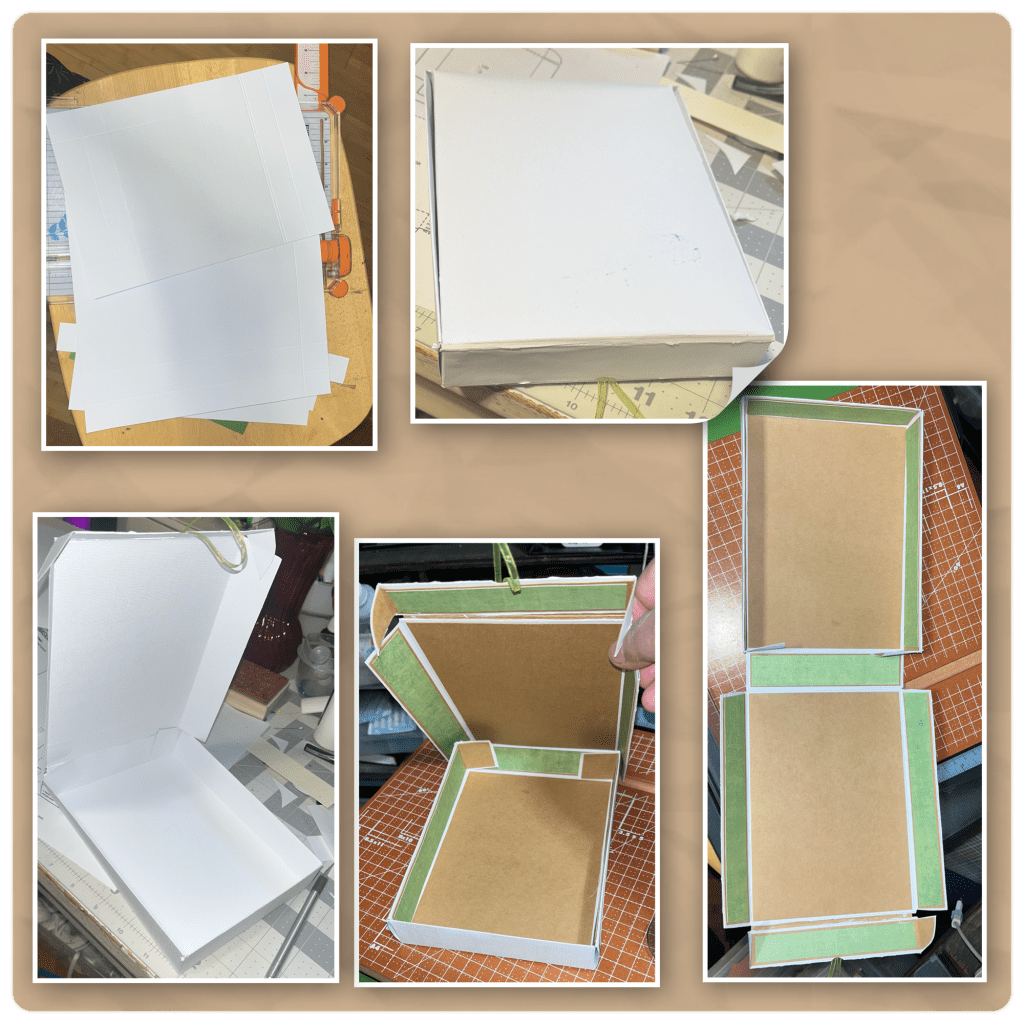
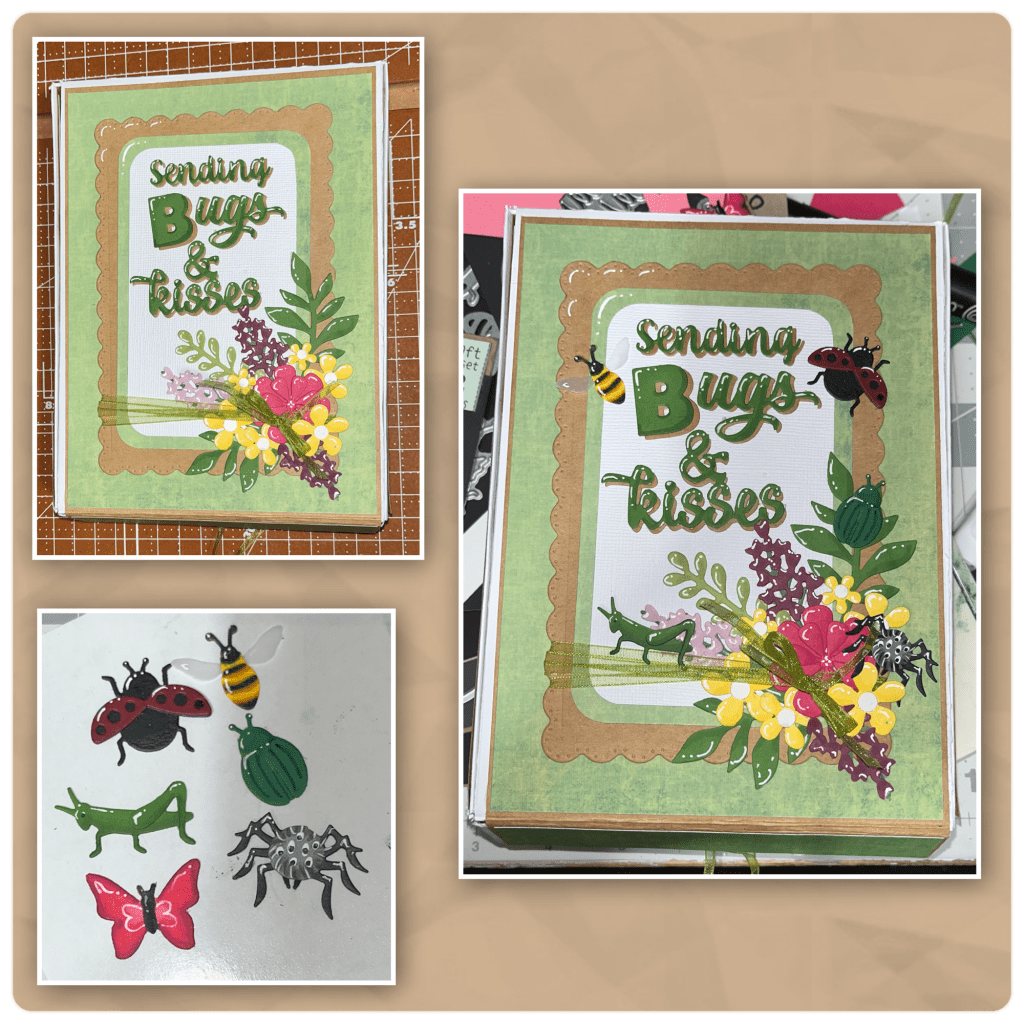
Originally I was only going to make a lady bug in a card, but had so much making a few crawly friends, so then decided to make a box. This is a box that Karen taught in a video and links are at the bottom. I made the A7 size box. I only had light weight 12” x 12” cardstock so I added layers of cardstock and the green paper. The Kraft cardstock pieces are 1/8” smaller than the dimensions of the box, and the green paper layers are 1/8” smaller than the cardstock.
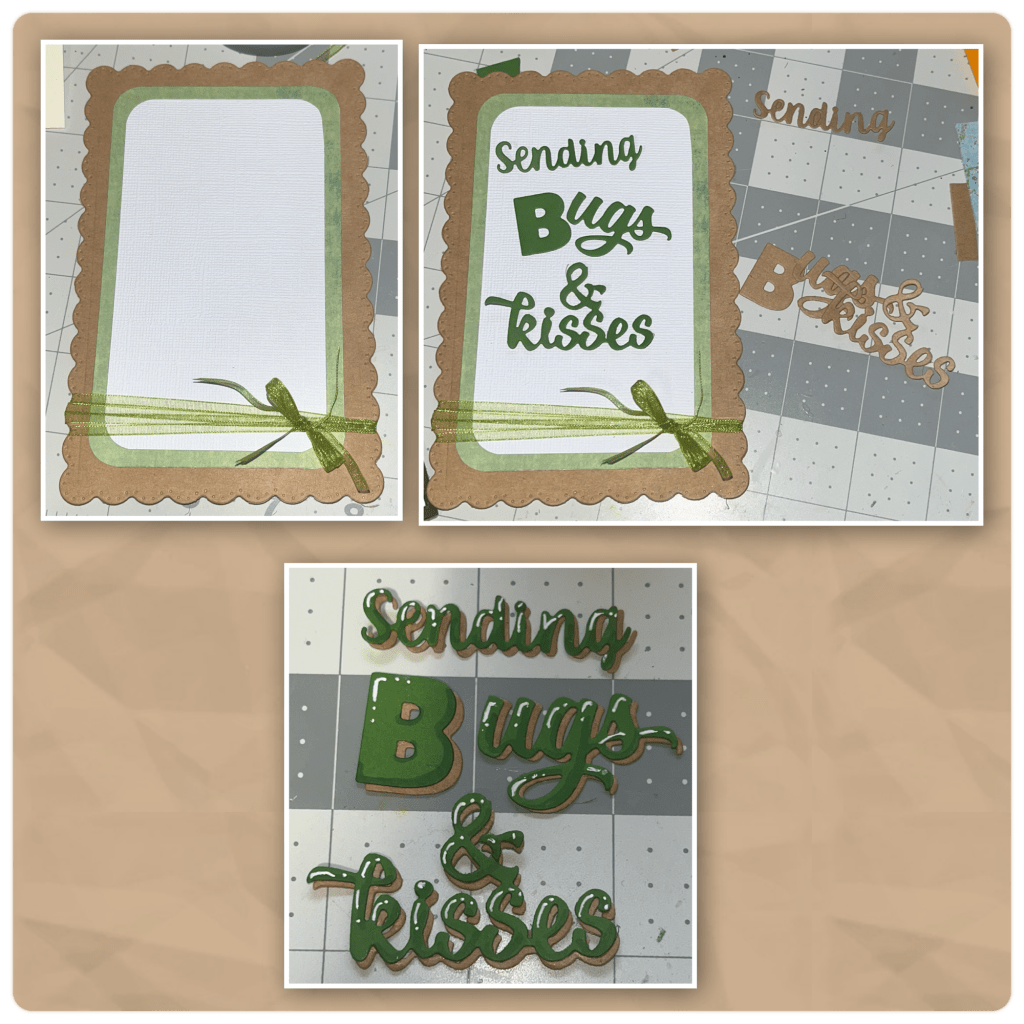
To make the panel on the top of the box I cut a large scalloped frame from the Rectangles and Labels crosshatch. Because I only have a small piece of the green paper left, I rounded the corners using an old Creative Memories corner rounder (no link it is almost 20 years old) I cut a white rectangle about 1/4” smaller than the green. I did a little word surgery to make the greeting. Using alcohol markers I added shading, and a white Gelly Roll pen for highlights. I wrapped a thin green ribbon around the panel.
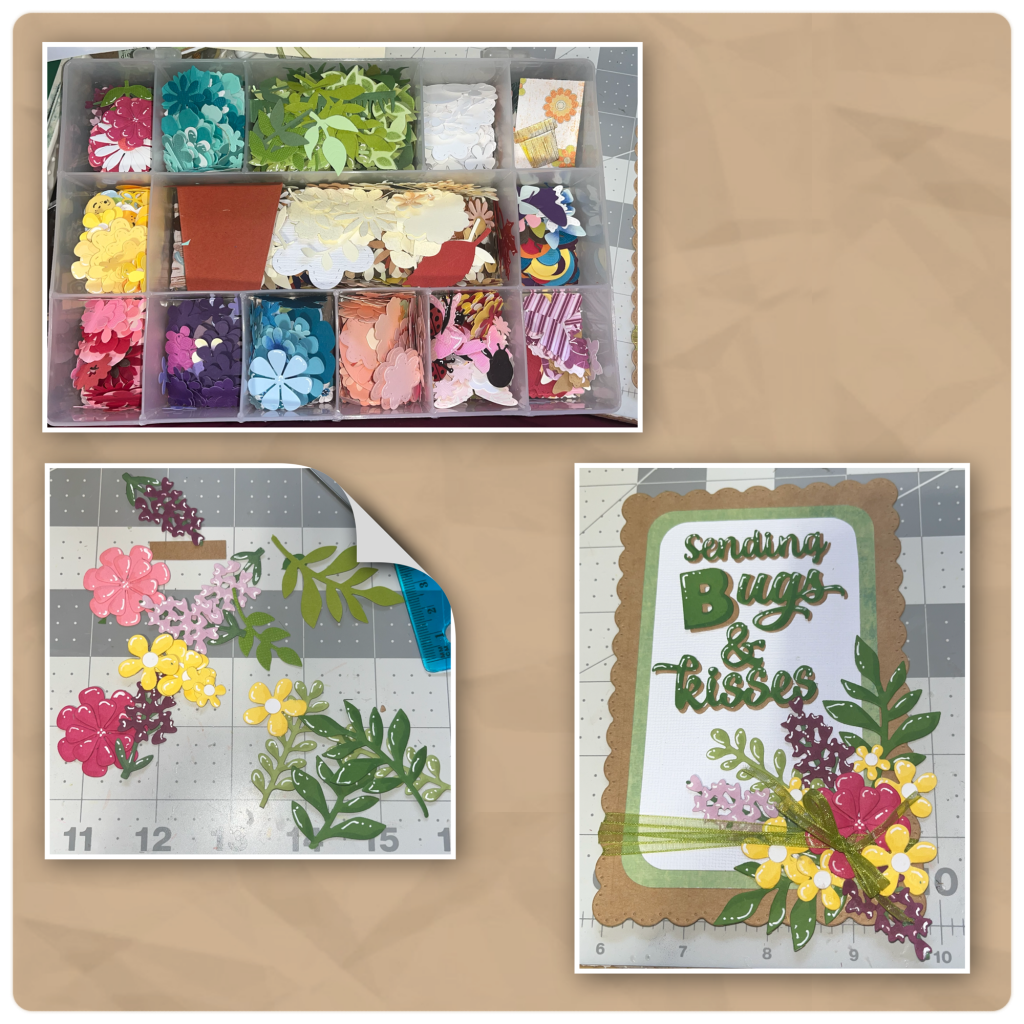
By now I knew my project was turning into something bigger than originally planned I decided to just use the flowers that I had in my extra diecut box.
Also when I made this finishing touches on the box I had already created all the big bugs I decided to make small bugs to add to the front. I coloured with alcohol markers, and highlighted with a white Gelly Roll Pen
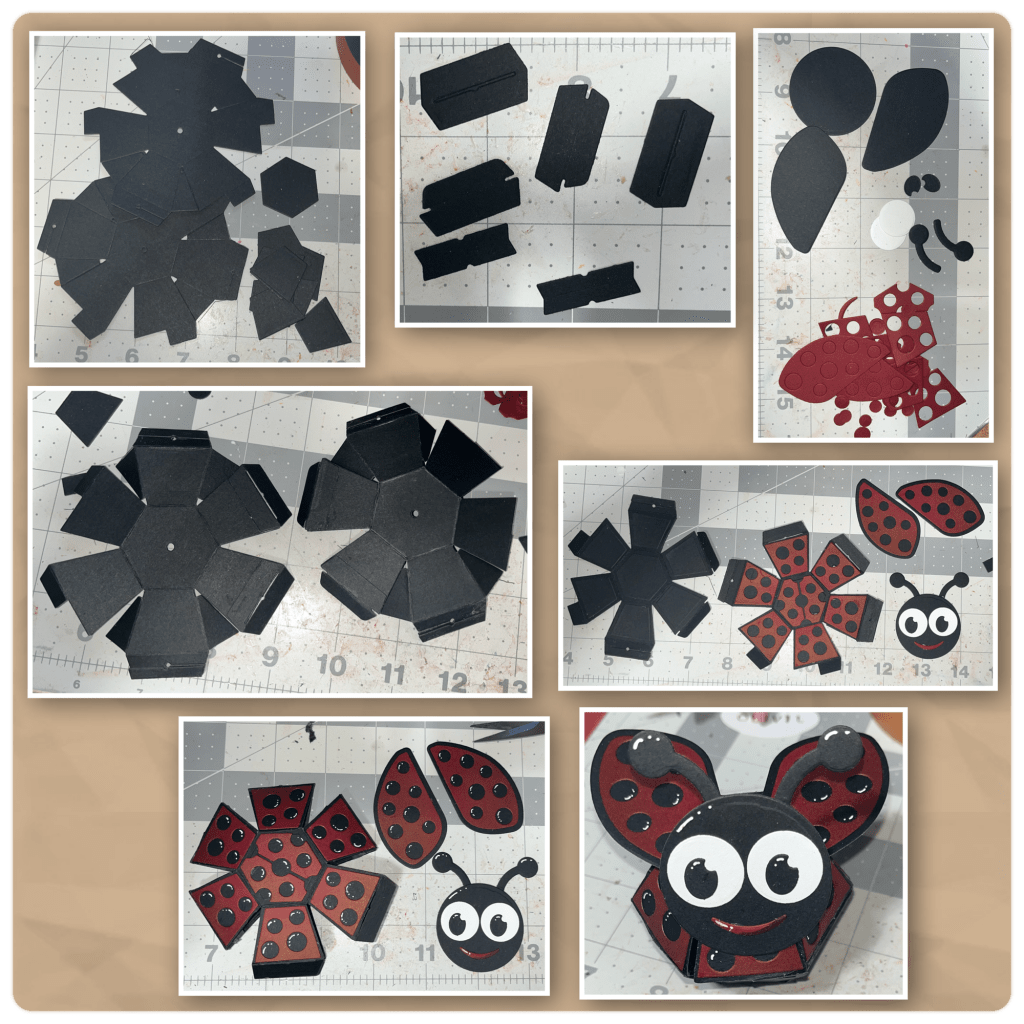
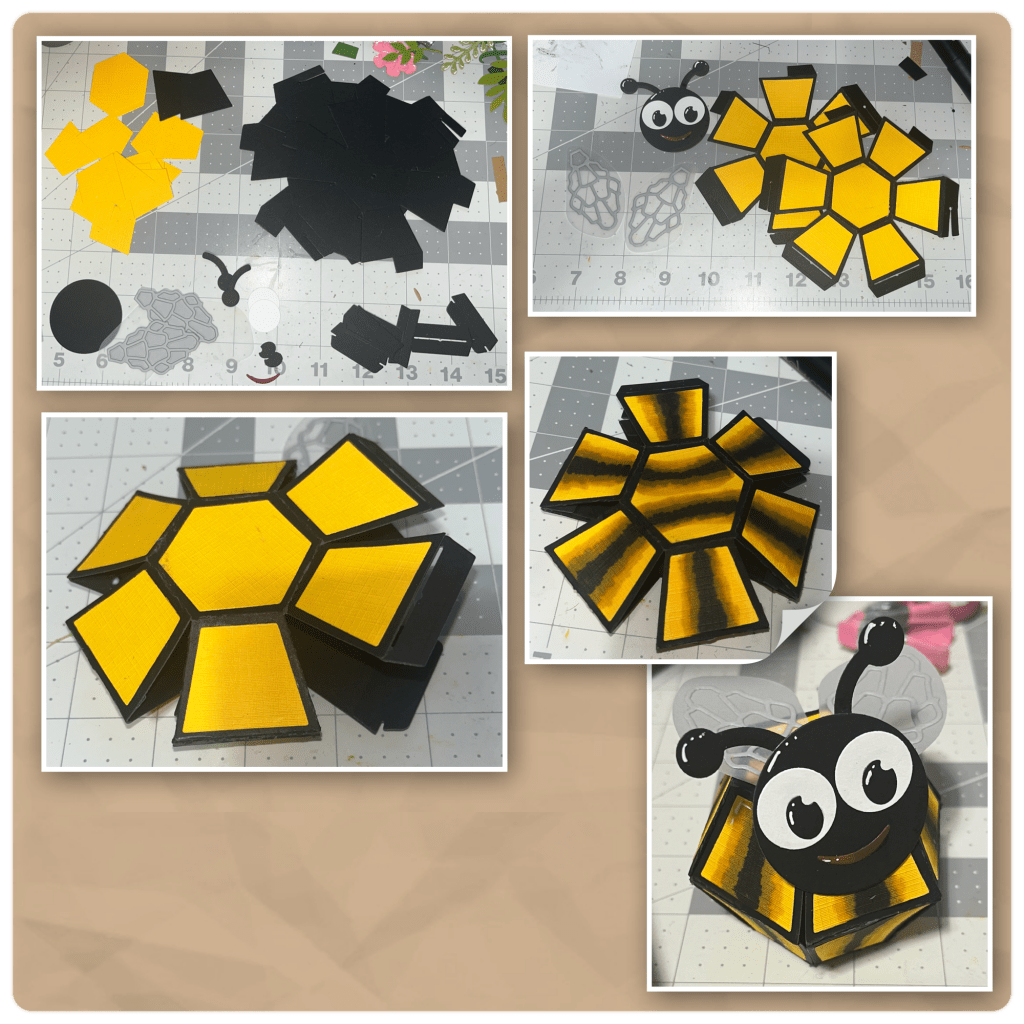
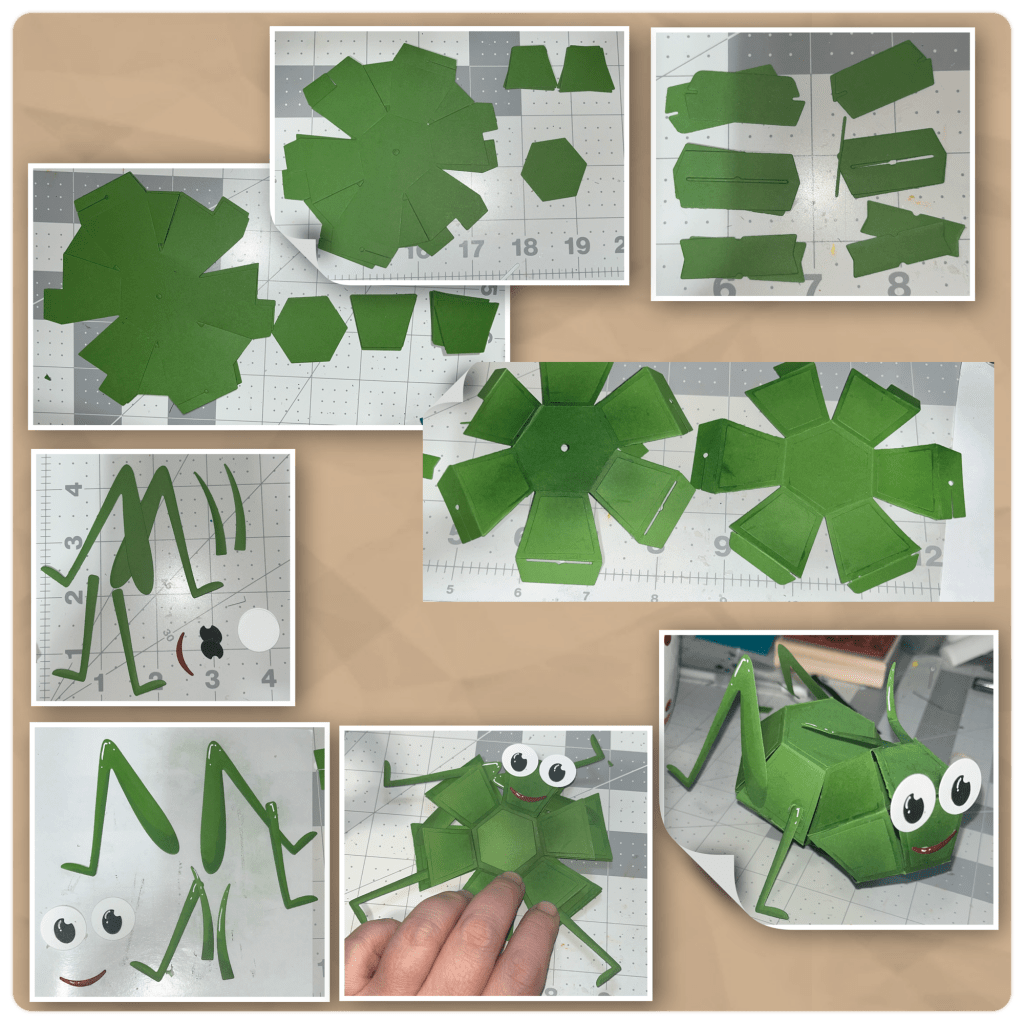
Now for the bug balls. All of the bugs were made using either the Mini Ball or the Bitty Ball. I will let you know which for each. I used the Access tabs and the Double Up sets as well. They all also use the Animal Add ons 6-Bugs
For the Lady Bug I used the Mini Ball and the pieces from the Animal Add ons 6-Bugs. The ball is done in black, with the red layers. I coloured with alcohol markers, and highlighted with a white Gelly Roll Pen
For the Bee I used the Bitty ball pop up to make a black ball with the yellow layers. I wasn’t sure how I was going to colour the stripes so I thought it would be easiest to make the ball and before I added the rubber bands colour on the stripes. I wanted the stripes to like kind of fuzzy so I started with a yellow marker, then a grey then black.
To make the grasshopper I created a Mini Ball and a Bitty Ball both from green. I brushed on green ink to add shading and I coloured the legs with alcohol markers, and highlighted with a white Gelly Roll Pen.
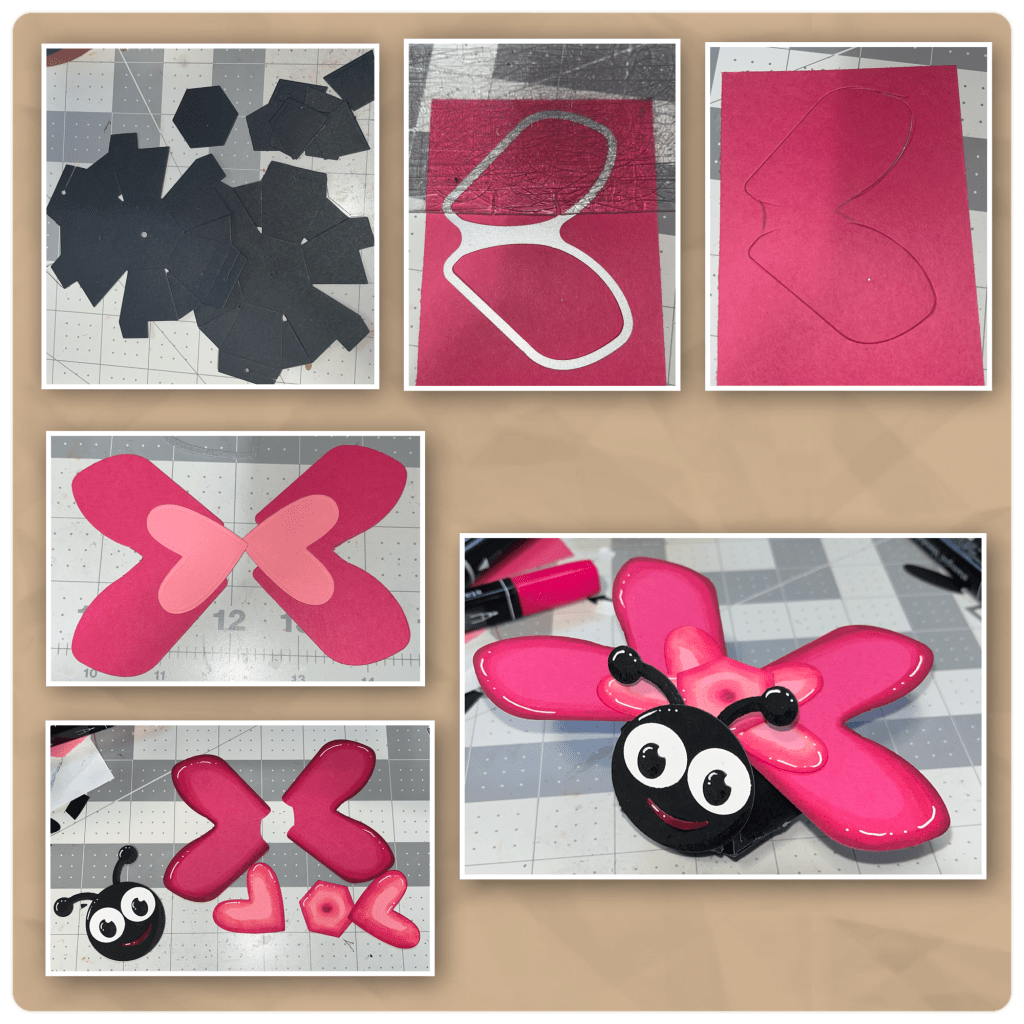
I am so please with how this cutie turned out. I made the Mini Ball in black. To make the wings I used the die that is meant to cut 2 wings from Animal Add ons 6-Bugs. I wanted to cut one big wing as apposed to 2 small wings so I did partial die cutting. Partial die cutting is when you only lay the cutting pad where you want to cut. So I had to run the die through twice per wing. First only cutting the top (as shown in photo below) then the same on the bottom. DO NOT CUT THE MIDDLE. I took a pencil and connected the wings to make one wing (as photo below) then cut on the lines to complete the wing. Do the same for the second wing. I used Hearts from the Hearts Crosshatch to add a lighter colour to the wings. I also cut the pink Hexagon from the Mini Ball set to cover where the wings over lap. I coloured with alcohol markers, and highlighted with a white Gelly Roll Pen. If you put the wings on, in a bit of an angle it gives the appearance that the front of the wings are bigger than the back of the wings even though they are the same size.
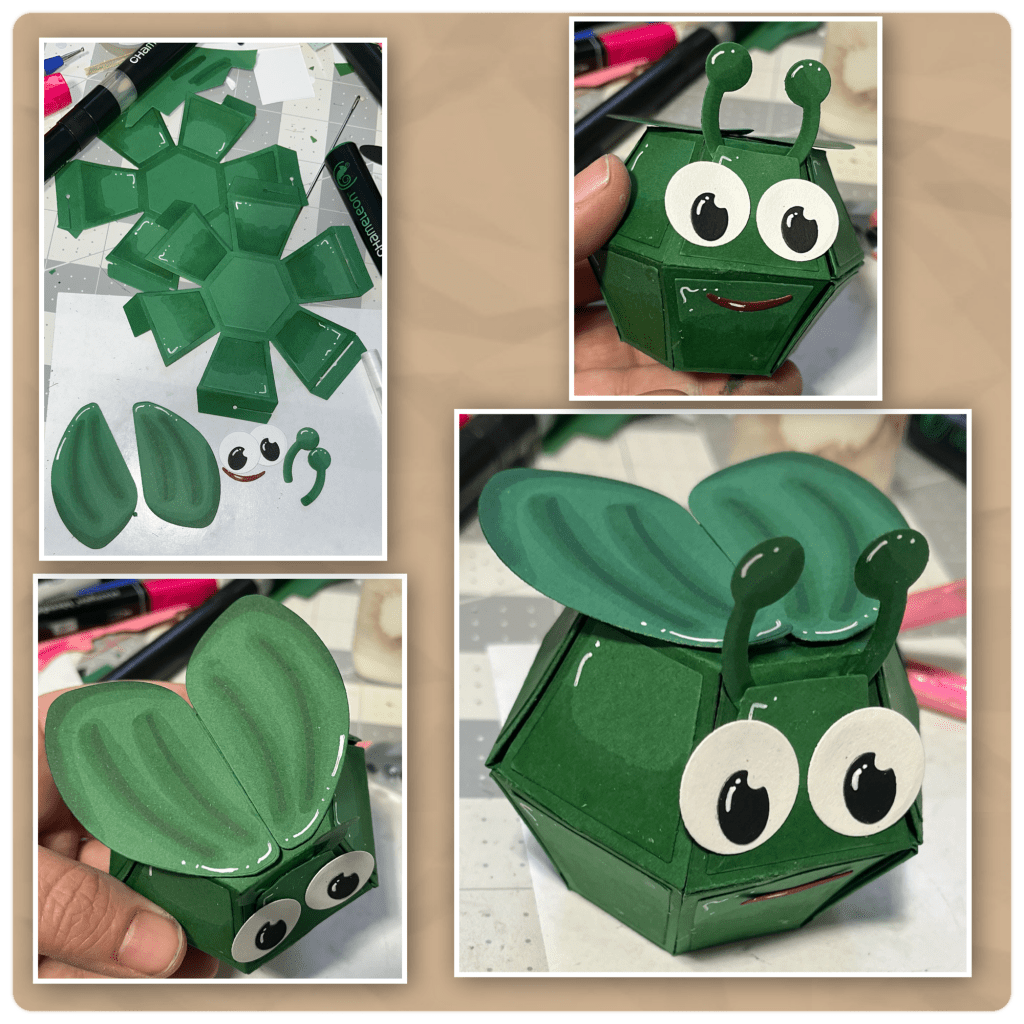
For the little beetle I created a green Mini Ball, I sponged on some green ink then I coloured with alcohol markers, and highlighted with a white Gelly Roll Pen. I used the same marker to add details to the wings.
The spider was actually my daughter’s idea and of course once the seed was planted in my head I just had to make it. I made a Mini Ball and a Bitty Ball from black to make the head and the body. I cut out all the trapezoids from grey then coloured with alcohol markers. I started with a light grey, then a dark grey then black. Lastly I added white highlights. I was careful to colour them so the fur was going in the same directions. To make the face I used the same circle from the Animals Add on 6-Bugs but I trimmed off the bottom a bit. To make the pincers I used the crab claws from Ocean Animals. To make the eyes I cut the white circles using the wing for the lady bug, and the black circles are the flower centers from the Fun Flowers set. I used the grass hopper legs but trimmed them as shown. I thought there needed to be a bit more contrast so I added a Circle from the Circles Crosshatch for behind the face. Not shown in these photos but in the main photo at the top I added 2 tuffs of hair (from the Mini Ball pop up set), one in grey to match the body and one in black to add some contrast. To add the legs I used the box for reference to make sure that the spider would fit in the box when complete.

Here are the buggy friends, just hanging out.

Box Directions
Karens Pretty Springy Ball Box Template only the dimensions, cutting and scoring (FREE DOWNLOAD)
Karen’s Ball Box VIDEO TUTORIAL watch the video to make the box
Dies Used for this project
Rectangles and Labels Crosshatch scalloped rectangle on box
Word set 14- Hugs “sending”, Hugs (cut off the H)
Word set 9- Love “and Kisses”
Alphabet “B” changing “Hugs” to “Bugs”
Playful Pop Up little Lady Bug, little Beetle
Bug Border little Bee, little Grasshopper
Halloween Charms little Spider
Backyard Charms little Butterfly
