

This card, my goodness, has been in progress for months. Someone (John Watterson) platted the seed in my head after I posted my first House of cards Castle and asked when I would make a Harry Potter version. I laughed and said it would be a while. So I started in a few months ago and I decided to that it was time to get it done. Part of my problem was, that I knew I wanted to make it but I wasn’t sure for who. So I decided to make it for me. This quote has always resonated something in me, from the first time I heard it. I thought I would pull out all the stops, and make a card that I can enjoy for myself. So I did.
While making the card I didn’t take photos of every detail, I did a bunch of fussy cutting dies to make the different pieces. I did use mostly Karen Burnistons diesets. I don’t want to take a month to make this post so I will give the card base and Castle details but I may miss a few things. If I am missing something that you want to know please message me and I will reply.

All the fun is in the reveal, to see this card in action please check out my FACEBOOK page, feel free to join if you would like to share your own crafty creations. You can also see a video of this card on my INSTAGRAM page.
1- I die cut the cards from the House of Cards die set. I drew on the bricks as shown, I used a grey pen to draw the lines, I added shadding with a Versa Mark Marker, and highligts with a white Gelly Roll pen, I used a darker grey pen to round the corners and thickening the lines to make it look like mortar. I did this on both sides.

2- I decided to try a different style to the structure than my Previous Castle, making sure the gold club shape is facing out on the pieces that will attach to the mechanism
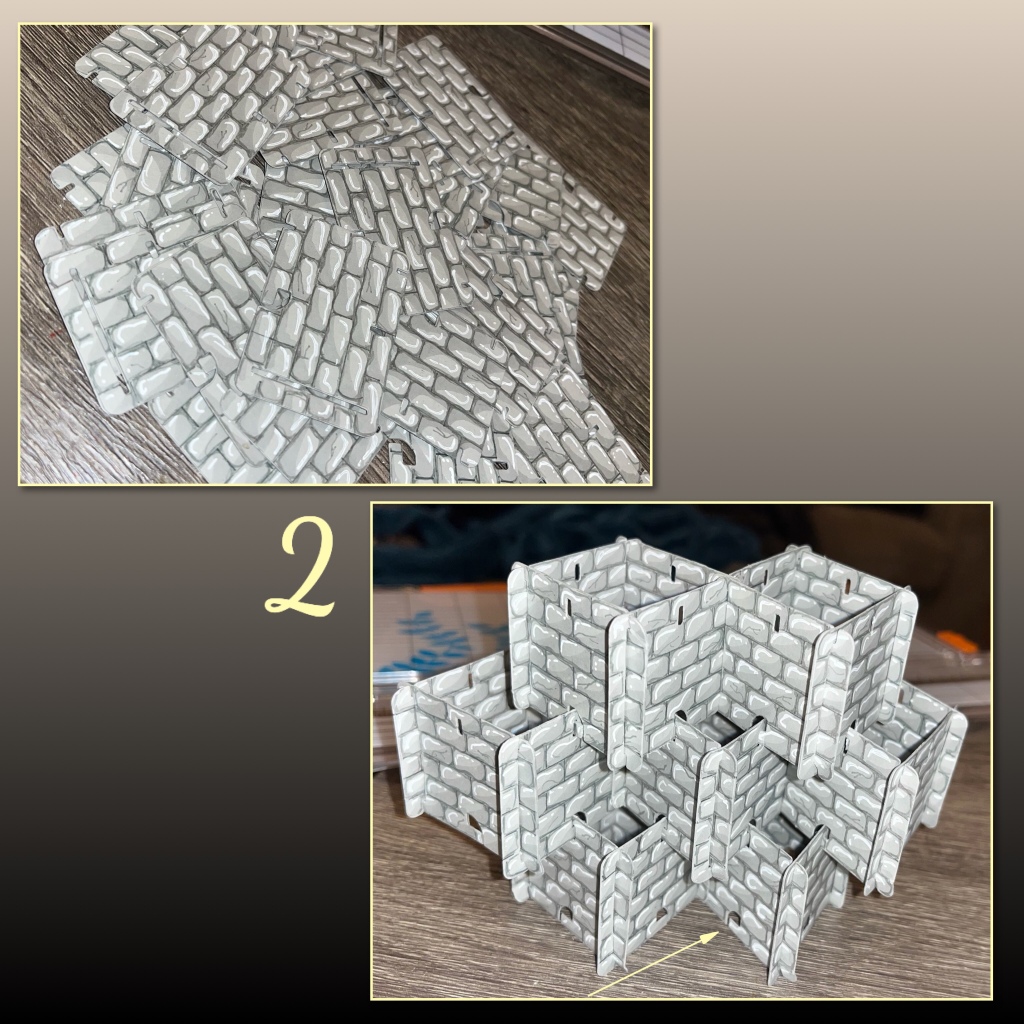
3- die cut several pieces of the Castle Pop Up, the base pieces in light grey and the layering pieces in the dark grey. I used the stencil feature on the dies to draw on the bricks. I added shadding with a Versa Mark Marker, and highligts with a white Gelly Roll pen

Oops photos # wrong. Sorry the order is a little off
6A- create door by cutting the golf club sale into a piece of wood grain paper, adhere to cattle then add the door frame.
B- I had a few extra card pieces so I trimmed them to cover some of the holes at connection points that aren’t being used.
C- I covered the inside of the wins with vellum. The bricks were still visible so I coloured them in with Wink of Stella.
D- i trimmed some of the base pieces, covered with the brick layers and added them randomly around the card.

I used the Pear Blossom Press EZ Lights to light up the 3 towers
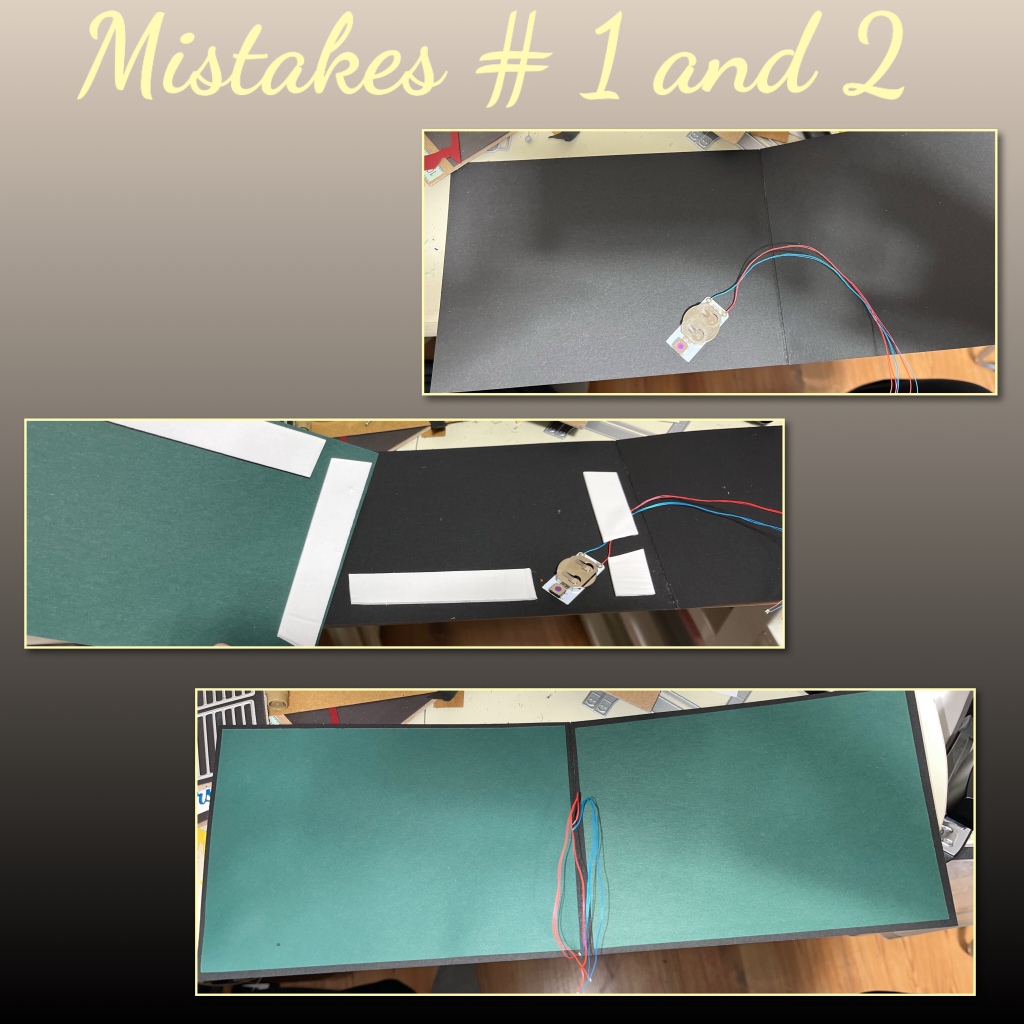
What’s a hand made card with out a few mistakes? First off I made the card base too small. This is 5”x7” and the towers were sticking out the end. Also I adhered the battery button on the card base, then realized that the wires would not run from where they are to the top of the towers where I wanted the window to light up.
4A- tape the light end where you want them.
B- Take 2 of the window sections, cut out the middle and bottom of one. Adhere to the second one that has not been cut, as shown. Sandwich a small piece of vellem between. This makes a channel for the wire to feed through.
C- this what it looks like from the back side. The wire is slightly visible.

5- I decided to hide the battery and button behind one of the upper turrets. Run the wires to the other towers I had to use a small hole punch to run the wire through some of the cards.

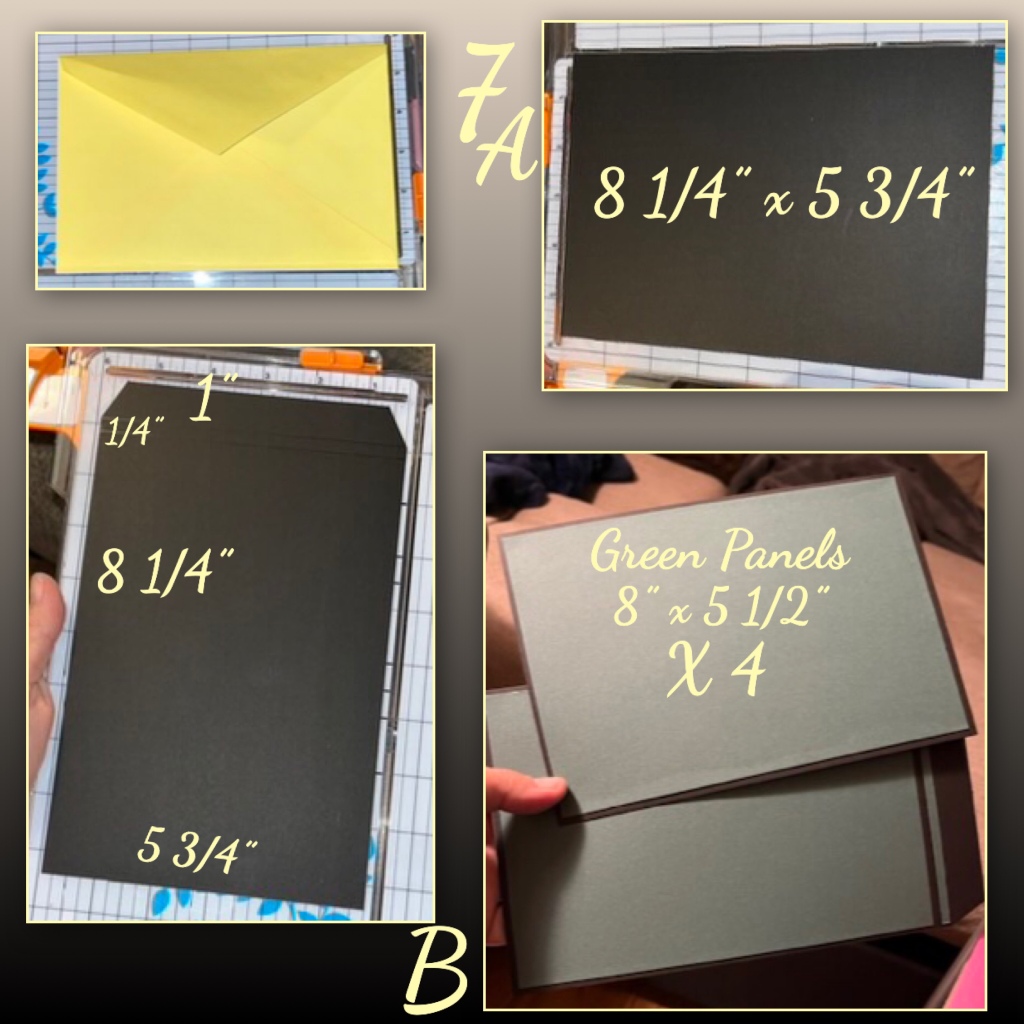
I dug out my biggest envelope to see how big of a card I could make and still fit in an envelope, but who’s kidding who, the card in the end is too thick lol.
7A- cut and score the pieces and panels as shown.
B- add the panels to the front and inside, NOT THE BACK
8A- attach the House of Crds mechanism to the card base. You will have to trim a bit to account for the 1/4” gusset
B- I thought I would add a bit of reinforcement
C add the card.

Another mistake, after a few days of opening and closing the card the mechanism ripped because the card stock was not thick enough to support the weight of the castle. So I made a new mechanism and I doubled up the cardstock, I used eyelets to help strengthen the connection points.

9- I used a Tiny Treeto make a Whomping Willow. I used the cloud like shape from the set to make the bumpy trunk. I used Gumdrops to make the whompers and I added shadding with a Versa Mark Marker, and highligts with a white Gelly Roll pen

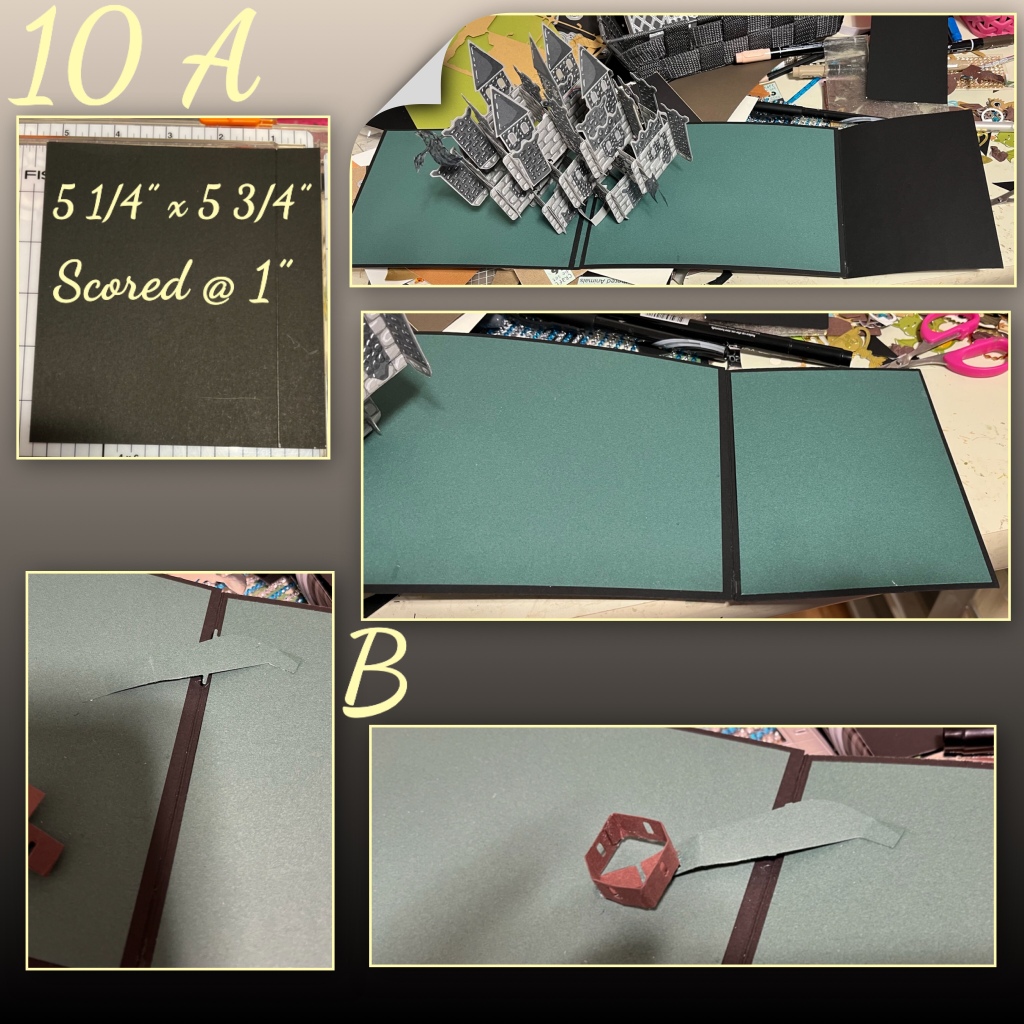
10A- I decided to add an extra fold to attach the tree, dimensions below.
B- I Added the fold splitter from the Tiny Tree set and attached the mechanism.
11A- cut out spiders and webs (I will list all at the bottom), webs were cut from vellum
B- add the tree
C- add another Tiny Tree Mechanism, but add the webs and spiders to it as shown.

12A- I drew larger bricks for the card front, the same way I drew the bricks on the Castle.
B- I drew a row of stones, again the same as I did on the castle.
C- I hand cut around the edges
D- because the bottom row of bricks are only half bricks I trimmed them off. I cut a gap in the wall under where the stones will cover to make up the space.

13A- I drew a 2 lines the width of the stone border, then drew the snake body wrapping around the lines.
B- to colour I used 3 shades of green alcohol markers. I started with dark green dots, then medium green dots, then light green dots.
C- cut out the snake, then I used the end as reference to draw the head. I used a 1/4” punch for the eyes.
D- wrap the snake around the wall, and add to card front. I also add the “Happiness can be found even in the darkest of times” to the front, I printed it from a computer into white cardstock.

14A- to make the Dementors I diecut Half of a ghost and half of fireplace flames from vellum, I trimmed with scissors and coloured with 3 shades of grey alcohol marker
B- to make the Phoenix i used a bird, leaves and wings, (listed at the end) coloured with yellow, and orange alcohol marker, black pen and white gel pen. I also used gold

15A- I cut a bunch of elements out and added along a wall I added. (listed at end)
B- using left over pieces I made a block for

16A- added a few more characters
B- to make the snitch I actually used a smaller circle that shown, 1/4” and I trimmed the flutter charm wings.


Diesets used
Gingerbread Tiny House add on– Whopping Willow
Slim Pattern Plate Spiders– web
Halloween Borders – spiders
Halloween Scene large web, spider
Halloween Charms large spider
Knight & Dragon– Dragon and Sword of Griffindore
Feathered Animals Owls
Fire Place Pop up flames- Dementors
Halloween Elements Bird head on Diadem (Crown), Dementors,
Outdoor Scene– largest bird- Phoenix, deer Patronis
Pop n Swap leaves- Phoenix
Flutter Charms wings- Phoenix and Golden snitch
Treasure Charms – Ring, locket, Diadem, Hufflepuff cup, Goblet of Fire
Witch & Cauldron – sorting hat, Dobbys face and hands, broom
Fireplace Extras 1 Christmas candles, Dobbys sock
Bookworm– diary, books
Garden Charms Mandrake (plant baby) shovel
Circles Crosshatch– Quidditch hoop
Mailbox Pop up– letter that owl is holding
Other Tools used
To see a similar card, different colours and different configurearion please check out my Fairytale Castle

Omg, this card is just phenomenal. The work and the hours involved are definitely apparent and appreciated by everyone that see this card. I especially loved it’s recipient with someone that actually will always appreciate the hours and time that went into it. I’m glad this card stayed wieventually eat them all myselfth you, it’s something to be cherished. On a side note.. Candy Corn a nah or yeah for you. For me it’s a yeah for the taste but a nah for buying as I have no will power and I’d eventually eat them all myself. Lol
LikeLiked by 1 person
Super card! Every time I make a card I learn something new. I love that you share your mistakes and successes. Adding lights to the house of cards pop-up is challenging. I like how you resolved adding the control panel. Happy crafting!
LikeLiked by 1 person
Totally amazing! Thank you for taking the time and effort to post all your technique and construction details. I always learn so much! I only wish I had enough patience. dedication and creativy to even attempt such a treasure.
LikeLiked by 1 person